メインコンテンツにスキップ
リペアコミュニティに参加 - アカウントの作成

Olympus Stylus 1010 Flash Replacement

必要な工具と部品

    1. Olympus Stylus 1010 Flash Replacement, Disassembling Olympus Stylus 1010 Case: 手順 1、 2の画像 1 Olympus Stylus 1010 Flash Replacement, Disassembling Olympus Stylus 1010 Case: 手順 1、 2の画像 2
      • Remove the five Phillips #00 bottom and right side panel screws.

      FixBotに聞いてみる

      コメントを追加

    2. Olympus Stylus 1010 Flash Replacement: 手順 2、 1の画像 1
      • Remove the right side panel by pulling off the large silver piece.

      FixBotに聞いてみる

      コメントを追加

    3. Olympus Stylus 1010 Flash Replacement: 手順 3、 2の画像 1 Olympus Stylus 1010 Flash Replacement: 手順 3、 2の画像 2
      • Remove the remaining three Phillips #00 side and front panel screws.

      FixBotに聞いてみる

      コメントを追加

    4. Olympus Stylus 1010 Flash Replacement: 手順 4、 1の画像 1
      • Using your thumb and forefinger, pull off the silver name plate and silver "T-shape" piece.

      FixBotに聞いてみる

      コメントを追加

    5. Olympus Stylus 1010 Flash Replacement: 手順 5、 1の画像 1
      • Remove the black front panel by sliding it towards the lens and then pulling it up off of the camera.

      FixBotに聞いてみる

      コメントを追加

    6. Olympus Stylus 1010 Flash Replacement: 手順 6、 3の画像 1 Olympus Stylus 1010 Flash Replacement: 手順 6、 3の画像 2 Olympus Stylus 1010 Flash Replacement: 手順 6、 3の画像 3
      • Remove the three Phillips #00 screws from the front of the camera.

      • Using a spudger, lift the two tabs to separate the case—one tab on top and one tab on the right side.

      FixBotに聞いてみる

      コメントを追加

    7. Olympus Stylus 1010 Flash Replacement: 手順 7、 3の画像 1 Olympus Stylus 1010 Flash Replacement: 手順 7、 3の画像 2 Olympus Stylus 1010 Flash Replacement: 手順 7、 3の画像 3
      • Using a plastic spudger, lift up the black clips.

      • Still using the plastic spudger, detach the gold connector strip and white connector strip.

      • Using both hands, pull the camera apart into two pieces.

      FixBotに聞いてみる

      コメントを追加

    1. Olympus Stylus 1010 Flash Replacement, Lens: 手順 8、 2の画像 1 Olympus Stylus 1010 Flash Replacement, Lens: 手順 8、 2の画像 2
      • Using a plastic spudger, lift up the black clips.

      • Still using the spudger, detach the three gold wire tape connectors from the inside of the camera.

      FixBotに聞いてみる

      コメントを追加

    2. Olympus Stylus 1010 Flash Replacement: 手順 9、 1の画像 1
      • Remove the three screws from the inside of the camera using a #00 screwdriver.

      FixBotに聞いてみる

      コメントを追加

    3. Olympus Stylus 1010 Flash Replacement: 手順 10、 2の画像 1 Olympus Stylus 1010 Flash Replacement: 手順 10、 2の画像 2
      • Using your thumb and forefinger, pull the lens piece straight out from the body of the camera.

      FixBotに聞いてみる

      コメントを追加

    1. Olympus Stylus 1010 Flash Replacement, Motherboard: 手順 11、 1の画像 1
      • Remove the two Phillips #00 screws on the right side of the camera.

      FixBotに聞いてみる

      コメントを追加

    2. Olympus Stylus 1010 Flash Replacement: 手順 12、 1の画像 1
      • Using a plastic spudger, lift up the black clips.

      • Still using the spudger, detach the gold wire tape connectors from the motherboard.

      FixBotに聞いてみる

      コメントを追加

    3. Olympus Stylus 1010 Flash Replacement: 手順 13、 1の画像 1
      • Desolder the upper right and lower left wires to remove the motherboard.

      FixBotに聞いてみる

      コメントを追加

    4. Olympus Stylus 1010 Flash Replacement: 手順 14、 2の画像 1 Olympus Stylus 1010 Flash Replacement: 手順 14、 2の画像 2
      • In order to remove the motherboard, grab each side of it and pull up using your thumb and forefinger.

      FixBotに聞いてみる

      コメントを追加

    1. Olympus Stylus 1010 Flash Replacement, Flash: 手順 15、 3の画像 1 Olympus Stylus 1010 Flash Replacement, Flash: 手順 15、 3の画像 2 Olympus Stylus 1010 Flash Replacement, Flash: 手順 15、 3の画像 3
      • Remove the two remaining Phillips #00 screws.

      • Lift the metal piece straight up to remove it.

      FixBotに聞いてみる

      コメントを追加

    2. Olympus Stylus 1010 Flash Replacement: 手順 16、 3の画像 1 Olympus Stylus 1010 Flash Replacement: 手順 16、 3の画像 2 Olympus Stylus 1010 Flash Replacement: 手順 16、 3の画像 3
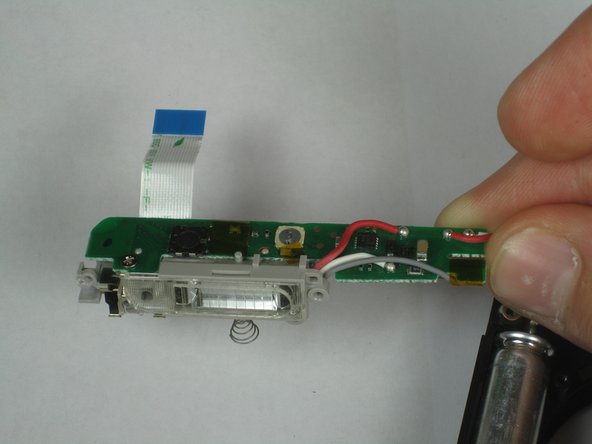
      • Pull gently on the white tab to remove the small motherboard with the flash device on it.

      FixBotに聞いてみる

      コメントを追加

    3. Olympus Stylus 1010 Flash Replacement: 手順 17、 2の画像 1 Olympus Stylus 1010 Flash Replacement: 手順 17、 2の画像 2
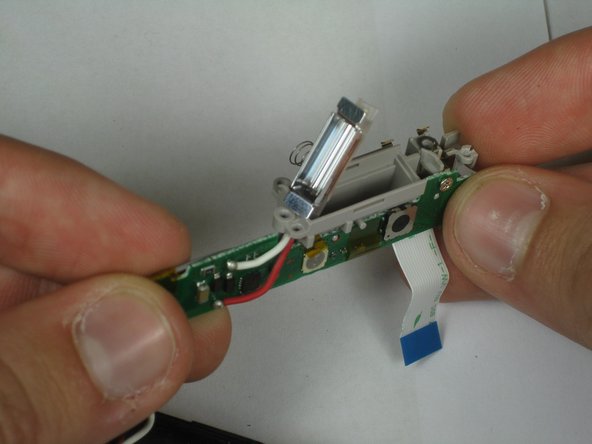
      • Pull out the silver button using your thumb and forefinger.

      • Remove the small motherboard from the camera casing.

      FixBotに聞いてみる

      コメントを追加

    4. Olympus Stylus 1010 Flash Replacement: 手順 18、 3の画像 1 Olympus Stylus 1010 Flash Replacement: 手順 18、 3の画像 2 Olympus Stylus 1010 Flash Replacement: 手順 18、 3の画像 3
      • Remove the plastic flash cover using a spudger.

      FixBotに聞いてみる

      コメントを追加

    5. Olympus Stylus 1010 Flash Replacement: 手順 19、 2の画像 1 Olympus Stylus 1010 Flash Replacement: 手順 19、 2の画像 2
      • Remove the flash bulb using a plastic spudger.

      FixBotに聞いてみる

      コメントを追加

終わりに

To reassemble your device, follow these instructions in reverse order.

キャンセル: このガイドを終了できませんでした。

作成者

5人の作成者と共同で作成されました。

Curtis Reedy

メンバー登録日: 01/12/11

270 ポイント

2のガイドは作成済み

チーム

Cal Poly, Team 13-4, Forte Winter 2011 Cal Poly, Team 13-4, Forte Winter 2011人のメンバー

CPSU-FORTE-W11S13G4

6 メンバー

71のガイドは作成済み

0件のガイドコメント

コメントを追加

統計データ:

過去 24時間: 2

過去 7 日: 9

過去 30 日: 25

今までの合計 3,107