はじめに
Oculus Quest 2、別名Meta Quest 2は、Facebook社(旧Oculus社)が開発したVRヘッドセットで、初代Questの2代目のイテレーションモデルです。Quest 2はスタンドアローンのヘッドセットとして、またUSBケーブルまたはWi-Fiで接続することでコンピューターと連動して動作することが可能です。このヘッドセットは、Qualcomm XR2プロセッサ、6 GBのRAM、片目あたり1823 x 1920の解像度です。
また、このヘッドセットにはたくさんのネジがあるので、ネジの管理に注意してください。
コネクタに関する情報は、ケーブルコネクターの認識と取り外し(RDCC)ガイドを参照してください。
修理ガイドをご覧になりたい場合は、 こちらをクリックして下さい
必要な工具と部品
-
-
鼻が当たる部分の隣にピックを差し込み、端のほうまでスライドさせて抉ってください。両サイド一回ずつで構いません。
-
両側が緩んだら、慎重にカバーを持ち上げて、2番目の画像のように、ノーズピースがデバイスの外周にくるように折りたたみます。
-
ZIFコネクターの黒い小さなクリップを上に持ち上げ、フレックスケーブルを引き抜きます。
Hard as rock, day 2
Shove your prying tool right in the sides (right and left, where the two arrows pointing inward are) and it pops right out (don't push too fast, just keep pushing until it pops out, i suggest using the flat end of a normal Ifixit spudger)
Kmic -
I REALLY wish this step had some better close ups. I thought I connected the cable correctly but I'm getting the black screen silly stuff going on. Boo!
You have to push the connector in a bit, and then the black clip will latch down. I'm using a lighted magnifier, myself.
-
-
-
リボンケーブルは接着剤でヘッドセットに軽く貼り付けられ、ケーブルはZIFコネクターで接続されています。ZIFコネクター情報については、 「ケーブルコネクターの認識と取り扱い」ガイド(RDCCガイド)の手順1を参照してください。
-
スパジャーの先端を使って、固定フラップを跳ね上げて、ケーブルの接続を外します。画像2 と画像3を参照して、フラップの動作を理解します。
-
-
-
P0ネジ-3本
-
P0ネジ-2本
The correct size for these five screws is P000, not P0.
where can I look up the naming scheme for that screw size you’r etalking about?
is that the same as the phillips PH000?
is that describing the thread dimensions or the head of the screw, or both?
I’ve looked up the screw dimensions / where I can get spares but can’t seem to find consistent results for this one,
I want to know the screw’s head and thread measurements so I can recreate a custom oculus shell in CAD and have the proper screws and parts all fit back together properly.
The ph screw driver was wrong and I stripped one of the screws thanks a lot ifixit
Of note; the screws are PH000 and they are especially soft and easy to strip.
For those like me that do not have the Marlin screwdrivers or any other thin extension to reach the two deep screws, but if you do have an iFixit kit with bits: I used the normal PH00 bit and the 4mm nut driver as a DIY extension. However, they do not magnetize so this may require some extra finesse to ensure they don't fall apart.
The ifixit kit comes with several ph sizes. There is ph000 ph00 and ph0 among others. It is printed on the side of the bits. They are definitely ph0 screws. The regular screwdriver in the ifixit kit can’t reach the two top screws. You will need an extension.
-
-
-
ピックを差し込み矢印で示した4か所をこじって爪を外してください。
-
するとヘッドセットからフロントカバーを持ち上げて外します。
I found it best just to gently pull it off from the side with my finger nails. There is nothing connected to this cover, yet be careful enough not to break the plastic clips.
-
-
-
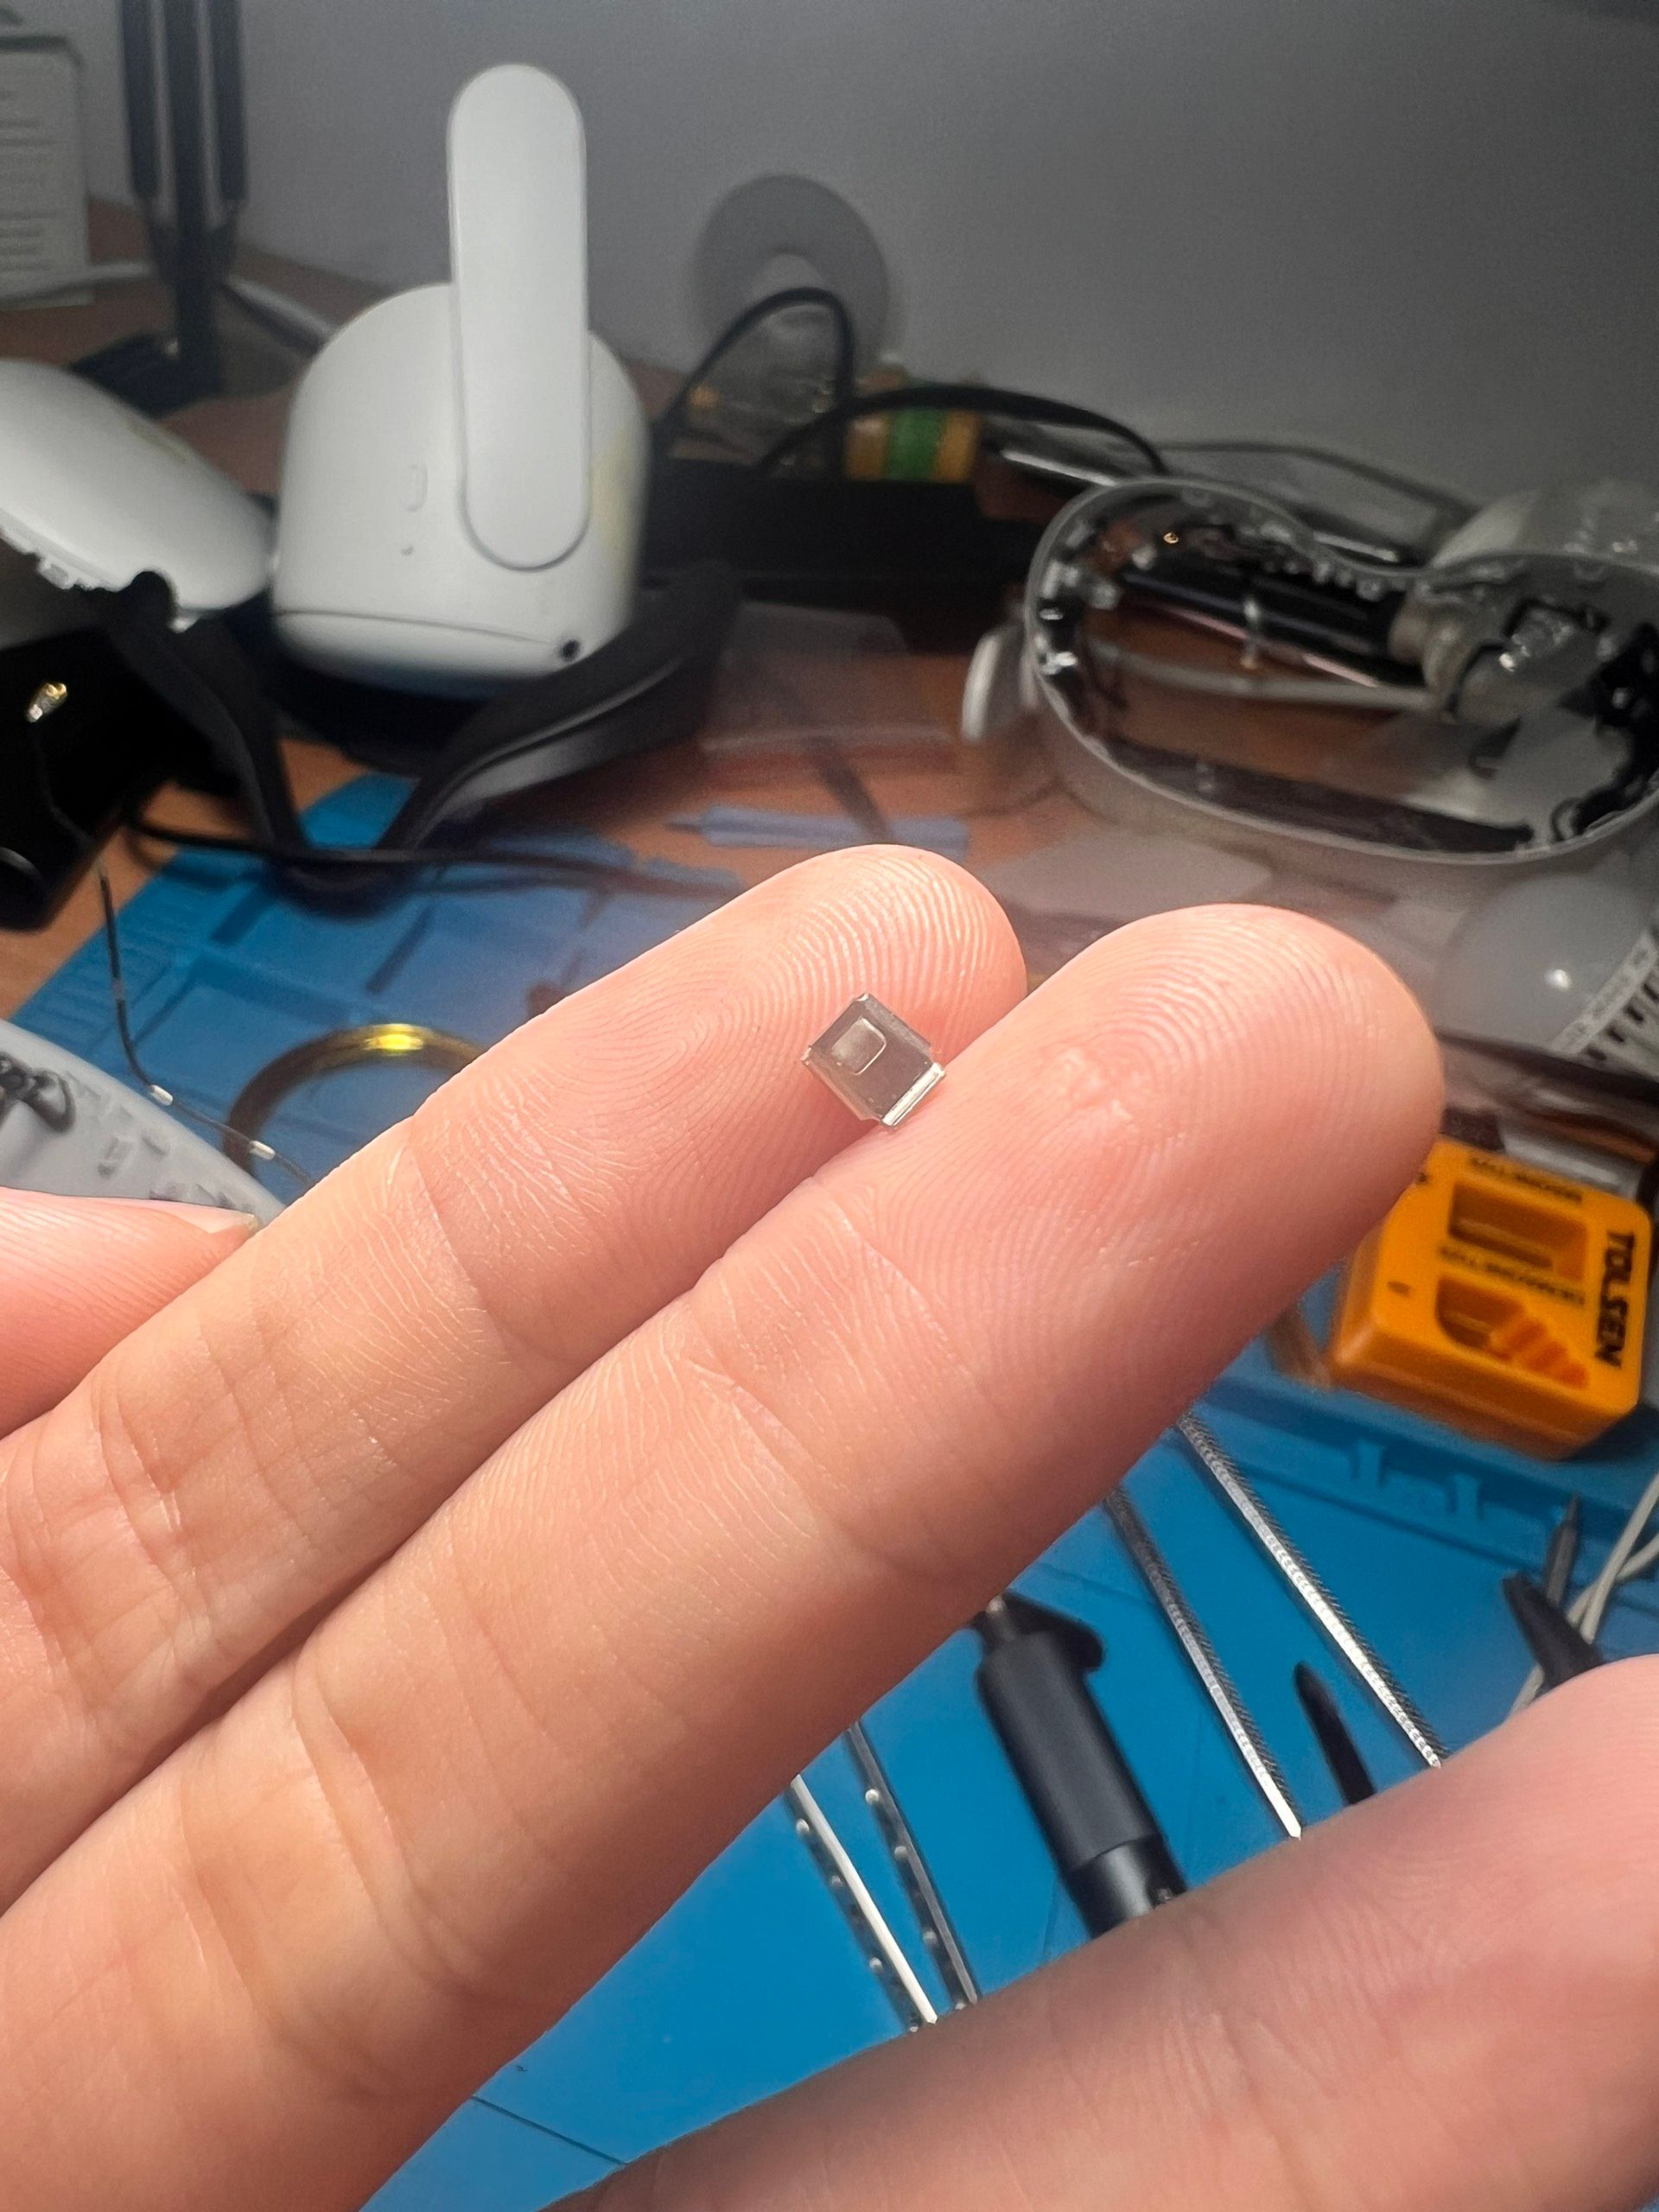
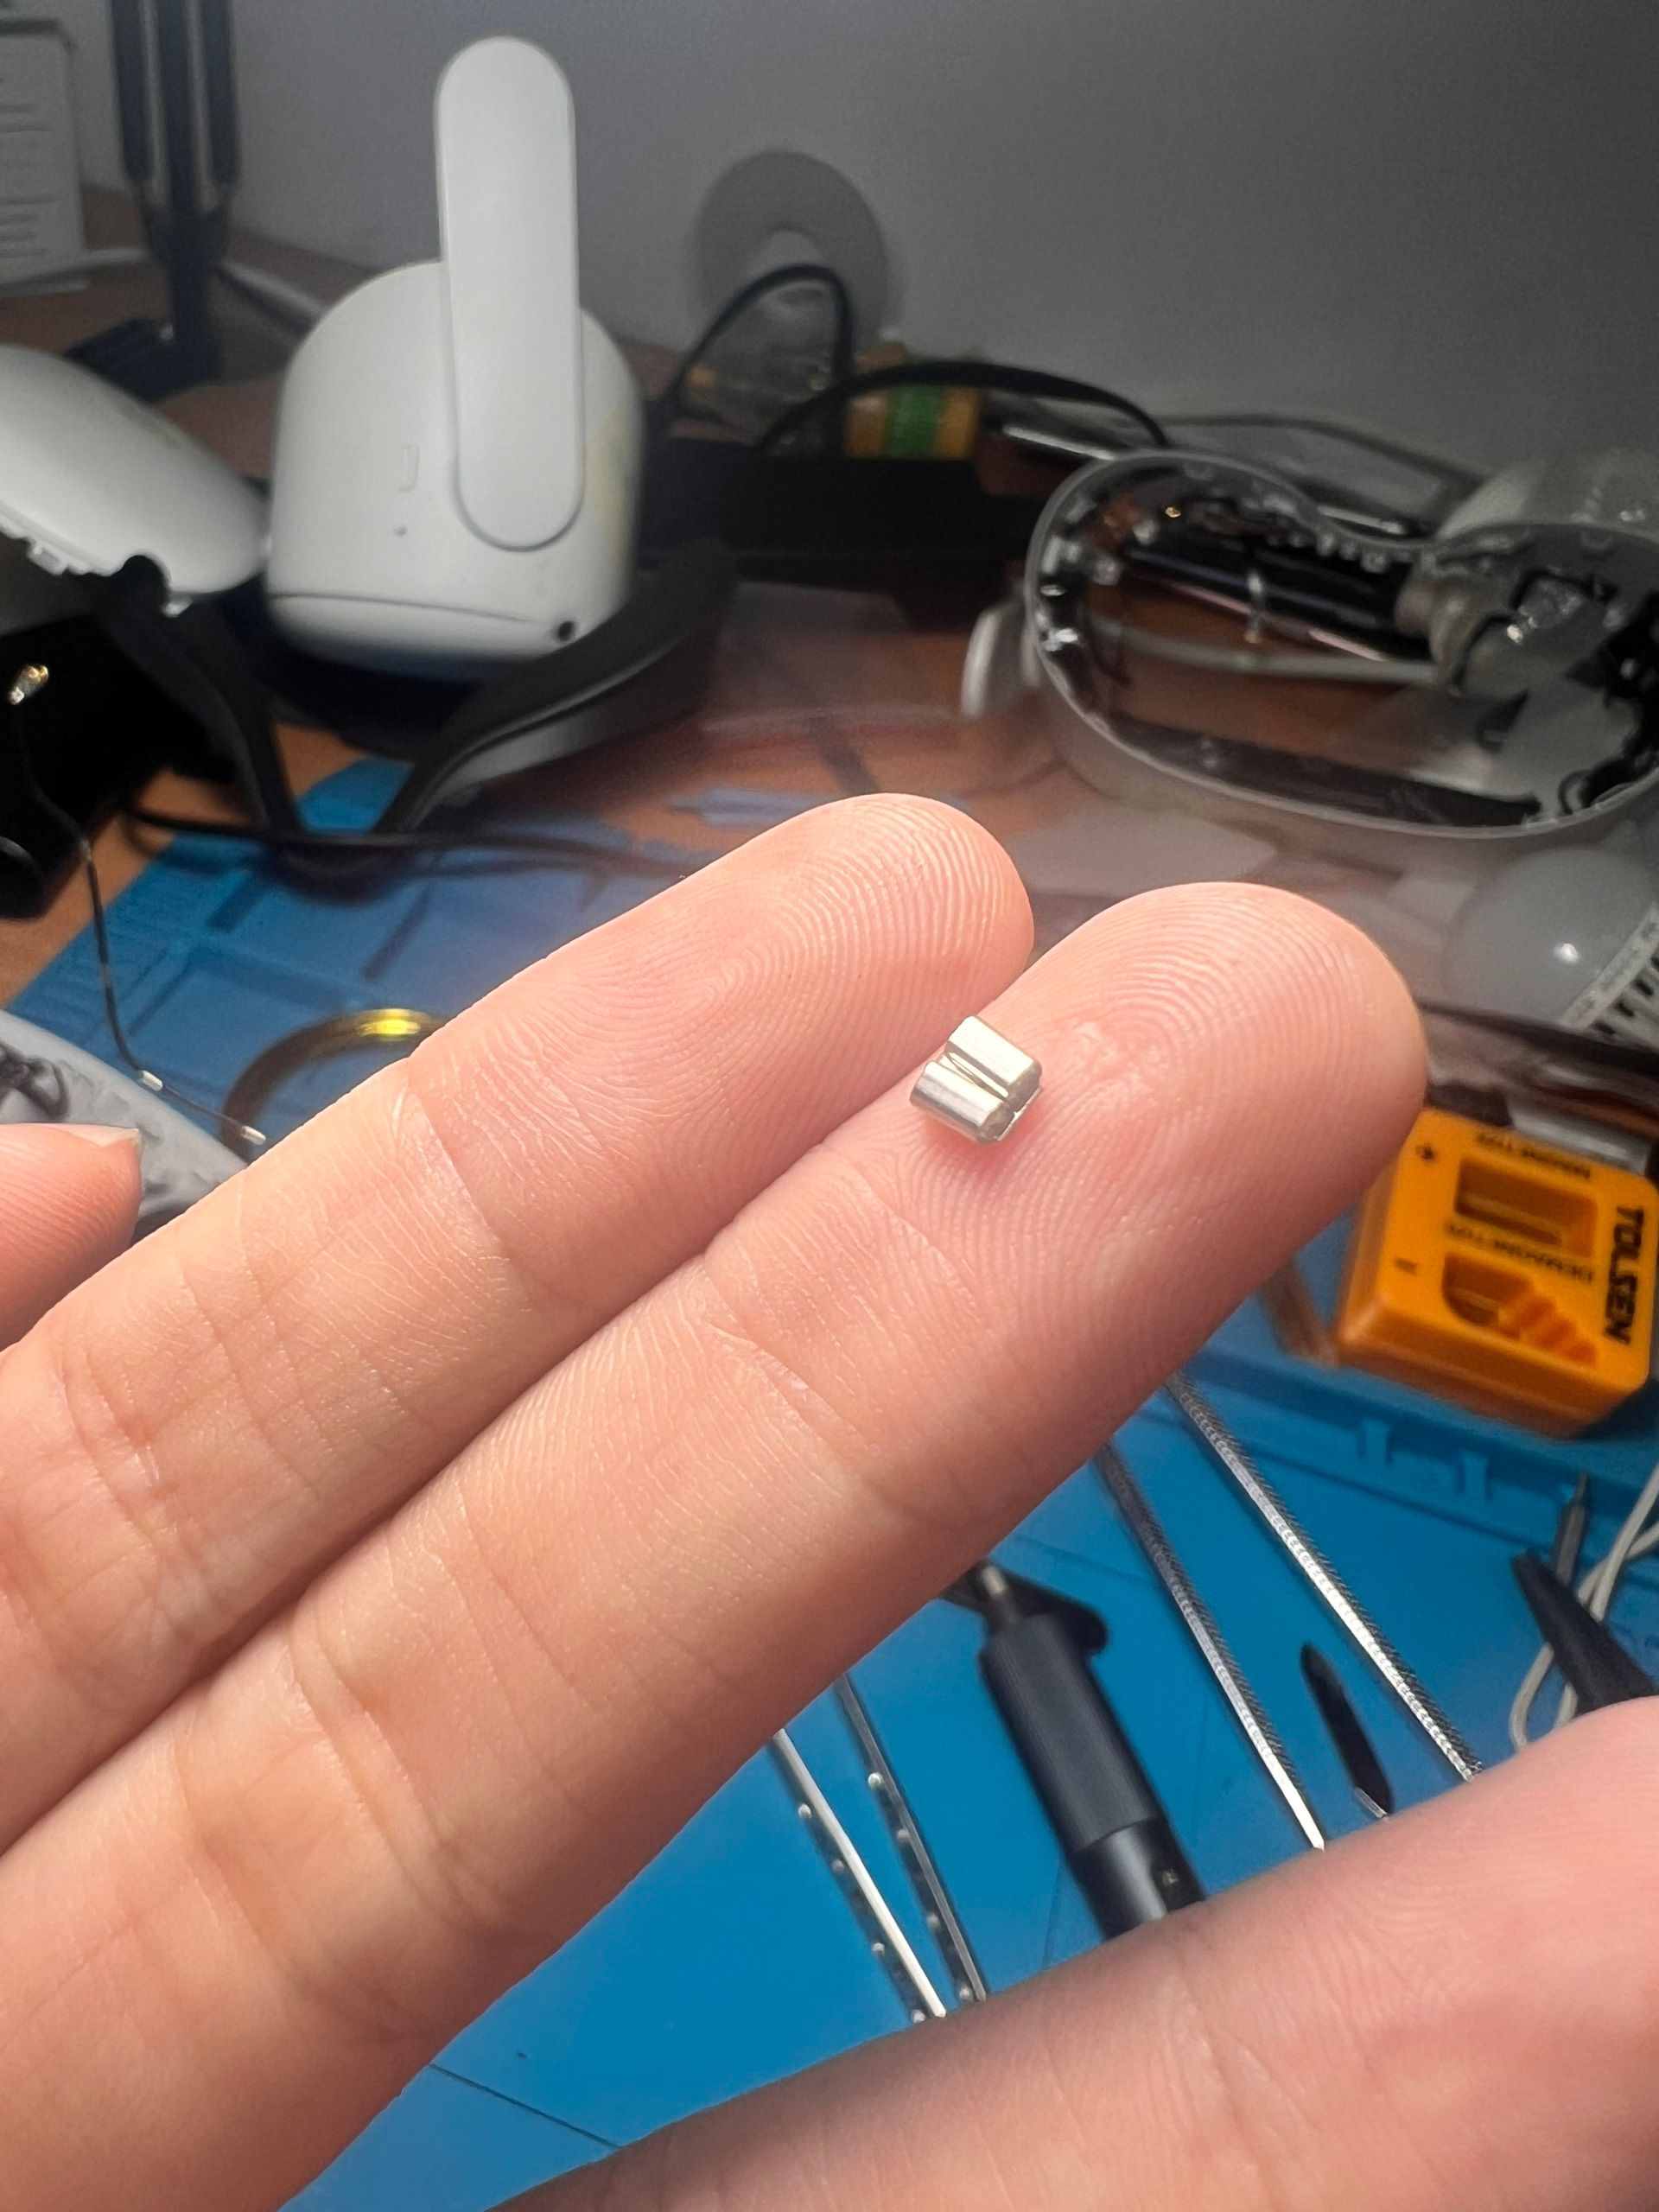
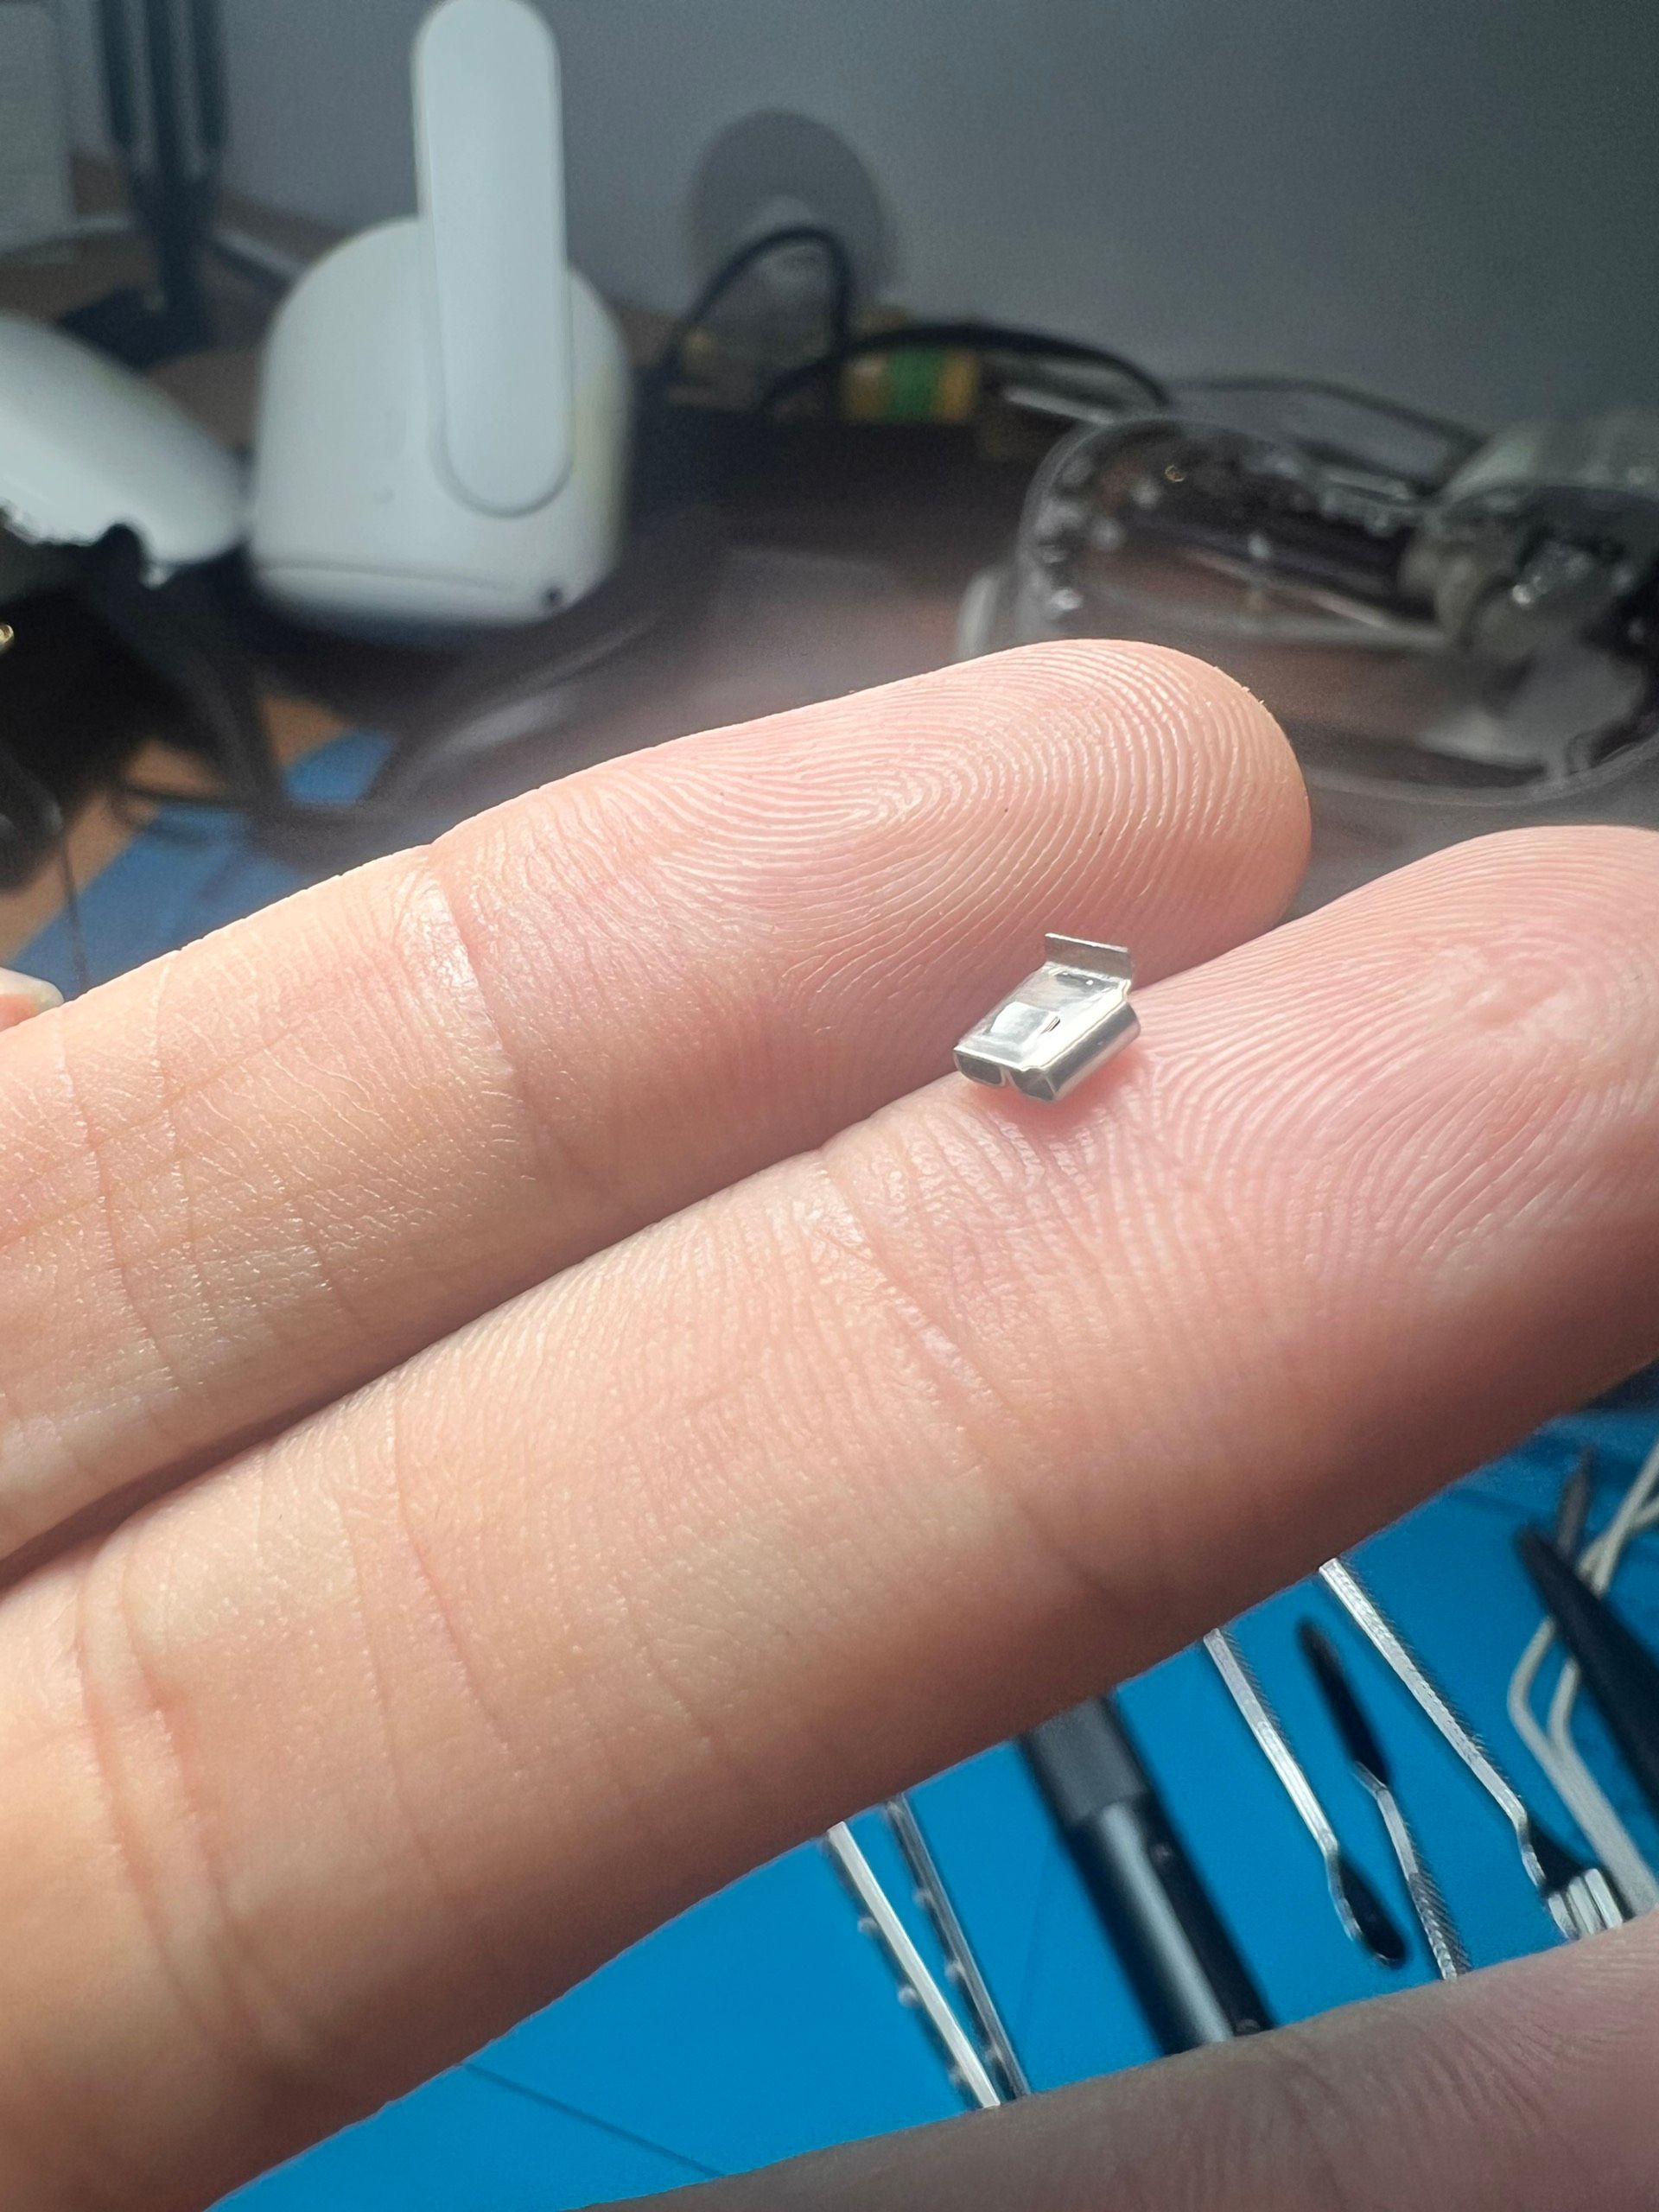
サイドWiFiアンテナの接続を抜きます。RDCCガイドの手順5を参照してください。ケーブルを外すには、ESD対応の細いこじ開け工具かピンセットをコネクタの金属ネックの下に滑り込ませ、ボードからまっすぐ持ち上げます。
-
P0ネジを1本外します。
-
P0ネジを2本外します。
After I remove bracket I found that battery cable already disconnected.After connect it my problem of quest 2 not charge after drop is fix. Thank you for helpful guide.
If the problem of it not charging persists it is a motherboard issue
Kmic -
Do you have the lengths for these color codes? I sorted mine but the cat knocked the bin over mixing the screws, most I remember. The bt antenna and the front housing screws are all I have left to sort
Same thing happened to me, I unplugged my battery wire and put it back on and now it's working. If you dropped your headset as well, this would probably help
-
-
-
バッテリーを抜いてください。RDCCガイドの手順4を参照してください。スパッジャーを使ってコネクタをまっすぐこじ開けます。
-
再組み立ての際、バッテリーリボンケーブルの一部をロジックボードの下に置くことを忘れないでくだ さい。
-
-
-
P0ネジを2本外します。
-
P0ネジを4本外します。
-
P0ネジを2本外します。このネジは他のネジより長くなっています。
-
画像中の矢印はBluetoothアンテナを指しています。接続を解除するには、ガイドの手順5を参照して、画像2に進んでください。ケーブルを取り外すには、ESD対応の細いこじ開け工具またはピンセットをコネクターの金属の首の下に滑り込ませ、ボードからまっすぐ持ち上げます。
-
画像3、ヘッドセットからアンテナを外します。
-
-
-
-
ファンケーブルを外します。
-
T2ネジを1本外します。
-
P0ネジを1本外します。
-
ヘッドセットから前面LEDを持ち上げて外します。
-
冷却ファンを外します。
Holas, quien me dice que es la parte negra del centro de las gafas, que es como una cinta negra grande
Jhon Hoyos - 返信
-
-
-
P0ネジを4本外します。
-
ヒートシンクが外せます。
Thermal Paste Present
Do I have to remove this if I am only planning to clean debris off the inside of the eye cups / lens?
Yes, if you are trying to get inside the lenses you have to remove everything.
Kmic -
-
-
-
メインボード上部付近に2つのZIFコネクタがあります。右側にZIFフラップが開いています。ZIFフラップは、オレンジ色の矢印の方向に押し下げると開きます。
-
両方のZIFコネクターのラッチを外し、ケーブルを外します。これらのケーブルは前面 LED、IPD センサー、近接センサーにつながっています。
-
側面のWiFi アンテナコネクタを引き抜きます。RDCC ガイドの手順5を参照してください。ケーブルを外すには、ESD対応の細いこじ開け工具かピンセットをコネクタの金属の首の下に滑らせ、基板からまっすぐ持ち上げます。
-
USB Type-Cポートとヘッドフォンジャックにつながるケーブルを抜きます。RDCCガイドの手順4を参照してください。こじ開け工具を使ってプレスコネクタをまっすぐ上にこじ開けます。
-
-
-
上部カメラのZIFコネクタを外します。
-
ZIFコネクタは2番目の画像に示されています。赤い矢印で示すように、スパッジャーでロックフラップを押し上げます。
-
フラップが開くと、リボンケーブルがコネクターから引き出されます。
-
-
-
スクリーンケーブルはプレスコネクタで取り付けられています。
-
スパッジャーを使ってプレスコネクタをまっすぐにこじ開けて、接続を外します。RDCCガイドの手順4を参照してください。
-
-
it looks like there is a 64gb sandisk chip that might come off with some hot air :)
(but this board look completely different than the quest 2 boards offered on eBay....)
-
-
P0ネジを2本外します。
-
P0ネジを2本外します。
-
サイドWi-Fiアンテナケーブルを解いていきます。
-
バッテリー電源はこのケーブルを通してミッドフレームに供給されています。ケーブルの底にはメタルパッドがあり、接着剤でミッドフレームに取り付けられています。ミッドフレームを取り外すには、このパッドを取り外してください。
On the upper right hand side of this image next to the first WiFi antenna you unplug, there is a ribbon cable that is held down with a STRONG adhesive that is very difficult to get off. I had to heat up the plastic tool I was using and the cable itself to soften it enough to pull of. Be very careful with it.
There is a metal plate glued to the bottom of the cable. It is easier to get a tool under the metal plate and separate it from the midframe than to unglue the cable from the plate. prying against the plate provides some protection for the cable.
-
-
-
サイドアームとスピーカーを取り付けているP0ネジ4本を外します。
-
両方のアームとスピーカーを固定しているメタル製ツメを外します。
-
アームを取り付けているプラスチックのパーツは、ケースの本体から捻りながら取り外せます。
Same here. I can’t figure out how to remove the clips.
Shape of the clip: https://postimg.cc/qtzJbBDR
more the pic https://www.droidshop.vn/wp-content/uplo...
I would like to know how too! I need to replace my speaker but i doesn't find the technic for metal clip. Thank you
its easy enough to use tweezers to remove the clips.
I am having trouble removing the screws. Any tips how to get them out.
-
-
-
小さな金属のでっぱりはレンズがスライドするガイドレールを保持しています。そのレールを取り外すとディスプレイが現れます。
What do the screens look like under the lenses? How and where do the cables transmitting the image and power to the screens?
Can you add a bit of information about the charging port. I need to replace but not sure best way to access.
You have to remove the assembly from the shell first, i.e. everything up to step 12.
After that you have 4 screws to pull out, 2 of which also hold in the speaker assembly.
-


117 の人々がこのガイドを完成させました。
以下の翻訳者の皆さんにお礼を申し上げます:
100%

これらの翻訳者の方々は世界を修理する私たちのサポートをしてくれています。 あなたも貢献してみませんか?
翻訳を始める ›
79 件のコメント
Thank you so much to me for making this guide. Helped me a lot!
It is worth emphasizing that this device has 2! WIFI antennas.
Anyone who wants to disconnect WIFI from their device must disconnect both.
Their connection to the motherboard, is right next to each other, but the right connection is immediately revealed while the left connection next to it is hidden under the black cover and requires a number of additional disassembly steps.
Alternatively, anyone who wants to disconnect WIFI from their device can disconnect the wires in the area where they connect to the antenna stickers on the right and left sides of the eyepieces of the glasses, thus saving all the disassembly of the front cover.
Thanks!! this really helped me, I have already customized mine with an official custom filter, but this will add an additional layer of Kashrus.
If you just need to replace a camera… it’s 14 screws. You need a T2 and a PH0 (not a P0…) Pretty easy once you get the front cover off and not covered here. It’s pretty easy to see what you do once you get in there though. Good luck!
PH0 and P0 are the same :)
Lylo -
Bravo pour ces informations. Un grand merci
где запчасти то покупать на данное устройство. выломали порт usb, а заменить нечем.
вы можете купить это на FixMyOculus.com
Kmic -
Un grand merci pour ce tuto qui m’a permis de sauver mon casque suite à une grande rasade de vin blanc .
Gérard leroy
Where is the hard drive located? Is it possible to upgrade the hard drive if you disassemble it far enough?
Can’t say for sure, but it’s VERY likely that the SSD is soldered to the main board and not replaceable without considerable skill and expensive tools
The storage device is the large flash chip on the main board labeled “SanDisk.” It is not user-upgradable (well, without considerable effort and maybe a little software hacking).
I’m trying to replace the Aux/power port on the mid frame part on the oculus, is it necessary to remove the mainboard in order to gain access to the part I’m trying to replace?
I’m wondering if you had any luck with this as the brand new headset I got was damaged over Christmas and now the charge port is incredibly loose.
Yes, the port is hidden by the lense/screen assembly
Kmic -
Has anyone confirmed whether or not the Quest 2 has an internal SD card reader? Someone on Facebook claims there is one, but I can’t find anything online that backs it up.
Need more detail on how to the clip of the first proximity sensor is removed/replaced.
oh. nice article rellyy hlpdddesbdyf rgoofnv thought hhbdj cbbjhnnsndvxc
what is the weight of battery? it's possibile turn on without battery but with cable connected? i think the best solution for future quest it's battery swapping.
Battery weight is 63g - I tested and you are not able to use the quest 2 with the battery removed and a power cable connected. The meta logo will appear for ~.1 seconds, then a battery with a slash through it image will appear on the screen.
d__g -
Agradezco mucho la información es una gran ayuda ya que tengo que desarmar totalmente el aparato que es de mi sobrino y lo dejo en el suelo y se le metieron hormigas sin está ayuda no creo haber podido hacerlo gracias
Hay in step 2 removing the rear cover I accidentally cut the ribbon connecting to the rear cover (proximity ribbon) does any1 know where I can get a replacement?
Id try eBay to find a used one as i doubt if Oculus, Facebook or Meta will just sell you the part outright!
So far so good waiting for my replacement screen dam hope for my girls sake i get it back together .hate to file a missing person report.
April Webb - 返信
Do I need to remove everything to replace the lens and LCD?
The LCD screen shouldn't need changing just change the lens. But if you need both just by a new unit as the Lens is about $80 and the LCD is about the same so for the cost of the parts its probably just easier to buy new!
Is it possible to remove the lenses on early stages?
ozan uygan - 返信
No you have to remove the screen assembly
Kmic -
I just swapped the mainboard into a new headset piece (speakers power button etc) and the unit works for about 2 minutes and then goes to a black screen. I can hit the power button again and get the device to display three dots, then the screen goes dark again.
Anyone have any ideas? This repair went very smoothly so Im not sure if its overheating now or what.... I did try disabling the prox sensor as well and that did not help.
Probably needed to replace the thermal past that was compromised when your disassembled it.
You Might have damaged your proximity sensor ribbon cable or connector as it wont work if it cannot detect if its on your face or not. Disabling the prox sensor will for SURE cause that error 100%! It cannot be disabled. That's why I think its the prox sensor ribbon cable or a bad connector that the cable goes into. Try replacing both the sensor and its connector ribbon cable if thats thats possible.
Hi has anyone try swapping a 64gb mainboard for a 128 gb or 256gb to increase the storage?
I did and it worked great, but the teardown to swap the board is tedious and very very delicate work!!
I don’t know why people are praising this guide. It is terrible, incomplete. Lacks detail. Hand waives critical steps and instructions.
It is a terrible guide, one of the worst on this site.
I have been trying to figure out how to “life the front led away from the headset” for two hours. Each gentle attempt risks destroying it. Worst and most clear instruction I have ever seen.
And that is after trying to deduce what the OP meant multiple times, each with an intuitive leap of faith; rather than clear instructions.
larstaylor - 返信
if you are still trying a year later, the front LED is held to the fan assembly with some adhesive below the LED, you can just either pull it off or use a pry tool to get it off
It would have been nice of the OP had mentioned that you don’t need to take the %#*@ motherboard and heat sink off to dissemble the main body.
And mentioned that you will need to have thermal paste available to replace the thermal paste you ruined by removing a motherboard and heat sink you’d hit even need to remove.
larstaylor - 返信
Does replacing the mainboard is plug and play ?
Do i need to do something on the software side to get it to work ?
Asking before ordering part , answer will be very appreciated.
Yes you can swap motherboards! I did it in mine to get better memory, but if you have a warranty I wouldn't recommend it as this will void your warranty! I replaced my motherboard from a 64GB board to a 128GB one, the Oculus unit booted right up easily, then it gets its updates over the internet so just connect it to your wifi and it will update itself to the newest latest automatically! Now the teardown is tedious and if your not good with electronics I wouldn't attempt it!! As its very easy to damage things!
Hello. After replacing the motherboard, how to pair the old controllers?
Definitely one of the most unnecessarily complex devices I've ever disassembled.
Ended up having to take apart everything just to replace that one fried USB port, even accidentally snapped off the latches from two ribbon cable ports in the process (though the latter is entirely my fault in handling teeny tiny pieces).
But at least my Quest 2 is no longer a paperweight now. Thanks OP.
Can You help me? I try to reject the wifi modules and bluetooth modules but ı dont know which one is the wifi and which one is the bluetooth. Thank you for help.
The wifi is in on the top right of the motherboard (pic 5) and the bluetooth antenna is required for it to work, but is attached to the black piece at the bottom (pic 6)
Kmic -
Where is wifi chip? Can I remove it? if I success to remove it, quest 2 works well without wifi?
Just buy a whole new mainboard, ebay is selling the mainboards really cheap!! Just swap mainboards its easy, but make sure you unpair and factory reset your oculus before you do so, then when you pair the new board to your account its as easy as pie!
Mainboard image must be fake as SK Hynix doesn't make the Qualcomm Snapdragon CPU for the Oculus Quest 2, where the heck did that image come from??
Hola a todos, tengo un problema con mis oculus, no me funciona el Wifi y lo reinicié con los parametros de fabrica pero ahora no puedo completar las opciones de inicio del sistema, hay alguna forma de saltarse la configuración de Wifi ???????
Where would I buy a replacement fan and heatsink
Ebay or a website called fix my oculus
Kmic -
Hola a todos, de casualidad alguno sabe dónde comprar el Flex que va a uno de los sensores superiores de las Oculus quest 2
Jhon Hoyos - 返信
Where the heck do I buy a Oculus 2 headset battery in Australia?? I have been looking & can't find anything like it???
Thanks for your guidance
Does anyone have any idea how far into the disassembly is necessary to just do a shell swap? The speaker arms are damaged on both sides and it sounds like a shell swap would be easier than replacing the arms.
You have to remove everything, sorry.
Kmic -
Has anyone had to replace a broken speaker arm/headband.
Something worth noting for anyone doing this is first time many of the cables will be held down with adhesive tape, so you will need to remove the tape before some of the steps, mainly removing the midframe.
also my quest didn't have the 3.5mm hex screw for the motherboard in it for some reason.
The left lens on my headset completely stopped working recently. It used to turn back on if I slapped my headset but that has since stopped working. I would assume that it is either a faulty or loose connection to something, but I don't know for sure. How would I go about checking/possible fixing something like that?
It needs a new screen altogether
Kmic -
Any idea why one would stay white with blue lines in on the screen
It means that the screen is broken.
Kmic -
Savez-vous si le port USB peut être changé ? Le mien a grillé. Le casque fonctionne, mais je ne parviens pas à recharger.
Oui, vous pouvez changer le port USB-C, mais cela demande beaucoup de travail
Kmic -
Danke fürs Zeigen.
Mich würde interessieren, ob man die beiden Objektive so montieren kann, dass der Augenabstand nicht symetrisch ist. Eines meiner Augen ist 3,5mm weiter vom Zentrum als das andere Auge.
Gruß
Martin
Es gibt nur drei Anpassungen für die Augen, ohne das Oculus zu verändern, ist das nicht möglich.
Kmic -
Has anyone an idea where to get a spare battery?
Hornbrille - 返信
You can find one on ebay or there is a website called fix my oculus
Kmic -
used this to mod a vent hole in the front. guide helps quite a lot! thank you!
If i wanted to swap the headset shell can i remove the entire assembly or do i remove everything bit by bit. Thanks.
Everything comes out a little bit at a time because of cables. Hope this helps
Kmic -
Muchas gracias
I accidentally unplug the 3rd sensor! Where do I plug it back it at ????????? And do I need a special cord to charge it? I bought it off a friend of some sort but I cant get it to charge or turn on either they ripped me off or I have the wrong cord please help
Considering it can't charge (I had the same problem) it needs a motherboard replacement. You don't need a specific cord to charge it, but i recommend the one that comes with the headset. As for the sensor is it the top left, top right, bottom left, or bottom right?
Kmic -
I have black screen when turn on it, and I can reboot, and do factory reset but the black screen still. I don´t know if is the proximity sensor. Any idea?
It’s actually 6x T3 screws. A T2 driver is smaller than the groves of the T3 screws, will slip and strip.
Steven - 返信
It may depend on your bit manufacturer. I used an ifixit T2.
Daniel Yoder - 返信
What screw size are these? I need to replace one but I don't know what to search for
Michele Bright -
I have T2 on mine as well
weiwei.e.sun - 返信
What if one of the screws strips? We are using a t3 and it got all screws out but one. Now we cannot get that last screw out
AliD - 返信
Not much you can do except drill it out.
Kmic -