メインコンテンツにスキップ

Nvidia Shield Tablet Front and Rear Camera Replacement

必要な工具と部品

  1. Nvidia Shield Tablet Front and Rear Camera Replacement, Rear Case: 手順 1、 2の画像 1 Nvidia Shield Tablet Front and Rear Camera Replacement, Rear Case: 手順 1、 2の画像 2
    • First, remove the stylus from your tablet.

  2. Nvidia Shield Tablet Front and Rear Camera Replacement: 手順 2、 3の画像 1 Nvidia Shield Tablet Front and Rear Camera Replacement: 手順 2、 3の画像 2 Nvidia Shield Tablet Front and Rear Camera Replacement: 手順 2、 3の画像 3
    この手順で使用する道具:
    Anti-Static Wrist Strap
    $7.95
    購入する
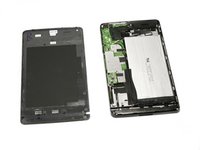
    • Set the tablet so the buttons, microSD, and stylus port are facing you.

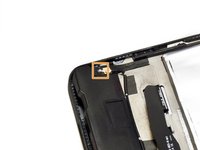
    • Open the microSD slot.

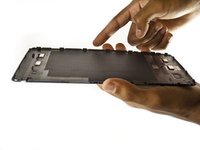
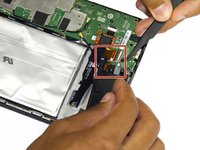
    • Using the flat end of the spudger tool, carefully pry open the case starting from the microSD slot, slowly sliding the spudger along the inside edge of the case.

    • You may want to put on your anti-static wrist strap at this point as the motherboard will be vulnerable to physical touch and electrostatic shock after the casing is removed.

  3. Nvidia Shield Tablet Front and Rear Camera Replacement: 手順 3、 2の画像 1 Nvidia Shield Tablet Front and Rear Camera Replacement: 手順 3、 2の画像 2
    • As you remove your case, be aware of small clips along the edges.

    • Finally, set the old casing aside.

  4. Nvidia Shield Tablet Front and Rear Camera Replacement, Speaker: 手順 4、 1の画像 1
    • Orient your tablet so that the top of the tablet is furthest away from you.

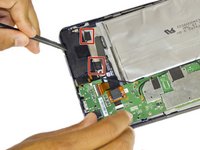
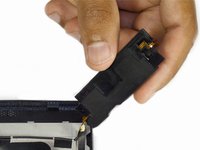
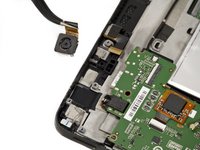
    • Locate the top speaker, a black semi-rectangular piece on the top right side of the tablet.

  5. Nvidia Shield Tablet Front and Rear Camera Replacement: 手順 5、 1の画像 1
    • Remove the two 3.0 mm Phillips #00 screws securing the speaker.

  6. Nvidia Shield Tablet Front and Rear Camera Replacement: 手順 6、 3の画像 1 Nvidia Shield Tablet Front and Rear Camera Replacement: 手順 6、 3の画像 2 Nvidia Shield Tablet Front and Rear Camera Replacement: 手順 6、 3の画像 3
    • Gently pry the speaker up with the flat end of a spudger.

    • Use a plastic opening tool to peel up the tape covering the speaker wire.

  7. Nvidia Shield Tablet Front and Rear Camera Replacement: 手順 7、 2の画像 1 Nvidia Shield Tablet Front and Rear Camera Replacement: 手順 7、 2の画像 2
    この手順で使用する道具:
    Anti-Static Wrist Strap
    $7.95
    購入する
    • Next, with a gentle but firm grip, pull the audio input ribbon with the precision tweezers.

    • Finally, unplug the power source from your speaker using the precision tweezers.

    • Make sure you are using your anti-static wrist strap.

  8. Nvidia Shield Tablet Front and Rear Camera Replacement, Front and Rear Camera: 手順 8、 3の画像 1 Nvidia Shield Tablet Front and Rear Camera Replacement, Front and Rear Camera: 手順 8、 3の画像 2 Nvidia Shield Tablet Front and Rear Camera Replacement, Front and Rear Camera: 手順 8、 3の画像 3
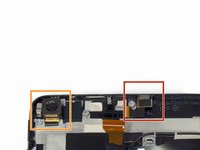
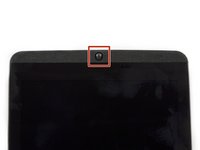
    • Having removed the speaker, locate the front-facing camera resting just underneath the speaker.

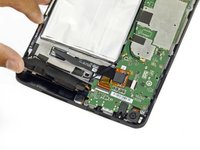
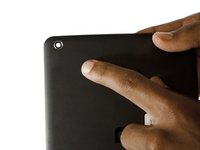
    • The rear-facing camera is on the left side of the tablet and it aligns with the camera hole on the back casing of your tablet.

  9. Nvidia Shield Tablet Front and Rear Camera Replacement: 手順 9、 3の画像 1 Nvidia Shield Tablet Front and Rear Camera Replacement: 手順 9、 3の画像 2 Nvidia Shield Tablet Front and Rear Camera Replacement: 手順 9、 3の画像 3
    • Gently unplug each camera using the precision tweezers.

終わりに

To reassemble your device, follow these instructions in reverse order.

ある他の人がこのガイドを完成しました。

作成者

2人の作成者と共同で作成されました。

Molly Bauer

メンバー登録日: 08/27/15

1,424 ポイント

6のガイドは作成済み

チーム

USF Tampa, Team 2-2, Blackwell Fall 2015 USF Tampa, Team 2-2, Blackwell Fall 2015人のメンバー

USFT-BLACKWELL-F15S2G2

3 メンバー

11のガイドは作成済み

0 件のコメント

コメントを追加

統計データ:

過去 24時間: 0

過去 7 日: 0

過去 30 日: 2

今までの合計 1,962