メインコンテンツにスキップ

Nostalgia Electrics RHP-310 Motor Replacement

必要な工具と部品

  1. Nostalgia Electrics RHP-310 Motor Replacement, Power Switch: 手順 1、 1の画像 1
    • Unplug the popper.

    • Lift the lid up to remove it.

  2. Nostalgia Electrics RHP-310 Motor Replacement: 手順 2、 1の画像 1
    • Lay the popper on its side.

    • Remove the five 12mm Philips #2 screws around the perimeter of the base with the Phillips #2 screwdriver.

    • Remove the two 15mm Philips #2 screws in the center of the base with the Phillips #2 screwdriver.

    • Put the removed screws in a safe place, they will be needed later to reattach the housing to the base.

  3. Nostalgia Electrics RHP-310 Motor Replacement: 手順 3、 1の画像 1
    • Flip the base over to view the interior of the base panel.

    • Unscrew the two 10 mm Philips #2 screws from the base panel.

    • Remove the base and set it aside.

  4. Nostalgia Electrics RHP-310 Motor Replacement: 手順 4、 2の画像 1 Nostalgia Electrics RHP-310 Motor Replacement: 手順 4、 2の画像 2
    • Locate the power switch connected to the side of the housing.

    • Pinch the sides of the power switch.

    • Push the power button up and out of the housing.

  5. Nostalgia Electrics RHP-310 Motor Replacement: 手順 5、 1の画像 1
    • Remove the wires connected to the power switch that should be detached from the housing.

    • Gently pry the wires loose from the power switch with the plastic opening tool.

    • The wires should easily pop out from the power switch.

  6. Nostalgia Electrics RHP-310 Motor Replacement: 手順 6、 1の画像 1
    • Remove the power switch from the housing unit.

    • You can now replace the power switch, if necessary.

  7. Nostalgia Electrics RHP-310 Motor Replacement, Replacing Housing: 手順 7、 2の画像 1 Nostalgia Electrics RHP-310 Motor Replacement, Replacing Housing: 手順 7、 2の画像 2
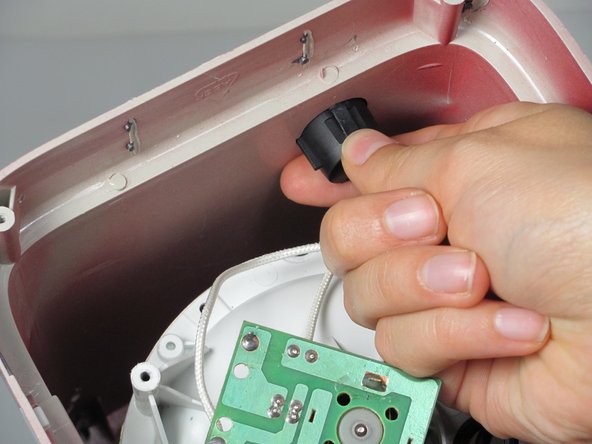
    • Gently remove the heating component from the popper.

    • Unscrew the four screws (11mm Philips #2 screws) that connect the white top to the housing.

    • Save the screws from this step. You will need them to connect the new housing to the white top.

  8. Nostalgia Electrics RHP-310 Motor Replacement: 手順 8、 1の画像 1
    • Remove the white top from the housing.

  9. Nostalgia Electrics RHP-310 Motor Replacement, Replacing Fan: 手順 9、 1の画像 1
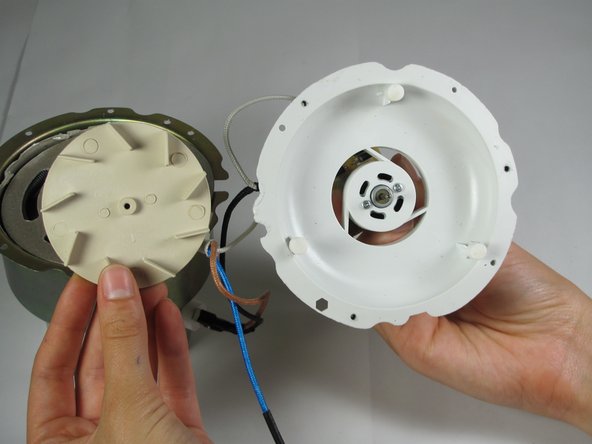
    • Unscrew the three 10 mm Philips #2 screws that hold the heating component together.

    • Keep the screws in a safe place. You will need them to put the heating component back together.

  10. Nostalgia Electrics RHP-310 Motor Replacement: 手順 10、 1の画像 1
    • Pull the heating component apart.

  11. Nostalgia Electrics RHP-310 Motor Replacement: 手順 11、 2の画像 1 Nostalgia Electrics RHP-310 Motor Replacement: 手順 11、 2の画像 2
    • Locate the fan.

    • Pull the fan off the motor.

    • Do not pull too hard or you will break the motor.

  12. Nostalgia Electrics RHP-310 Motor Replacement: 手順 12、 1の画像 1
    • You can now replace the fan. If there is debris, clean it out.

  13. Nostalgia Electrics RHP-310 Motor Replacement, Motor: 手順 13、 2の画像 1 Nostalgia Electrics RHP-310 Motor Replacement, Motor: 手順 13、 2の画像 2
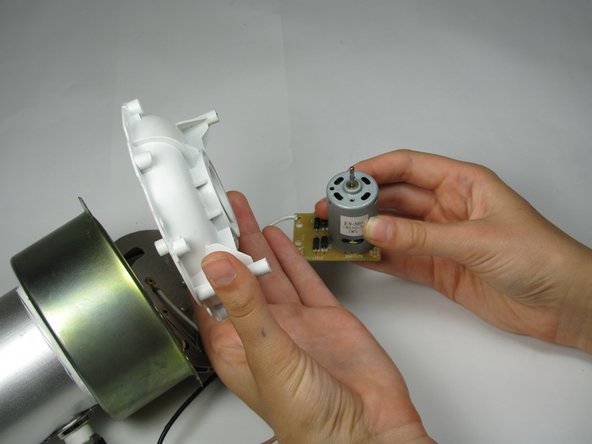
    • Use a Phillips #0 screwdriver to remove the two 2.5mm screws connecting the motor to the fan base.

    • Remember to keep the screws. You will need them to reassemble the popper.

    • Remove the motor from the fan base.

  14. Nostalgia Electrics RHP-310 Motor Replacement: 手順 14、 1の画像 1
    • Un-solder the wires that are connected to the motor.

  15. Nostalgia Electrics RHP-310 Motor Replacement: 手順 15、 1の画像 1
    • Replace the old motor by soldering the new motor to the circuit board.

終わりに

To reassemble your device, follow these instructions in reverse order.

作成者

6人の作成者と共同で作成されました。

Dana Clarke

メンバー登録日: 09/26/12

50 ポイント

6のガイドは作成済み

チーム

Cal Poly, Team 16-57, Forte Fall 2012 Cal Poly, Team 16-57, Forte Fall 2012人のメンバー

CPSU-FORTE-F12S16G57

5 メンバー

6のガイドは作成済み

0 件のコメント

コメントを追加

統計データ:

過去 24時間: 0

過去 7 日: 0

過去 30 日: 13

今までの合計 1,916