メインコンテンツにスキップ

Nokia Lumia 925 Battery Replacement

必要な工具と部品

  1. Nokia Lumia 925 Battery Replacement, Motherboard: 手順 1、 2の画像 1 Nokia Lumia 925 Battery Replacement, Motherboard: 手順 1、 2の画像 2
    • Remove the sim card holder by inserting tweezers into the hole. Push down and the holder will spring back up.

    • Pull out the holder until it is completely separate.

    • Something like a paperclip will work if there are no tweezers available.

  2. Nokia Lumia 925 Battery Replacement: 手順 2、 3の画像 1 Nokia Lumia 925 Battery Replacement: 手順 2、 3の画像 2 Nokia Lumia 925 Battery Replacement: 手順 2、 3の画像 3
    • Slide a plastic opening tool under the back cover.

    • Slide the tool around the outsides of the cover to fully dislodge the pins holding the cover to the phone.

    • Some pins are facing the opposite way from the others.

  3. Nokia Lumia 925 Battery Replacement: 手順 3、 3の画像 1 Nokia Lumia 925 Battery Replacement: 手順 3、 3の画像 2 Nokia Lumia 925 Battery Replacement: 手順 3、 3の画像 3
    • Remove the 3 screws using the T7 Torx screwdriver.

    • Unclip the black tab connector.

  4. Nokia Lumia 925 Battery Replacement: 手順 4、 2の画像 1 Nokia Lumia 925 Battery Replacement: 手順 4、 2の画像 2
    • Remove the silver metal cover.

    • Be careful of the tape under the right square side of the panel. Using a spudger helps.

  5. Nokia Lumia 925 Battery Replacement: 手順 5、 3の画像 1 Nokia Lumia 925 Battery Replacement: 手順 5、 3の画像 2 Nokia Lumia 925 Battery Replacement: 手順 5、 3の画像 3
    • Unclip the two orange tabs.

    • Remove the four silver screws using the T5 Torx screwdriver.

  6. Nokia Lumia 925 Battery Replacement: 手順 6、 2の画像 1 Nokia Lumia 925 Battery Replacement: 手順 6、 2の画像 2
    • Remove the motherboard by sliding tweezers between it and the back of the screen. Lift up.

  7. Nokia Lumia 925 Battery Replacement, Display: 手順 7、 2の画像 1 Nokia Lumia 925 Battery Replacement, Display: 手順 7、 2の画像 2
    • Push the screen from the inside of the phone.

    • Pull the screen off.

    • Slide the electronic strip through the small opening.

  8. Nokia Lumia 925 Battery Replacement, Speaker: 手順 8、 1の画像 1
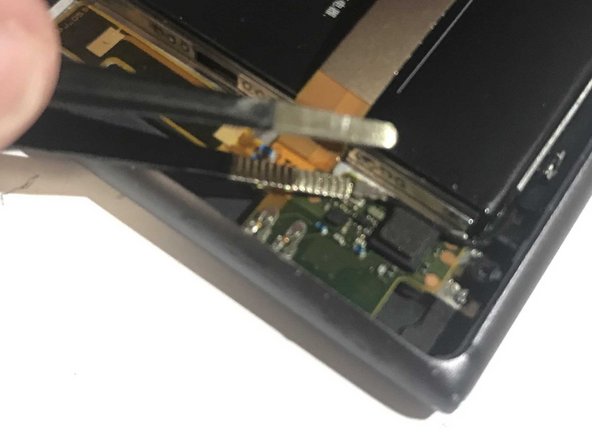
    • Locate the grey speaker/camera cover.

    • Carefully remove the cover with either a pair of tweezers or your fingers.

  9. Nokia Lumia 925 Battery Replacement: 手順 9、 3の画像 1 Nokia Lumia 925 Battery Replacement: 手順 9、 3の画像 2 Nokia Lumia 925 Battery Replacement: 手順 9、 3の画像 3
    • With a pair of tweezers, gently remove the orange colored tab closest to the speaker.

  10. Nokia Lumia 925 Battery Replacement, Front Camera: 手順 10、 1の画像 1
    • Pull at the orange section until it becomes loose.

    • It is located in the upper leftmost section of the phone behind the front camera.

  11. Nokia Lumia 925 Battery Replacement: 手順 11、 1の画像 1
    • Pull vertically on the same orange section until the front camera comes out.

    • The front camera as well as the speaker may come out after the last step so be careful.

  12. Nokia Lumia 925 Battery Replacement, Battery: 手順 12、 2の画像 1 Nokia Lumia 925 Battery Replacement, Battery: 手順 12、 2の画像 2
    • Remove the two black screws by using the T5 Torx screwdriver.

  13. Nokia Lumia 925 Battery Replacement: 手順 13、 2の画像 1 Nokia Lumia 925 Battery Replacement: 手順 13、 2の画像 2
    • Carefully pull the metal rod out.

  14. Nokia Lumia 925 Battery Replacement: 手順 14、 2の画像 1 Nokia Lumia 925 Battery Replacement: 手順 14、 2の画像 2
    • Pry off the speaker.

    • Apply heavy pressure, and pull towards the battery.

  15. Nokia Lumia 925 Battery Replacement: 手順 15、 2の画像 1 Nokia Lumia 925 Battery Replacement: 手順 15、 2の画像 2
    • Unclip the black wire.

  16. Nokia Lumia 925 Battery Replacement: 手順 16、 2の画像 1 Nokia Lumia 925 Battery Replacement: 手順 16、 2の画像 2
    • Peel off the electronic strip.

    • Be careful not to tear.

  17. Nokia Lumia 925 Battery Replacement: 手順 17、 2の画像 1 Nokia Lumia 925 Battery Replacement: 手順 17、 2の画像 2
    • Pry off the metal vibrating unit using tweezers.

    • This requires a lot of force.

  18. Nokia Lumia 925 Battery Replacement: 手順 18、 2の画像 1 Nokia Lumia 925 Battery Replacement: 手順 18、 2の画像 2
    • Insert the tweezers under the corner of the battery, and lift out.

    • You have successfully removed the battery.

終わりに

To reassemble your device, follow these instructions in reverse order.

3 の人々がこのガイドを完成させました。

作成者

3人の作成者と共同で作成されました。

Guillermo Lara

メンバー登録日: 09/18/18

409 ポイント

3のガイドは作成済み

チーム

University of North Texas, Team S4-G6, Raign Fall 2018 University of North Texas, Team S4-G6, Raign Fall 2018人のメンバー

UNT-RAIGN-F18S4G6

4 メンバー

10のガイドは作成済み

2 件のコメント

Add markers to steps 10 and 11 for clarity. Add the battery to the “parts” section. For step 5 make sure the bullet color matches the marking color. Remember to add an introduction.

Jackson Reynolds - 返信

\Some steps unnecessary e.g. remving the screen.

Also some other parts.

Use your brain.

malcolm redwood - 返信

コメントを追加

統計データ:

過去 24時間: 0

過去 7 日: 9

過去 30 日: 24

今までの合計 1,854