メインコンテンツにスキップ

Nokia Lumia 830 Main Camera Replacement

必要な工具と部品

  1. Nokia Lumia 830 Main Camera Replacement, Battery: 手順 1、 2の画像 1 Nokia Lumia 830 Main Camera Replacement, Battery: 手順 1、 2の画像 2
    • Place the phone with the screen facing down.

    • Remove the back cover by placing your fingernail or plastic opening tool under the slotted indent at the bottom of the phone.

  2. Nokia Lumia 830 Main Camera Replacement: 手順 2、 3の画像 1 Nokia Lumia 830 Main Camera Replacement: 手順 2、 3の画像 2 Nokia Lumia 830 Main Camera Replacement: 手順 2、 3の画像 3
    • Carefully remove the battery by placing the plastic opening tool underneath the indent at the bottom of the battery, and pry it up.

    • There may be adhesive underneath the battery to keep it in place, this may make it a bit difficult to remove the battery.

  3. Nokia Lumia 830 Main Camera Replacement, Main Speaker: 手順 3、 2の画像 1 Nokia Lumia 830 Main Camera Replacement, Main Speaker: 手順 3、 2の画像 2
    • Remove the black strips on both sides of the battery compartment.

  4. Nokia Lumia 830 Main Camera Replacement: 手順 4、 2の画像 1 Nokia Lumia 830 Main Camera Replacement: 手順 4、 2の画像 2
    • Remove the two 3.9mm silver screws from the bottom corner of the phone. Then remove the five 2.5mm black screws from top to bottom of the phone.

    • All of the screws take a t5 star screwdriver.

  5. Nokia Lumia 830 Main Camera Replacement: 手順 5、 3の画像 1 Nokia Lumia 830 Main Camera Replacement: 手順 5、 3の画像 2 Nokia Lumia 830 Main Camera Replacement: 手順 5、 3の画像 3
    • Use the plastic opening tool to push into the slots holding the backing in place.

    • All five slots are along the inner wall of the battery compartment. Push the slots on the sides first before pushing the slot on the top.

    • Remove the backing from the frame, making sure to lift the bottom portion away from the phone, to allow the top to slide out of place.

  6. Nokia Lumia 830 Main Camera Replacement: 手順 6、 1の画像 1
    • Lift the speaker out of the phone. You may need to wiggle the speaker loose.

  7. Nokia Lumia 830 Main Camera Replacement, Motherboard: 手順 7、 3の画像 1 Nokia Lumia 830 Main Camera Replacement, Motherboard: 手順 7、 3の画像 2 Nokia Lumia 830 Main Camera Replacement, Motherboard: 手順 7、 3の画像 3
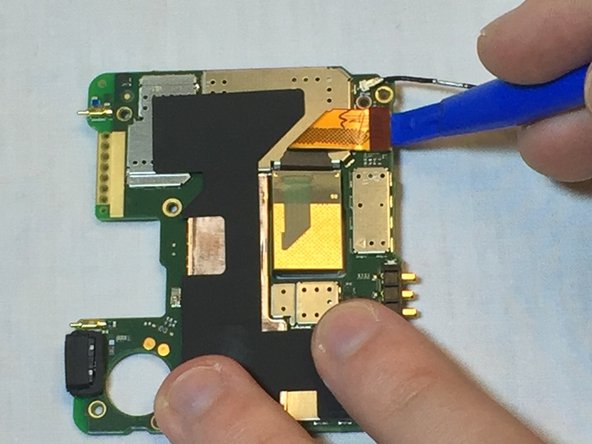
    • Hold the phone in place and grab the metal end of the RF cable with the precise tweezers.

    • The RF cable is the long, skinny cable that runs down the side of the phone

    • Be sure to pull the cord up gently, so it is not damaged.

  8. Nokia Lumia 830 Main Camera Replacement: 手順 8、 3の画像 1 Nokia Lumia 830 Main Camera Replacement: 手順 8、 3の画像 2 Nokia Lumia 830 Main Camera Replacement: 手順 8、 3の画像 3
    • *Optional* Remove the copper tape at the top right corner of the phone with the precise tweezers.

    • Scoop one end of the tweezers underneath the skinny part of the tape and peel up.

    • This tape is not stuck in any way with the vibrator motor. It will lift with the motherboard. Removal is not necessary

  9. Nokia Lumia 830 Main Camera Replacement: 手順 9、 3の画像 1 Nokia Lumia 830 Main Camera Replacement: 手順 9、 3の画像 2 Nokia Lumia 830 Main Camera Replacement: 手順 9、 3の画像 3
    • There are five flex connectors located on the motherboard. They look like rectangular metal boxes with a thin strip connected to them.

    • Unclip the connectors from the motherboard using the plastic opening tool. Lightly press the wedge end of the tool to the opposite site of the connector with the strip attached to it, and pry it up.

    • Place the plastic opening tool underneath the motherboard near where the three prongs stick out of the bottom and push the motherboard up to remove it.

  10. Nokia Lumia 830 Main Camera Replacement, Main Camera: 手順 10、 2の画像 1 Nokia Lumia 830 Main Camera Replacement, Main Camera: 手順 10、 2の画像 2
    • After you've removed the motherboard, locate the camera connector at the bottom right hand corner of the motherboard, as shown in the image.

    • Gently use the plastic opening tool to lift the connectors, disconnecting the camera from the motherboard.

    • Lastly, use tweezers to remove completely.

終わりに

To reassemble your device, follow these instructions in reverse order.

4 の人々がこのガイドを完成させました。

作成者

2人の作成者と共同で作成されました。

saydeking

メンバー登録日: 10/03/16

527 ポイント

4のガイドは作成済み

チーム

USF Tampa, Team 1-2, Sullivan Fall 2016 USF Tampa, Team 1-2, Sullivan Fall 2016人のメンバー

USFT-SULLIVAN-F16S1G2

3 メンバー

11のガイドは作成済み

0 件のコメント

コメントを追加

統計データ:

過去 24時間: 0

過去 7 日: 0

過去 30 日: 7

今までの合計 1,050