メインコンテンツにスキップ

Nokia 8390 Charging Port Replacement

必要な工具と部品

  1. Nokia 8390 Charging Port Replacement, Back Cover: 手順 1、 1の画像 1
    • Locate the button on the bottom of the back cover.

  2. Nokia 8390 Charging Port Replacement: 手順 2、 3の画像 1 Nokia 8390 Charging Port Replacement: 手順 2、 3の画像 2 Nokia 8390 Charging Port Replacement: 手順 2、 3の画像 3
    • Depress the button with your finger.

    • While the button is depressed, slide the back cover off of the phone.

  3. Nokia 8390 Charging Port Replacement, Outer Case: 手順 3、 3の画像 1 Nokia 8390 Charging Port Replacement, Outer Case: 手順 3、 3の画像 2 Nokia 8390 Charging Port Replacement, Outer Case: 手順 3、 3の画像 3
    • Grasp the top and bottom of the front cover.

    • Grasp the phone body with your other hand.

    • Lightly pull the casing off of the phone.

  4. Nokia 8390 Charging Port Replacement, Motherboard: 手順 4、 3の画像 1 Nokia 8390 Charging Port Replacement, Motherboard: 手順 4、 3の画像 2 Nokia 8390 Charging Port Replacement, Motherboard: 手順 4、 3の画像 3
    • Locate the six star-shaped screws on the phone.

    • Note: There are two on the bottom end, two in the middle, and two on the top end.

    • Remove these screws using the screwdriver.

  5. Nokia 8390 Charging Port Replacement: 手順 5、 3の画像 1 Nokia 8390 Charging Port Replacement: 手順 5、 3の画像 2 Nokia 8390 Charging Port Replacement: 手順 5、 3の画像 3
    • Grab the top and bottom of the phone casing.

    • Carefully pull the motherboard apart from the bottom casing.

    • The circuit board should be divided into two parts.

  6. Nokia 8390 Charging Port Replacement: 手順 6、 3の画像 1 Nokia 8390 Charging Port Replacement: 手順 6、 3の画像 2 Nokia 8390 Charging Port Replacement: 手順 6、 3の画像 3
    • Grab the top and bottom of the remaining casing.

    • Carefully pull apart the casing from the circuit board.

  7. Nokia 8390 Charging Port Replacement: 手順 7、 1の画像 1
    • The circuit board should be divided into three parts, completely separate from the back casing, as shown.

  8. Nokia 8390 Charging Port Replacement, Charging Port: 手順 8、 3の画像 1 Nokia 8390 Charging Port Replacement, Charging Port: 手順 8、 3の画像 2 Nokia 8390 Charging Port Replacement, Charging Port: 手順 8、 3の画像 3
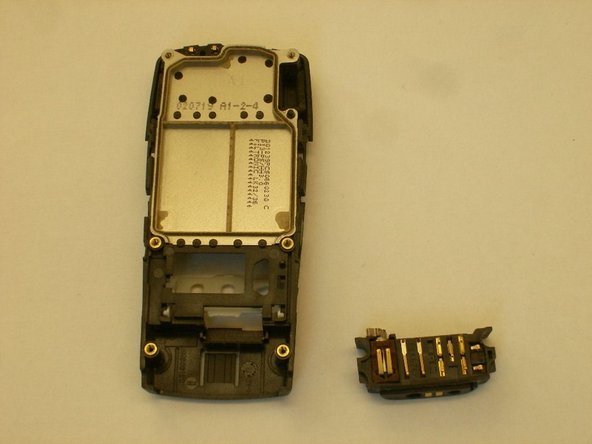
    • Hold back of phone in hand so that hand is not covering any parts.

    • Grasp charge port with thumb.

    • Pull out with hand.

終わりに

To reassemble your device, follow these instructions in reverse order.

2 の人々がこのガイドを完成させました。

作成者

3人の作成者と共同で作成されました。

Clinton

メンバー登録日: 10/22/12

57 ポイント

7のガイドは作成済み

チーム

Clemson, Team 14-5, Benson Fall 2012 Clemson, Team 14-5, Benson Fall 2012人のメンバー

CLEM-BENSON-F12S14G5

3 メンバー

16のガイドは作成済み

0 件のコメント

コメントを追加

統計データ:

過去 24時間: 0

過去 7 日: 1

過去 30 日: 2

今までの合計 323