はじめに
Batteries left in toys for prolonged times can breakdown and corrode the battery pack. The rusty liquid created leaves a telltale orange stain on fabrics and around the battery pack. By the time you notice the stain the contacts within the pack are usually beyond repair but the toy is salvageable if you follow this guide. The reason this guide opens the entire toy is that it was impossible to tell what the function of any wire had before it had corroded from the battery contacts. (And the wires were not the usual red, black and white)
必要な工具と部品
-
-
One happy looking but non-functioning robotic dog.
-
Turning the toy over it can be seen that the velcro fastening and lining has been discoloured by the corroding batteries.
-
-
-
-
Pull back legs from their fur covers. In this case they are merely springs/looped metal, other toys may have flexible plastic coated metal.
-
You may have to trim/cut any filling that may have stuck onto the wire or springs to free the legs.
-
Unpick 2 small stitches keeping the tail in position, then free from it from fur cover.
-
Once tail and rear legs are free you can then pull the front legs free from fur cover. Trim filling as necessary.
-
-
-
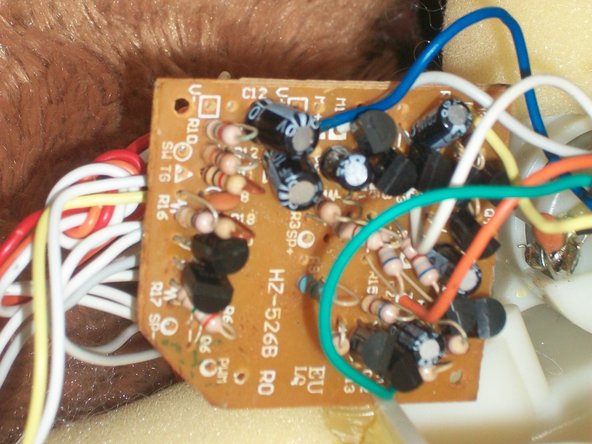
Spaghetti junction! The motherboard is sitting vertically inside the box. To lever it out use a flathead screwdriver between the uppermost board edge and the plastic casing.(marked on photo in pink) Push the screwdriver so that the edge of board lifts and you are able to grab with your fingers.
-
-
-
Carefully desolder the 3 wires for the old battery pack. Feed the new battery pack wires through from front of toy. Solder the new battery pack wires on ensuring that the correct wires are on the correct terminals of motherboard.
-
replace motherboard in casing, secure with 4 screws.
-
Reconnect wire for head, reinsert head into fur cover.
-
Place front legs in fur cover, then rear legs and tail. Make sure all wire limbs are covered with filling.
-
Use 2 strands of embroidery thread to close back seam.
-
Use cotton thread running stitch to close pouch around battery pack wires.
-


Put new batteries in and enjoy your refurbished toy. Please ensure that as batteries start to falter that you change them or if toy is unused for any length of time the batteries are removed.
Put new batteries in and enjoy your refurbished toy. Please ensure that as batteries start to falter that you change them or if toy is unused for any length of time the batteries are removed.
3 の人々がこのガイドを完成させました。

チーム

2 件のコメント
Brilliant. I've just picked up a Nintendo Dalmatian for my granddaughter. It's sturdy, well built, but as you suggest the battery box was decidedly dead. Fortunately I've kept a couple of old battery boxes from other toys and successfully renewed the box terminals. No movement except for front legs, so I'm going to strip the outer skin of the dog and lubricate the joints. You worried me a bit with 'renew the motherboard'. Really?? Oh well, I'll keep trying. Definitely I'd offer you points for your article - if I knew how. So - thanks.
Where do you get the battery boxes