メインコンテンツにスキップ

Nintendo Wii Drive Board Fuse Replacement

必要な工具と部品

  1. Nintendo Wii Drive Board Fuse Replacement, Faceplate: 手順 1、 2の画像 1 Nintendo Wii Drive Board Fuse Replacement, Faceplate: 手順 1、 2の画像 2
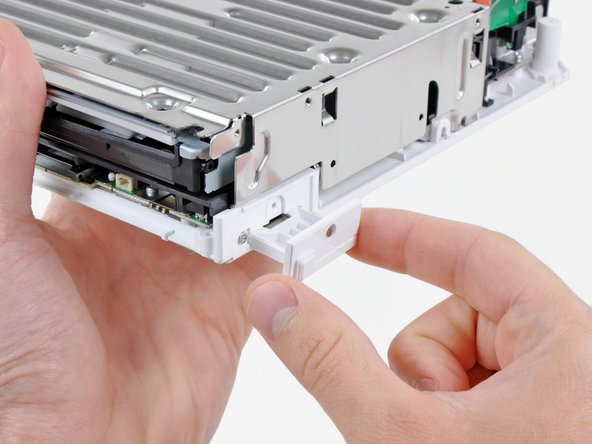
    • Use a metal spudger to remove the white plastic screw covers stuck to the lower case near the front of the Wii.

  2. Nintendo Wii Drive Board Fuse Replacement: 手順 2、 1の画像 1
    • Remove the two 8.3 mm Tri-Point screws hidden under the covers you just removed.

  3. Nintendo Wii Drive Board Fuse Replacement: 手順 3、 1の画像 1
    • Remove the single 5.9 mm Phillips screw under the controller port door nearest the faceplate.

  4. Nintendo Wii Drive Board Fuse Replacement: 手順 4、 1の画像 1
    • Use a metal spudger to remove the rubber foot stuck to the side of the Wii near the DVD drive opening.

  5. Nintendo Wii Drive Board Fuse Replacement: 手順 5、 1の画像 1
    • Remove the single 5.9 mm Phillips screw hidden under the foot you just removed.

  6. Nintendo Wii Drive Board Fuse Replacement: 手順 6、 2の画像 1 Nintendo Wii Drive Board Fuse Replacement: 手順 6、 2の画像 2
    • Carefully pull the faceplate away from the front of the Wii.

    • Use a pair of tweezers to disconnect the LED cable's plastic connector from the motherboard.

    • Remove the faceplate.

  7. Nintendo Wii Drive Board Fuse Replacement, Outer Case: 手順 7、 3の画像 1 Nintendo Wii Drive Board Fuse Replacement, Outer Case: 手順 7、 3の画像 2 Nintendo Wii Drive Board Fuse Replacement, Outer Case: 手順 7、 3の画像 3
    • Open the controller port cover until it is perpendicular to the black controller port bezel.

    • Pull the controller port cover straight up to release it from the outer case.

    • Repeat this procedure for the memory card port cover.

  8. Nintendo Wii Drive Board Fuse Replacement: 手順 8、 2の画像 1 Nintendo Wii Drive Board Fuse Replacement: 手順 8、 2の画像 2
    • Remove the two remaining 4.1 mm Phillips screws along the top edge of the black plastic controller port bezel.

    • Lift the bezel from the long edge furthest away from the controller ports and remove it from the Wii.

  9. Nintendo Wii Drive Board Fuse Replacement: 手順 9、 1の画像 1
    • Remove the two 5 mm Phillips screws above the controller ports.

  10. Nintendo Wii Drive Board Fuse Replacement: 手順 10、 1の画像 1
    • Use a metal spudger to remove the three highlighted screw covers stuck to the side of the Wii.

  11. Nintendo Wii Drive Board Fuse Replacement: 手順 11、 1の画像 1
    • Remove the following screws:

    • Two 5 mm Phillips screws

    • One 8.2 mm Tri-Point screw

  12. Nintendo Wii Drive Board Fuse Replacement: 手順 12、 1の画像 1
    • Use a metal spudger to remove the two rubber feet stuck to the bottom face of the Wii near the rear ports.

  13. Nintendo Wii Drive Board Fuse Replacement: 手順 13、 1の画像 1
    • Remove the two 8.2 mm Tri-Point screws hidden under the feet you just removed.

    • You may use a 4 mm hex driver to extend your bit into the recesses and reach the screws.

  14. Nintendo Wii Drive Board Fuse Replacement: 手順 14、 1の画像 1
    • Lift the outer case straight up off the body of the Wii.

  15. Nintendo Wii Drive Board Fuse Replacement, DVD Drive: 手順 15、 2の画像 1 Nintendo Wii Drive Board Fuse Replacement, DVD Drive: 手順 15、 2の画像 2
    • Remove the small Phillips screw securing the battery door to the bottom panel.

    • This screw is captive to the battery door.

    • Pull the battery door out of the Wii.

    • The system time will be reset once you remove the battery door.

    • This is a good time to change the CR2032 battery if it hasn't been changed recently.

  16. Nintendo Wii Drive Board Fuse Replacement: 手順 16、 1の画像 1
    • Remove the 8.2 mm Tri-Point screw that was hidden beneath the battery door.

  17. Nintendo Wii Drive Board Fuse Replacement: 手順 17、 1の画像 1
    • Remove the two 8.2 mm Tri-Point screws securing the DVD drive shield near the controller ports.

  18. Nintendo Wii Drive Board Fuse Replacement: 手順 18、 1の画像 1
    • Lift the DVD drive shield upward and remove it from the Wii.

  19. Nintendo Wii Drive Board Fuse Replacement: 手順 19、 1の画像 1
    • Remove the four 9 mm #1 Phillips screws securing the DVD drive to the bottom panel.

  20. Nintendo Wii Drive Board Fuse Replacement: 手順 20、 1の画像 1
    • Lift the side of the DVD drive opposite the controller ports enough to access the cables on its bottom face.

    • Carefully pull the DVD drive power cable out from under the plastic shroud near the heat sink.

  21. Nintendo Wii Drive Board Fuse Replacement: 手順 21、 1の画像 1
    • Pull the DVD drive power cable away from its socket on the DVD drive.

  22. Nintendo Wii Drive Board Fuse Replacement: 手順 22、 2の画像 1 Nintendo Wii Drive Board Fuse Replacement: 手順 22、 2の画像 2
    • Use your fingernail to flip up the retaining flap on the DVD drive ribbon cable socket.

    • Be sure you are prying up on the retaining flap, not the socket itself.

    • Pull the DVD drive ribbon cable out of its socket.

    • Remove the DVD drive from the Wii.

  23. Nintendo Wii Drive Board Fuse Replacement, Drive Board Fuses: 手順 23、 1の画像 1
    • Measure across each fuse with a continuity meter.

    • If either fuse is open, you will need to replace it with an 0603 fuse; if one is not available, you can use a 0-ohm resistor or jumper wire for testing purposes.

終わりに

To reassemble your device, follow these instructions in reverse order.

15 の人々がこのガイドを完成させました。

作成者

3人の作成者と共同で作成されました。

bushing

メンバー登録日: 04/23/10

10,247 ポイント

13のガイドは作成済み

4 件のコメント

Soldering jumpers on those fuses is easier said than done. The left-hand fuse follows the same trace all the way to the larger solder pad above, so don't worry about bridging. But it looks like there's a cap or diode along the trace of the right-hand fuse, so solder carefully! This worked great, and got my Wii drive back to spinning without spending $80 on a new drive.

Robert Allshouse - 返信

If anyone could give specifications for the fuses needed, it would be very much appreciated... 0603 Fuses come in different amp ratings. I saw one person suggest elsewhere that after research he found that the ones used in this repair are 2A 0603 fuses, can anyone confirm this please before I get the wrong ones?

Thanks in advance,

James @ Retro Gaming Repair UK

Retro Gaming Repair - 返信

I found a datasheet for littelfuse which labels the fuse as 2A. The datasheet can be found here

http://www.littelfuse.com/data/en/data_s....

Hope this helps.

Another tip for after you know the fuse is blown instead of removing the fuse and jumpering it add a little solder on both sides of the fuse then use a lead from a resister heating up the solder and push the lead from a resistor into it then do the same for the other side.

randyhenke - 返信

this guide assumes you have one revision of the board....i have another revision and can only find one of the resistors

dude105tanki - 返信

コメントを追加

統計データ:

過去 24時間: 2

過去 7 日: 36

過去 30 日: 247

今までの合計 60,737