メインコンテンツにスキップ

Nintendo Switch Lite Game Card Reader and Headphone Jack Replacement

必要な工具と部品

  1. Nintendo Switch Lite Game Card Reader and Headphone Jack Replacement, Remove the back panel screws: 手順 1、 1の画像 1
    この手順で使用する道具:
    Magnetic Project Mat
    $19.95
    購入する
    • Before beginning this repair, make sure that the device is completely turned off.

    • Use a Y00 screwdriver to remove the four 6.3 mm-long screws securing the back panel.

    • Throughout this repair, keep track of each screw and make sure it goes back exactly where it came from.

  2. Nintendo Switch Lite Game Card Reader and Headphone Jack Replacement, Remove the top and bottom back panel screws: 手順 2、 2の画像 1 Nintendo Switch Lite Game Card Reader and Headphone Jack Replacement, Remove the top and bottom back panel screws: 手順 2、 2の画像 2
    • Use a JIS 000 driver or an official iFixit PH 000 driver to remove the following screws securing the back panel:

    • Two 3.6 mm-long screws on the top of the device

    • Two 3.6 mm-long screws on the bottom of the device

    • To prevent these tight screws from stripping, apply firm downward force, work slowly and try a different screwdriver if the screws won't come out.

  3. Nintendo Switch Lite Game Card Reader and Headphone Jack Replacement, Release the clips securing the back panel: 手順 3、 2の画像 1 Nintendo Switch Lite Game Card Reader and Headphone Jack Replacement, Release the clips securing the back panel: 手順 3、 2の画像 2
    • Insert an opening tool into the left speaker grille on the bottom of the device.

    • Twist the opening tool to release the clips securing the back panel.

    • Avoid inserting the opening tool further than required to prevent damage to the speaker module.

  4. Nintendo Switch Lite Game Card Reader and Headphone Jack Replacement, Continue releasing the clips around the device: 手順 4、 2の画像 1 Nintendo Switch Lite Game Card Reader and Headphone Jack Replacement, Continue releasing the clips around the device: 手順 4、 2の画像 2
    • Slide the opening tool around the bottom-left corner to release the clips on the left side of the device.

  5. Nintendo Switch Lite Game Card Reader and Headphone Jack Replacement, Twist to release the clips: 手順 5、 2の画像 1 Nintendo Switch Lite Game Card Reader and Headphone Jack Replacement, Twist to release the clips: 手順 5、 2の画像 2
    • Insert an opening tool into the right speaker grille on the bottom of the device.

    • Twist the opening tool to release the clips.

    • Avoid inserting the opening tool further than required to prevent damage to the speaker module.

  6. Nintendo Switch Lite Game Card Reader and Headphone Jack Replacement, Slide and pry around the corners: 手順 6、 2の画像 1 Nintendo Switch Lite Game Card Reader and Headphone Jack Replacement, Slide and pry around the corners: 手順 6、 2の画像 2
    • Slide and pry the opening tool around the bottom-right corner to release the clips on the right side of the device.

  7. Nintendo Switch Lite Game Card Reader and Headphone Jack Replacement: 手順 7、 2の画像 1 Nintendo Switch Lite Game Card Reader and Headphone Jack Replacement: 手順 7、 2の画像 2
    • Continue sliding and prying the opening tool along the gap on the top of the device to release the clips.

  8. Nintendo Switch Lite Game Card Reader and Headphone Jack Replacement, Remove the back panel: 手順 8、 3の画像 1 Nintendo Switch Lite Game Card Reader and Headphone Jack Replacement, Remove the back panel: 手順 8、 3の画像 2 Nintendo Switch Lite Game Card Reader and Headphone Jack Replacement, Remove the back panel: 手順 8、 3の画像 3
    • Lift the bottom edge of the back panel, opening it like a book.

    • Remove the back panel.

  9. Nintendo Switch Lite Game Card Reader and Headphone Jack Replacement, Remove the shield plate: 手順 9、 1の画像 1
    • Use a JIS 000 driver or an official iFixit PH 000 driver to remove the following four screws:

    • Three 3.1 mm screws

    • One 4.5 mm screw

  10. Nintendo Switch Lite Game Card Reader and Headphone Jack Replacement: 手順 10、 3の画像 1 Nintendo Switch Lite Game Card Reader and Headphone Jack Replacement: 手順 10、 3の画像 2 Nintendo Switch Lite Game Card Reader and Headphone Jack Replacement: 手順 10、 3の画像 3
    • Use a spudger or your fingers to lift the shield plate up and out of the device.

    • You may feel a bit of resistance. This is normal, since the shield plate is slightly bonded to the heat sink with thermal paste.

    • Remove the shield plate.

    • Clean off the old thermal paste from the shield plate and heat sink using isopropyl alcohol and a microfiber cloth. Apply new thermal paste to the heat sink before reassembly.

  11. Nintendo Switch Lite Game Card Reader and Headphone Jack Replacement, Disconnect the battery: 手順 11、 2の画像 1 Nintendo Switch Lite Game Card Reader and Headphone Jack Replacement, Disconnect the battery: 手順 11、 2の画像 2
    • Use an opening tool or your fingernail to flip up the small, hinged locking flap on the motherboard interconnect cable's ZIF connector.

  12. Nintendo Switch Lite Game Card Reader and Headphone Jack Replacement: 手順 12、 2の画像 1 Nintendo Switch Lite Game Card Reader and Headphone Jack Replacement: 手順 12、 2の画像 2
    • Do Not Use Metal Tweezers! Some fixers state that metallic tweezers can short circuit the ribbon cable/connector. It might be safer to just use nylon-tipped or ceramic-tipped tweezers.

    • Use a pair of tweezers to slide the interconnect cable out of its connector on the motherboard.

  13. Nintendo Switch Lite Game Card Reader and Headphone Jack Replacement: 手順 13、 2の画像 1 Nintendo Switch Lite Game Card Reader and Headphone Jack Replacement: 手順 13、 2の画像 2
    • Use the point of a spudger to pry the battery connector straight up and out of its socket on the motherboard.

  14. Nintendo Switch Lite Game Card Reader and Headphone Jack Replacement, Remove the heat sink: 手順 14、 1の画像 1
    • Use the flat end of a spudger or your fingers to carefully peel up the foam that's lightly adhered to the fan.

    • The foam only needs to be peeled back enough to clear the fan.

  15. Nintendo Switch Lite Game Card Reader and Headphone Jack Replacement: 手順 15、 1の画像 1
    • Use a JIS 000 driver or an official iFixit PH 000 driver to remove the three 3 mm screws securing the heat sink to the motherboard.

  16. Nintendo Switch Lite Game Card Reader and Headphone Jack Replacement: 手順 16、 3の画像 1 Nintendo Switch Lite Game Card Reader and Headphone Jack Replacement: 手順 16、 3の画像 2 Nintendo Switch Lite Game Card Reader and Headphone Jack Replacement: 手順 16、 3の画像 3
    • Use a spudger or your fingers to lift the heatsink up and off of the motherboard to remove it.

    • You may feel a bit of resistance. This is normal, since the heat sink is slightly bonded to the CPU with thermal paste.

    • Clean off the old thermal paste from the heat sink and CPU using isopropyl alcohol and a microfiber cloth. Apply new thermal paste to the CPU before reassembly.

  17. Nintendo Switch Lite Game Card Reader and Headphone Jack Replacement, Remove the game card reader and headphone jack: 手順 17、 2の画像 1 Nintendo Switch Lite Game Card Reader and Headphone Jack Replacement, Remove the game card reader and headphone jack: 手順 17、 2の画像 2
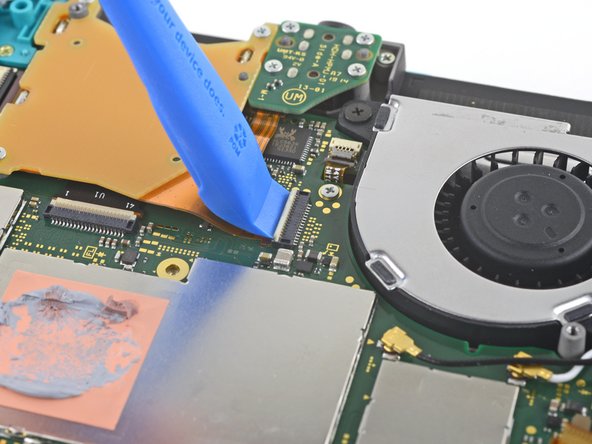
    • Use an opening tool or your fingernail to flip up the small, hinged locking flap on the game card reader cable's ZIF connector.

  18. Nintendo Switch Lite Game Card Reader and Headphone Jack Replacement: 手順 18、 1の画像 1
    • Use a Phillips screwdriver to remove the seven 3.1 mm screws securing the game card reader and headphone jack.

  19. Nintendo Switch Lite Game Card Reader and Headphone Jack Replacement: 手順 19、 3の画像 1 Nintendo Switch Lite Game Card Reader and Headphone Jack Replacement: 手順 19、 3の画像 2 Nintendo Switch Lite Game Card Reader and Headphone Jack Replacement: 手順 19、 3の画像 3
    • Use a pair of tweezers or your fingers to carefully lift the game card reader and maneuver it to the left to slide the cable out of its connector.

    • Remove the game card reader and headphone jack.

終わりに

To reassemble your device, follow these instructions in reverse order.

Take your e-waste to an R2 or e-Stewards certified recycler.

Repair didn’t go as planned? Try some basic troubleshooting, or ask our Nintendo Switch Lite Answers community for help.

14 の人々がこのガイドを完成させました。

作成者

2人の作成者と共同で作成されました。

Craig Lloyd

メンバー登録日: 02/10/16

35,354 ポイント

82のガイドは作成済み

2 件のコメント

Huge risk here not covered in the instructions, smoked out the main board when the tweezers bumped the power contacts putting the ribbon cable back. That should really be a warning in the instructions since you have to hook the power cable back up first before you put the ribbon cable back.

walesjd - 返信

Ideally you shouldn’t be using any metal tools. To remove and replace the ribbon cable in question can be done with a finger and plastic spudger.

David Harkness -

コメントを追加

統計データ:

過去 24時間: 17

過去 7 日: 81

過去 30 日: 343

今までの合計 17,167