はじめに
この修理ガイドを参照して、破損したNintendo Switch Liteの左側スピーカーを交換します。
Switch LiteはJISネジを使用していますが、急なときはプラス(PH)ドライバーでも対応できます。iFixitのプラスビットはJIS規格のネジと相互互換性があるように設計されているので、ネジを剥がさないように十分注意してください。
ご注意: この修理ガイドでは、放熱グリスの付いたヒートシンクがあるシールドプレートを取り出します。シールドプレートを再度取り付ける前に、放熱グリスを除去して、新しく塗布してください。
必要な工具と部品
-
-
Y00ドライバーを使って、バックパネルを固定している6.3mmネジを4本外します。
-
-
-
プラスドライバーもしくはiFixit PH000ドライバー で、バックパネルを固定している次のネジを外します。
-
デバイス上部の長さ3.6mmネジー2本
-
デバイス下部の長さ3.6mmネジー2本
I accidentally stripped the back screw and now I can't open it. I removed all the other screws. What should I do?
-
-
-
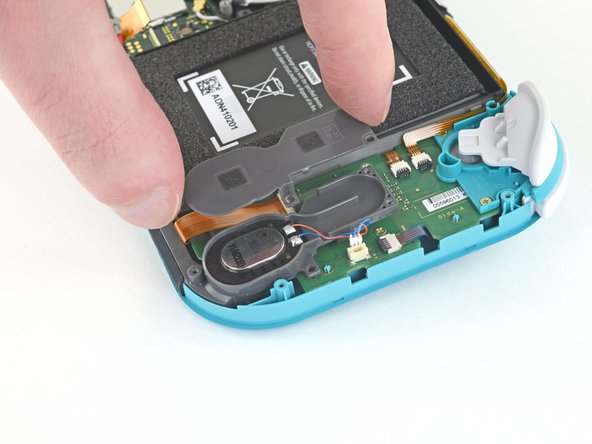
デバイス下部の左側スピーカーグリルの内側に、開口ツールを差し込みます。
-
開口ツールをひねって、バックパネルを固定しているクリップを外します。
-
-
-
-
プラスドライバーもしくは iFixit PH 000ドライバーを使って、次のネジを4本外します。
-
長さ3.1 mmネジー3本
-
長さ4.5 mmネジー1本
There are four screws instead of three mentioned
With how easy it seems to be to do serious damage with the next few steps, I figured I'd say that realistically you can skip steps 9-13 when doing this repair. While they provide a bit of extra security by disconnecting the battery, the left stick is completely accessible and replaceable without touching the heat shield or anything underneath (And steps 17 and 18 disconnect power from the daughter board regardless).
i stripped a &&^&^$^ screw
Well I actually removed the screw right next to the 4.5 screw. I did not realize it till my son showed me why the plate wouldn't release. Ha ha, it's funny now but yeah not a big deal. I could have bent it badly assuming I took all screws out though. For anyone reading this before going in. 👍
Toastninja - 返信
-
-
-
開口ツールもしくは爪先で、マザーボードの相互接続ケーブルのZIFコネクタに付いている小さなヒンジ状の固定フラップを跳ね上げます。
The clip broke off when trying to remove this cable. Audio only works through headphones and the display now won’t turn on after the clip broke. Does anyone know where I could get a clip or how I could fix it without it?
Mi è successa la stessa cosa è non so come ripararla! Chissà se c’è un modo!
-
-
-
ピンセットでマザーボード上のコネクタから、相互接続ケーブルをスライドして外します。
I turned the unit off beforehand, I used tweezers just like the instructions said (ifixit branded) , my device sparked and now it won’t turn back on
The flap came off is it important or is there a way t fix it?
We're you able to get it working without the white flap? My screen is not working after putting it back together and i noticed this white flap was falling off
Did you get it working without the white flap? Everything on the switch works fine except for audio going through headphones and the display not turning on.
do not use metal sharp pointed tweezers! you will rip your ribbon cable. Use the inside of a Bic type pen or something else dull and plastic to pull the cable away by putting the pen part where the first bend is.
-
-
-
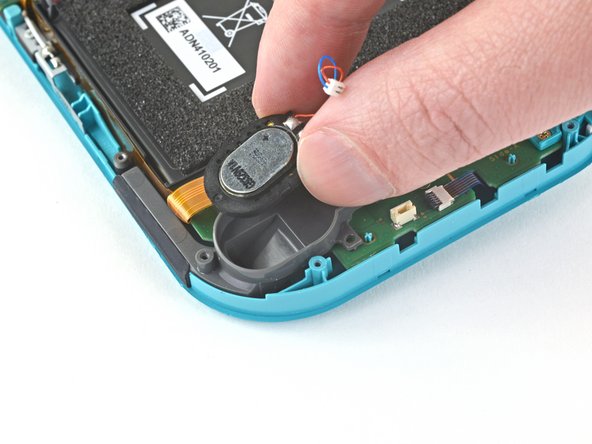
スパッジャーの先端を使って、マザーボード上のソケットからバッテリーコネクタをこじ開けて、接続を外します。
Caution the connector may not be properly soldered onto the motherboard. For me it snapped off the pins and now have to find a place to get that fixed if even possible. may have bricked it.
Yup, broke the connector right off the motherboard. Thanks, ifixit -_-
I backed out when I reached this point. I couldn't risk damaging it. Do u just need to pull it up? Did you mean that it might have been soldered shut below?
Jannalyzer - 返信
You should just need to pull straight up, but make sure you’re pulling on the wires or the gray plug—do not pull on the black socket or it can snap off of the motherboard.
With how easy it seems to be to do serious damage at this point, I figured I'd say that realistically you can skip steps 9-13 when doing this repair. While they provide a bit of extra security by disconnecting the battery, the left stick is completely accessible and replaceable without touching the heat shield or anything underneath (And steps 17 and 18 disconnect power from the daughter board regardless).
just broke my connector... ifixit PLEASE put a warning on how fragile the solder on this connector is.
Note for this step, you do not need to apply a lot of force. I used two tools here: small screwdriver to hold down the black base, and one side of fine-tipped tweezers to get under all 3 wires. Gently, push down on the tweezers to push the wires upwards, which should force the gray connector up and off the base. It did not take a lot of force. Take your time and it will be fine. Again, like others have said, do NOT pull or pry up the black base.
-


このデバイスを再組み立てするには、インストラクションを逆の順番に従って作業を進めてください。
このガイドを完成後、パフォーマンスの最適化のために、新しくインストールしたバッテリーを キャリブレーションしてください。
e-wasteを処理する場合は、認可済みリサイクルセンターR2を通じて廃棄してください。
修理が上手く進みませんか?ベーシックなトラブルシューティングのページを参照するか、Nintendo Switch Liteのアンサーコミュニティに尋ねてみましょう。
このデバイスを再組み立てするには、インストラクションを逆の順番に従って作業を進めてください。
このガイドを完成後、パフォーマンスの最適化のために、新しくインストールしたバッテリーを キャリブレーションしてください。
e-wasteを処理する場合は、認可済みリサイクルセンターR2を通じて廃棄してください。
修理が上手く進みませんか?ベーシックなトラブルシューティングのページを参照するか、Nintendo Switch Liteのアンサーコミュニティに尋ねてみましょう。
2 の人々がこのガイドを完成させました。
以下の翻訳者の皆さんにお礼を申し上げます:
100%

Midori Doiさんは世界中で修理する私たちを助けてくれています! あなたも貢献してみませんか?
翻訳を始める ›

コメント 1 件
Est-ce que les haut parleur des la switch classique et de la lite son pareil et compatible ?
All my screws got stripped any ideas on how to remove?
Almost A Mammal - 返信
A Y0 screwdriver seemed to work better for me.
Tommy Morrill - 返信
What type of screw driver do I use to un screw the screws and which way
Luca Capito - 返信
Y 0.6 was all I had but it seemed to fit perfectly
Trevor - 返信