はじめに
このガイドを参照して、Nintendo SwitchのJoy-Conコントローラーのバックルロックの交換をしましょう。
Joy-Conの左右には若干の違いがありますが、この修理ガイドは左右どちらにも適用できます。
必要な工具と部品
-
-
開口ピックをコントローラー(LとZボタンの反対側)の下側端の継ぎ目に差し込みます。
-
開口ピックの平面側先端をJoy-Conの側面上をゆっくりとスライドします。
-
-
-
-
プラス#00ドライバーを使って、バックルロックの固定ブラケットに留められたネジを1本外します。
Be sure not to over-tighten this screw on reassembly, or the button will stick. Test the button before reassembling the plastic shell.
-
-
-
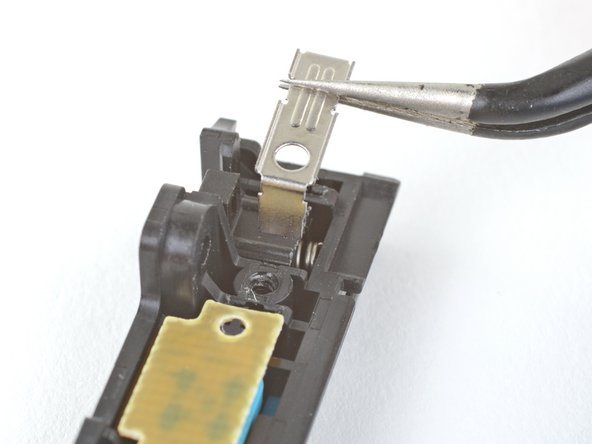
ピンセットの片側を、バックルロック中央の平面パーツの下に滑り込ませます。
-
ピンセットでブラケットをつかみ、ブラケットを充電レールから引き離すと、ブラケットが外れます。
This step takes some considerable force by the way.
if you have trouble removing the silver bracket just pry with the tweezers then put the screwdriver under the bracket the pry and it comes of so much easier!!!
The spring may eject during this step if you pull with enough force to pry the buckle lock out. Keep your body to prevent the spring from flying too far. Also be mindful of which direction in the room it could fly to help you locate it sooner if it does eject out-of-sight.
Yes it's true, I've lost springs before when disassembling a Joycon, have a flashlight near you in case it rockets somewhere in the room.
Note that if the buckle release is stiff or not returning to the correct position you may need to loosen this part out to give the correct resistance against the spring. This is more prevalent in non standard parts such as a metal Buckle lock. Lubrication may also help, such as WD40.
-
-
-
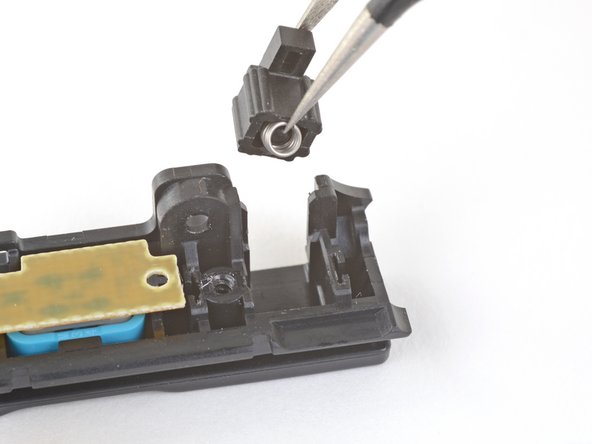
充電レールのスロットからバックルロックを少し持ち上げ、ピンセットで掴める程度にまでスプリングを露出させます。
-
ピンセットがロックの両側に回り込み、ロック内のスプリングを摘めるまでバックルロックを掴みます。
-
充電レールのスロットからバックルロックを引き抜きます。
Upon reassembly of the buckle lock make sure the notch on the back is facing downwards.
Dude, the shooting spring has to be a warning, PLEASE. I didn’t read the whole thing and it spring out once I lifted the buckle lock. I spent like 30 MINUTES finding it AND HAVING A MENTAL BREAKDOWN. I got so angry and once I found it it was AMAZING. So PLEASE AT ALL COSTS DO NOT LOSE IT PLEASE. I WAS GOING THROUGH THE STAGES OF GRIEF.
ALSO be careful when screwing because I stripped the screw meaning the head of a screw has worn out from not pushing down enough and screwing it back in which ruined the screw. So BE VERY VERY CAREFUL, be sure you know everything you’re doing because if you don’t it’ll MESS you up.
There used to be a photo and a procedure step showing the buckle lock orientation. Some important stuff got deleted here.
Jim Nugent - 返信
Unbedingt darauf achten den richtigen Metallsicherungsriegel zu benutzen!
Es gibt einen für den rechten Joycon und einen für den linken!
Am besten genau mit dem alten aus Plastik vergleichen
don't tighten the metal buckle too tight. it stops the spring from working and the lock will not work
-


デバイスを再組み立てする際は、これらのインストラクションを逆の順番に従って作業を進めてください。
e-wasteを処理する場合は、認可済みリサイクルセンターR2を通じて廃棄してください。
修理がうまく進みませんか?トラブルシューティングのヘルプにはアンサーコミュニティを参照してください。
デバイスを再組み立てする際は、これらのインストラクションを逆の順番に従って作業を進めてください。
e-wasteを処理する場合は、認可済みリサイクルセンターR2を通じて廃棄してください。
修理がうまく進みませんか?トラブルシューティングのヘルプにはアンサーコミュニティを参照してください。
112 の人々がこのガイドを完成させました。
以下の翻訳者の皆さんにお礼を申し上げます:
100%


これらの翻訳者の方々は世界を修理する私たちのサポートをしてくれています。 あなたも貢献してみませんか?
翻訳を始める ›

34 件のコメント
I tried to do this carefully, but I ended up removing the side rail ribbon cables and I had to disassemble the whole thing just to try to get to the inside of these babies. However it seems I messed up, and now I could use some help here. I don't want to lose my left Joy-Con.
It seems rather strange.. Its pretty easy to reattach. All I have is a $@$*!& ph00 + y00 that stripped the screws so I broke the cover. Technically not my fault. I have done multiple reshells.
I tryed to do this but the 2nd at the bottom would not come out now my buckle is chiped
You mean the screws? Break off the shell! A perfect opportunity to put some clear ones :))
I bought this kit of replacement metal buckles, and they work beautifully: https://www.amazon.com/gp/product/B07BDH...
This kit comes with four buckles, two for the left Joy Con, and two for the right. If you happen to have two sets (or plan to get a second set) of Joy Cons, a whopping $9.00 will set you up right.
I did have a bit of trouble replacing the metal cover that holds the buckle in place, but that was my own stupidity as I was trying to do this repair with insufficient light. Once I shed some light on the subject and I could see what I was doing, everything went back together smooth as silk. I replaced the buckles on both of my Joy Cons, and they’re both rock solid now.
I just bent that and refitted it. Force INDEED works.
i held the latch in one hand and gently pulled it out and the spring went flying! never found it again. just printed a shorter one with a pen spring.
I saw a recommendation to remove the latch while holding the controller inside a zip lock bag, i thought that was pretty clever :)
Strange.. I did both and never had such issues. I just do this trick; first I cover the area, 2nd I remove the energy by when raising at pushing slowly grabbing back if you understand. Kinda hard to explain.
pretty easy solution, don’t think it’s fixed the wobbly joycon issue much but I feel safer in the knowledge that these new buckles shouldn’t wear out as easily (if at all)
It really shouldn’t. In my opinion, metal to metal is more prone to break, maybe the rail or the joycon, but yeah feels much sturdier. So worth it.
Be careful with the small metal screw that attaches joycon shell to the black rail thingie - it’s very easy to damage the screw hole when reassembling the joycon by not properly aligning it with the shell.
Followed this guide. Was super easy. I replaced the locks in both my joycons in under 30 minutes.
NOTE: Often the metal locks come with some tools when you order them. IN my experience these are not high quality and can damage the screws. I recommend getting ifixit tools.
RIP my springs. IDK how you’re meant to take the latches out but I definitely didn’t do it right. Good thing Aliexpress sells replacements lol
If you drop your switch on the side the joycons would probably be the first thing to break… sooo by making a joycon component that makes contact with the console out of metal, wouldn’t that mean the mechanism in the console itself would break in case of a drop?
That’s almost certainly why the JoyCon latches are plastic to begin with… they’re probably engineered to give way under extraordinary circumstances.
I can tell you from experience the joycons are sturdy enough to survive serious stresses. My granddaughter somehow managed to remove one by snapping off the mounting screws on the rails. Not easy to do, as the rails are mounted directly on the metal midframe. So I got the honor of pioneering the midframe replacement guide here.
I also bought this kit of replacement metal buckles, and they work beautifully: https://www.amazon.com/dp/B08HPD3Z46/ref...
This kit comes with four buckles, two for the left Joy Con, and two for the right. If you happen to have two sets (or plan to get a second set) of Joy Cons, a whopping price will set you up right.
Ray Rivera - 返信
So my joycon is loose, Should I buy a spring or just need to replace the buckle lock only?
If the button still goes in and out when pressed the spring should be fine. That said, if you see a good offer that includes both it never hurts to have spares since they are very easy to lose.
David R. -
I replaced the buckles in my joycons but now my left joycon slides off more easily (without pressing the button) than before? Can someone help me with this?
Are you sure you’ve put the right buckle in? The buckles for each joycon are different and if you put in the wrong one, it’ll be hard to slot in but easy to remove (the opposite of what you want). It happened to me on my first repair lol
David R. -
I was able to do this easily, and it works great! However, I did have to do it twice because the first time I put in the wrong side of buckle. For other people like me who might forget that these things are different whether left or right, I think a big disclaimer at the beginning could help, something like “Make sure you are installing the correct side of buckle for your joycon” for example. Thanks for the guide!
Can the people who changed the original latches, to the metal ones, tell me if this repair ended up damaging the console, because it is no longer plastic? Thank you.
It does not damage the console. The metal latch only interfaces with the metal bars on the side of the screen, which are very robust.
Echoing David R’s comment; I did the exact same thing. The buckles are sided, meaning one’s for the left side and the other’s for the right. Be sure you’ve got them in the correct position before you button it all up again or like me you’ll be disassembling them again so you can swap the buckles to their proper positions. Once they were on the correct sides, the controllers latch down nicely.
It should be made aware that each buckle is shaped differently for each joycon. I bought the pack thinking I could fix both my left joycons, then I realized I had to disassemble one again.
Thank you very much! I was wondering why my joy cons was still unlatching. Turns out I inverted the buckles during the installation.
if you have trouble removing the silver bracket just pry with the tweezers then put the screwdriver under the bracket the pry and it comes of so much easier!!!
When you're screwing the lock bracket screw back in, make sure not to screw it in too tight. I had it screwed in too tight when I installed the metal locks, and the lock wouldn't go back out properly after I pressed the release button.
You have to be careful at the end with the cabel of the SR, SL buttons. Mine got damaged while putting anything back together. As said in a other guide here its best to place it below the battery to prevent damage!