はじめに
この修理ガイドでは、光学ドライブとレーザーにアクセスするために、GameCubeの光学ドライブアセンブリを解体する方法です。これらのパーツは、ゲームコンソールでゲームするために、ゲームディスクの情報を読み取る役割を果たしています。
光ドライブが故障したり(ディスクが回転しないなど)、光学レーザーレンズが破損したりすると、ゲームディスクを正しく読み取ることができなくなります。その場合はデバイスのパーツを交換する必要があります。GameCubeは古いゲームコンソールなため、交換パーツを探すにはE-bayなど利用するのが良いでしょう。
解体する前に、4.5mmのゲームビットドライバーを用意します。これは、任天堂の特定のゲーム機を開くために使用される特別なツールです。
必要な工具と部品
-
-
GameCube下側を上に向け、ネジを外した状態で、ユニットの外カバーを慎重に上半分から引き離します。
-
GameCubeの内側が上向きになるように動かします。
This can also be done whilst being in the normal upright position after all 4 of the 4.5mm Gamebit screws have been removed. Pull the top of the shell directly upwards and it should slide off easily.
Less chance of snagging any wires or parts.
-
-
-
バックパネルの両脇にあるクリップをゆっくりと押し下げます。
-
GameCubeからバックパネルを慎重に外します。
A second picture clearly showing which direction to pull the back panel away from the unit would be nice.
-
-
-
ユニット正面側にあるコントローラーポートのクリップをゆっくりと外します。
well... what happens if accidentally i disconnected it?
presumably nothing major. The CMOS battery is attached to the controller ports, so the most i'd expect is that the gamecube loses it's date/time setting. As long as you reset that before jumping into animal crossing or something, you should be fine. I'm currently doing a teardown of my gamecube, and if something does prove to have gone wrong, i'll report back.
sigoshi -
okay, i finished putting it back together. gamecube works fine and surprisingly still remembers what year it is. boots into smash bros and shows memory card contents fine.
sigoshi -
-
-
-
プラスドライバーを使って、コントロールポートの裏側にある2本のネジ(赤色でマーク)を外します。
-
コントロールポートと回路基板のグレーのアウターケースをゆっくりと外します。
must do this?
That step is not needed for the laser replacement.
Love ur labeling and legends. Good on ya
Not a necessary step
-
-
-
本機の左側には、冷却ファンとそのハウジングがあります。
-
冷却ファンの筐体を固定している2本のネジを慎重に外します。
-
-
-
-
光学ドライブはメタルプレートに固定されています。
-
#2 プラスドライバーを使って、光学ドライブの外側周辺に留められたネジを12本外します。
Are these 12 screws the exact same kind like the 2 that were on the fan?
Yes! As far as I can tell anyway. Makes sense, too since opposite the fan you have five of the same holes as well.
-
-
-
GameCube本体の残りの部分から、光学ドライブアセンブリを慎重に分離します。
-
光学ドライブアセンブリは、スロットによってマザーボード下部に固定されています。アセンブリを慎重に外すには、多少の力が必要です。
-
メタルプレートと実際の光学ドライブは取り付けられたままです。
-
-
-
GameCubeから光学ドライブアセンブリが外れているはずです。
-
光学ドライブアセンブリを裏返して、下面が上にくるように配置します。
-
#1プラスドライバーでネジを6本外します。
-
ネジが外れたら、メタルプレートをゆっくりと持ち上げて外します。
If you are just doing the lens power adjustment, from this step skip straight to step 17. Steps 11-16 are unnecessary unless you are replacing the lens completely.
-
-
-
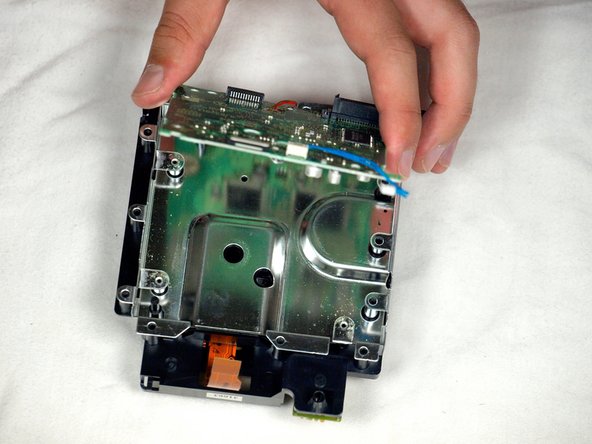
青いワイヤをゆくりと引き抜きます。
-
黒いタブを白いプラスチックからゆっくりと引き離して茶色のケーブルの張力を緩めて、タブからゆっくりと離れることができます。
-
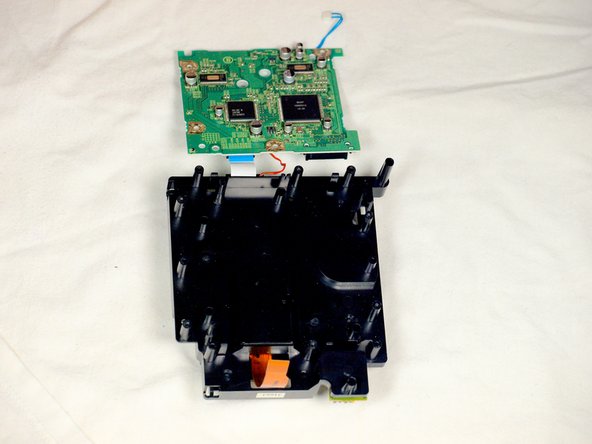
3枚目の画像のように、回路基板と光学ドライブアセンブリを接続している4本の#1プラスネジを外します。
-
4本目のネジは、3枚目の画像のドライバの後ろにあります。
A helpful addition/change to this step would be to include a photo of where/how to remove the brown ribbon cable (maybe also include this terminology in the text, instead of just “cable”). Furthermore, the yellow box to indicate the blue cable highlights everything except the part that you need to remove, which is a little confusing.
Thanks!
Ben
I cannot get the 4 little screws to go back into the board once removed. There is nothing for them to bite into - how do I get this board put back together?
-
-
-
回路基板(大型のグリーン正方形)をゆっくりと持ち上げます。
-
3番目の画像にあるように、回路基板をゆっくりと外します。(グリーンの正方形)
-
赤いワイヤ
-
白いリボンケーブル
What would happen if I accidentally separated the white ribbon cable... because I watched a video of some guy going through this same process. Separated all the cables and his worked. My cube stopped reading disks recently. Laser is calibrated properly. Begins to spin then stops
Ps
Is there anyway I can save my cube
I'm just guessing here, but I think they mean there's no need to separate those cables to complete the repair—just be careful not to pull or stress them. Like you said, nothing bad will happen if you choose to disconnect a couple cables. As for what's wrong with your cube, you might want to try asking your question over in the Answers forum.
There is a small tab to the left of the red wire that you need to pull out to release the circuit board.
Why do we need further disassembly that this ? The potentiometer is already accessible at this point. Why do we need to tear down the lens from it’s slot in step 16 ?
Good question! I’m wondering the same thing.
You don’t. You can stop here if you’re doing the laser potentiometer calibration.
jweeman -
-
-
-
ドライブアセンブリの上半分が外れたら、上下を逆にします。
-
プラスドライバー(#1)を使って、レンズのアセンブリーバー付近の3本のネジを慎重に外します。
-
最後の3本のネジを外して、レンズアセンブリを取り出します。
what kind of screws are these on the laser lens i lost one and need to buy new ones cause i cant find the 3rd
we're replacing the laser tho
-


このデバイスを再組み立てするには、インストラクションを逆の順番に従って作業を進めてください。
このデバイスを再組み立てするには、インストラクションを逆の順番に従って作業を進めてください。
20 の人々がこのガイドを完成させました。
以下の翻訳者の皆さんにお礼を申し上げます:
100%

Midori Doiさんは世界中で修理する私たちを助けてくれています! あなたも貢献してみませんか?
翻訳を始める ›

チーム

Cal Poly, Team 6-2, Maness Fall 2009 Cal Poly, Team 6-2, Maness Fall 2009人のメンバー
CPSU-MANESS-F09S6G2
4 メンバー
45のガイドは作成済み
5 件のコメント
What type of optical drive could I use to replace the one in said GameCube once I've broken it down?
Did you ever find out, Bob?
I found OEM parts (removed from other Game Cubes) available on Ebay. Just ordered the part for about $16.
erin clark - 返信
Good walkthrough. My 8 year old completed this repair with minimal help from me. Thanks!
erin clark - 返信
As a tech writer I just wanted to say our step by step instructions are spot on. Great Job