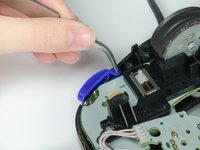
メインコンテンツにスキップ

Nintendo GameCube Controller Triggers Replacement

必要な工具と部品

  1. Nintendo GameCube Controller Triggers Replacement, Back Panel: 手順 1、 1の画像 1
    • Place the controller (buttons down) on a solid surface.

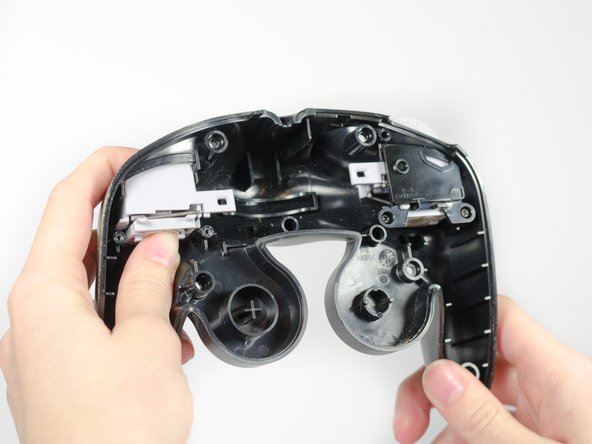
    • Remove the six 9.2mm Tri-wing Y0 screws that hold the back panel in place.

  2. Nintendo GameCube Controller Triggers Replacement: 手順 2、 1の画像 1
    • Gently lift the back panel up, separating it from the front panel.

    • Some of the buttons may fall out if they are knocked around.

  3. Nintendo GameCube Controller Triggers Replacement, Z Button: 手順 3、 2の画像 1 Nintendo GameCube Controller Triggers Replacement, Z Button: 手順 3、 2の画像 2
    • Grab the Z-button by the peg with tweezers and lift it out of the controller.

    • During re-assembly, make sure the plastic rim and spring fit into the slot provided, or else the case will not shut.

  4. Nintendo GameCube Controller Triggers Replacement, Circuit Board: 手順 4、 1の画像 1
    • Carefully unhook the cable that is looped around the peg.

  5. Nintendo GameCube Controller Triggers Replacement: 手順 5、 1の画像 1
    • Lift the circuit board out of the controller.

    • Do not grab the rumble motor to lift the circuit board as shown in the picture. It will in many cases just remove the rumble motor. Instead, grab the edges of the board.

  6. Nintendo GameCube Controller Triggers Replacement, Triggers: 手順 6、 1の画像 1
    • Remove the two 8.9mm Phillips Head #0 screws.

  7. Nintendo GameCube Controller Triggers Replacement: 手順 7、 1の画像 1
    • Remove black cover.

  8. Nintendo GameCube Controller Triggers Replacement: 手順 8、 3の画像 1 Nintendo GameCube Controller Triggers Replacement: 手順 8、 3の画像 2 Nintendo GameCube Controller Triggers Replacement: 手順 8、 3の画像 3
    • To remove the trigger assembly, depress the trigger with your index finger as if you are using the controller normally.

    • Hold the grey square bracket onside of the controller with your thumb.

    • Keep your fingers in the same place while rotating upwards towards you to remove trigger assembly.

  9. Nintendo GameCube Controller Triggers Replacement: 手順 9、 1の画像 1
    • Pull the metal clip from the trigger.

終わりに

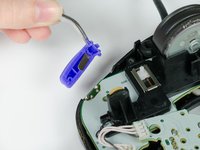
In order to remove the other trigger, simply repeat Steps 6 through Step 9 on the right side.

To reassemble your device, follow these instructions in reverse order.

11 の人々がこのガイドを完成させました。

作成者

4人の作成者と共同で作成されました。

Sean Michel

メンバー登録日: 01/14/13

2,496 ポイント

8のガイドは作成済み

チーム

Cal Poly, Team 19-44, Regan Winter 2013 Cal Poly, Team 19-44, Regan Winter 2013人のメンバー

CPSU-REGAN-W13S19G44

4 メンバー

26のガイドは作成済み

2 件のコメント

Don't forget to aline the trigger slider holes and the slider pins on the board when putting it all back together.

buttpug - 返信

Hallo ich habe da mal eine Frage. Ist es möglich die Empfindlichkeit der Trigger zu beeinflussen ? Leider reagieren sie erst sehr spät da mann den Knopf sehr weit hereindrücken muss.

danke schon mal

Otti

Ottitrotti - 返信

コメントを追加

統計データ:

過去 24時間: 4

過去 7 日: 25

過去 30 日: 95

今までの合計 26,912