はじめに
ゲームカートリッジの取り出しに問題がある場合、ファミコンを開き、ゲームカートリッジトレイを取り外す必要があります。詳しくは、こちらのガイドをご覧ください。
必要な工具と部品
-
-
-
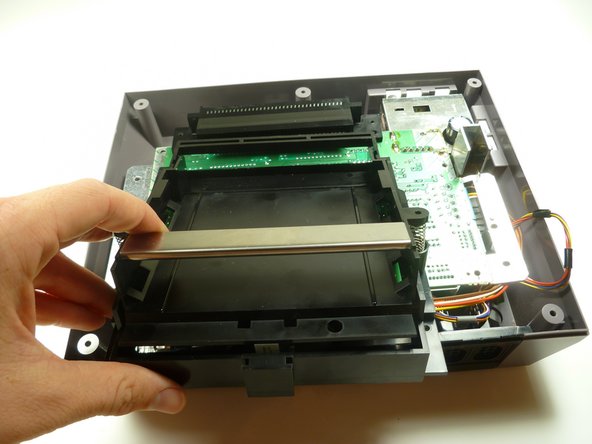
注:カートリッジトレイの下には、黒い台形状のタブがあります(マークーを参照)。このタブは、正しく組み立てられると、このようにマザーボードとシールドの下に入ります。
This is so unclear! I have no idea what tab this step is referring to.
So, it’s a year later, and I have a lot more experience with this system now. The front of the cartridge tray needs to hook under the edge of the board.
It’s much easier to get the tray on and off if you just make sure the board is unscrewed from the case. Then pick the board up a little and the tray should be much easier to slide on and off.
its when your replacing the cartridge tray, if u do it wrong the tray will feel like it's bowing up in the middle, like when u put in the screws u have to press the tray down to get the screw holes to line up / be flush, if u get the lip underneath to catch correctly there will be no issue/bow u wan't have to press down on it, or make the screws pull the tray to the motherboard, instead the tray will be flush with no pressure applied, i had no idea what he meant either until i was reversing the steps.
also not all NES are the same underneath, my tab was much less noticeable and i had one less screw to get the shield off then he showed. and 2 less screws to remove the cartridge tray.
This seemed very unclear to me at first, until I tried to replace the cart tray. I apparently didn’t get the little lip under the mobo on my first attempt, and I noticed there was a pretty decent chunk of space between the front brass screw holes and their corresponding holes on the mobo. I reseated it, and the second time I heard a little click (apparently the lip going under the mobo). This time the bottom/brass screw holes were virtually FLUSH with the mobo holes. If you see a chunk of space between the cart tray and the mobo near the brass screw holes you didn’t get the lip under the mobo.
-


デバイスを再組み立てする際は、これらの修理ガイドを逆の順番に従って作業を進めてください。
デバイスを再組み立てする際は、これらの修理ガイドを逆の順番に従って作業を進めてください。
8 の人々がこのガイドを完成させました。
以下の翻訳者の皆さんにお礼を申し上げます:
100%

Midori Doiさんは世界中で修理する私たちを助けてくれています! あなたも貢献してみませんか?
翻訳を始める ›
チーム

Cal Poly, Team 14-40, Forte Fall 2010 Cal Poly, Team 14-40, Forte Fall 2010人のメンバー
CPSU-FORTE-F10S14G40
4 メンバー
20のガイドは作成済み
the outside screws are a little deep, plan ahead :)
Joseph McCord - 返信
Why use a slotted driver? The screws are phillips. Both #1 and #2 work for me.
kmcrawford111 - 返信