メインコンテンツにスキップ

Nintendo DSi XL Volume Control Switch Replacement

必要な工具と部品

  1. Nintendo DSi XL Volume Control Switch Replacement, Battery: 手順 1、 2の画像 1 Nintendo DSi XL Volume Control Switch Replacement, Battery: 手順 1、 2の画像 2
    • Remove the two Phillips screws securing the battery cover to the back of the handheld console.

    • Lift the battery cover off the back of the DSi XL.

  2. Nintendo DSi XL Volume Control Switch Replacement: 手順 2、 1の画像 1
    • Lift the battery from the DSi XL.

  3. Nintendo DSi XL Volume Control Switch Replacement, Lower Case: 手順 3、 3の画像 1 Nintendo DSi XL Volume Control Switch Replacement, Lower Case: 手順 3、 3の画像 2 Nintendo DSi XL Volume Control Switch Replacement, Lower Case: 手順 3、 3の画像 3
    • Remove the four rubber screw covers on the lower case by prying them up with a push pin.

  4. Nintendo DSi XL Volume Control Switch Replacement: 手順 4、 1の画像 1
    • Remove the following seven Phillips screws that secure the lower case to the rest of the DSi XL:

    • Four silver 5.3 mm screws

    • Two black 5.3 mm screws

    • One black 2.5 mm screw

  5. Nintendo DSi XL Volume Control Switch Replacement: 手順 5、 3の画像 1 Nintendo DSi XL Volume Control Switch Replacement: 手順 5、 3の画像 2 Nintendo DSi XL Volume Control Switch Replacement: 手順 5、 3の画像 3
    • Turn the DSi XL over, and open the display.

    • Insert a spudger between the upper and lower case at the bottom left corner of the DSi.

    • Slide the spudger along the bottom edge of the upper case to release the latches securing the upper case to the lower case.

  6. Nintendo DSi XL Volume Control Switch Replacement: 手順 6、 2の画像 1 Nintendo DSi XL Volume Control Switch Replacement: 手順 6、 2の画像 2
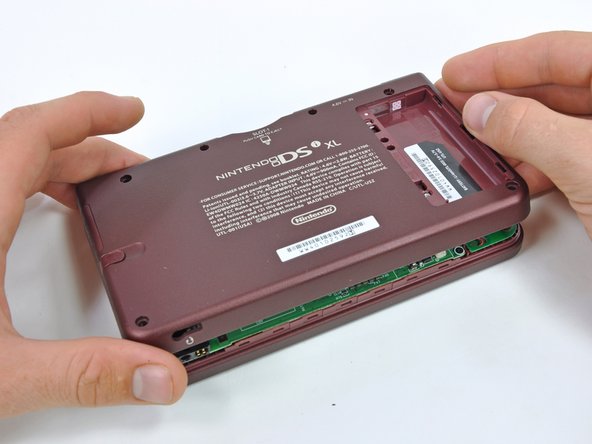
    • Close the display and turn the DSi XL over.

    • Lift the lower case from the front edge.

    • Rotate the lower case away from the DSi.

    • The lower case cannot be completely removed yet, since it is still connected to the motherboard.

  7. Nintendo DSi XL Volume Control Switch Replacement: 手順 7、 2の画像 1 Nintendo DSi XL Volume Control Switch Replacement: 手順 7、 2の画像 2
    • Using a spudger, pry the SD card/right shoulder button connector off its socket.

    • Pry the volume button/left shoulder button connector off its socket on the motherboard with a spudger.

  8. Nintendo DSi XL Volume Control Switch Replacement, Left Shoulder Button: 手順 8、 3の画像 1 Nintendo DSi XL Volume Control Switch Replacement, Left Shoulder Button: 手順 8、 3の画像 2 Nintendo DSi XL Volume Control Switch Replacement, Left Shoulder Button: 手順 8、 3の画像 3
    • Remove the two gold 4.0 mm Phillips screws securing the left shoulder button assembly to the lower case.

    • Lift the left shoulder button assembly from the lower case.

    • The components of the left shoulder button assembly:

    • Left shoulder button

    • Shoulder button spring

    • Retaining pin

    • Left shoulder button support panel

  9. Nintendo DSi XL Volume Control Switch Replacement, Volume Control Switch: 手順 9、 1の画像 1
    • On the inside of the battery compartment, use the tip of a spudger to detach the metal latch securing the volume control switch in place.

    • The latch will only move about 1 mm.

  10. Nintendo DSi XL Volume Control Switch Replacement: 手順 10、 3の画像 1 Nintendo DSi XL Volume Control Switch Replacement: 手順 10、 3の画像 2 Nintendo DSi XL Volume Control Switch Replacement: 手順 10、 3の画像 3
    • Using the flat end of a spudger, remove the adhesive securing the volume control switch ribbon cable to the back of the battery compartment.

    • Using the flat of a spudger, pry the volume control switch straight up out of the lower case.

    • Remove the volume control switch from the DSi XL.

  11. Nintendo DSi XL Volume Control Switch Replacement: 手順 11、 1の画像 1
    • Using the flat end of a spudger, remove the volume control buttons from the metal backing bracket.

    • The bracket is attached by a strong adhesive. Work slowly and carefully, being sure to not damage the ribbon cable.

    • Volume control switch remains.

終わりに

To reassemble your device, follow these instructions in reverse order.

2 の人々がこのガイドを完成させました。

作成者

2人の作成者と共同で作成されました。

Brett Hartt

メンバー登録日: 04/12/10

127,897 ポイント

143のガイドは作成済み

チーム

iFixit iFixit人のメンバー

Staff

135 メンバー

16,817のガイドは作成済み

0 件のコメント

コメントを追加

統計データ:

過去 24時間: 5

過去 7 日: 9

過去 30 日: 27

今までの合計 6,056