はじめに
This guide will instruct a user on how to access and replace a Nintendo DSI's batterypack.
必要な工具と部品
-
-
To begin the battery replacement, have all your tools and parts nearby and ready to go.
-
Nintendo DSI
-
#00 2.0mm Phillips Head Screwdriver OR Precision Screwdriver Kit
-
Spudger or Prying Tool
-
Nintendo DSI Battery
-
-
-
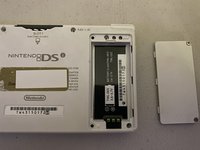
On the backside of the DSI, you'll notice a plastic panel with two screws off to the side. Unscrew both screws using a #00 Phillips head screwdriver or an appropriately sized screwdriver bit.
-
Unscrew both screws using a #00 Phillips head screwdriver or an appropriately sized screwdriver bit. The screws will stay with the panel during removal.
-
Lift the plastic panel up and away from the DSI. If the panel stays in place after unscrewing, hold the DSI upsidedown and gently tap the device. This should free the panel.
-
-
-
-
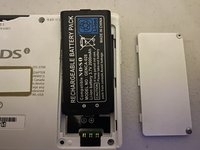
Once you've removed the plastic panel, you'll have full access to the battery pack.
-
Using the spudger/prytool or gently tapping the DSI, lift and remove the battery upwards and away from the device.
-
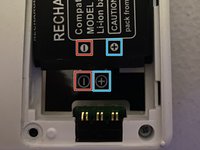
Positive
-
Negative
-
-
-
Once you've reinstalled/replaced the battery pack. Reinstall the plastic panel, making sure to line up the plastic hinges on the side adjacent to the screws.
-
Drop the panel into place and retighten both of the screws.
-


Congratulations! You just replaced your Nintendo DSi's battery!
7 の人々がこのガイドを完成させました。
