はじめに
この修理ガイドは、Nintendo DSの上部LCDスクリーンを交換する方法です。 スクリーンの修理必要なすべてのツールは、以下のツールセクションで参照または購入できます。 リボンケーブルを取り外したり移動させる作業では、ケーブルを切断したり、損傷させないように注意してください。 2つの回路基板を接続している黒と赤のワイヤーを引き裂いたり、破損させないよう、スクリーンをケースから外す際も注意が必要です。 これらのコンポーネントのいずれかの損傷は修理できない場合があり、このガイドでは対応外です。 これらのパーツの損傷を防ぐために、適切なツールを使用して正しいやり方で作業を進めてください。
必要な工具と部品
-
-
手でメインケースからバックパネルを持ち上げます。
-
前部と後部に分解し、後部を脇に置いておきます。
If some of your screws spin free but can’t be removed, it maybe that the screw posts have separated from the shell.
This makes separating the back panel more difficult, but it will still work.
The plastic used for the original silver nds may be the most prone to the UV damage that causes the plastic to become brittle.
-
-
-
-
黒いクリップを上向きに動かして、2つの大型リボンケーブルをアンロックします。
-
慎重にリボンケーブルを引き下ろして、指で外します。
Benutze für die nächsten Schritte besser einen Spudger und keine Pinzette,
sonst läufst du Gefahr eines der Kabel oder die Platine selbst zu beschädigen.
Better use a Spudger, not a Tweezer for the next Steps.
That minimize the risk to demolish one of the wires or the mainboard himself.
That’s what i did but it didn’t work
-
-
-
一番右の大型リボンケーブルの下に搭載された、小型のリボンケーブル2本を確認します。
-
小型のリボンケーブル用のロックを横にスライドして、ケーブルを取り出します。
Does anyone know where I can get a new connector for the P6 connector? I can only find them for the ds lite
-
-
-
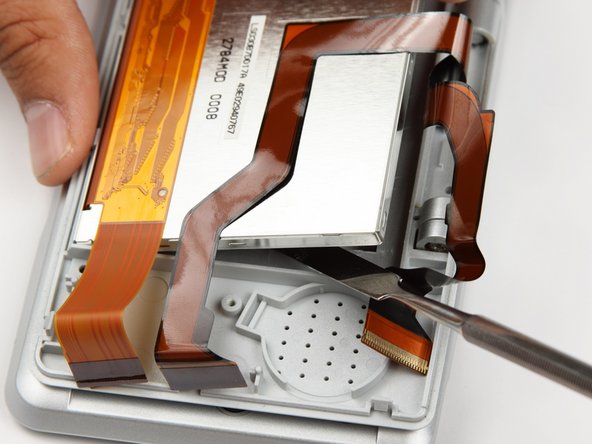
マイナスドライバー、ピンセット、デンタルフロスもしくは爪楊枝を使って、スクリーンのゴムカバーを外します。
-
#00プラスドライバーを使って、カバーの下のネジを外します。
Now that the original NDS is getting on in years, it’s possible that these silicone covers have become more fragile. I’ve shredded all 4 silver covers of my original silver nds.
-
-
-
本体からトップカバーを外します。
-
#00プラスドライバーを使って、ヒンジカバーを固定しているネジを外します。
-
ヒンジカバーを取り出して、脇に保管します。
-
-
-
#00プラスドライバーを使って、スピーカーの回路基板を固定している2本のネジを外します。
-
2本の小さな回路基板を取り出して、脇に保管します。
-
-
-
開口ツールを使って、シェルから上部スクリーンを慎重に持ち上げて取り出します。
-
上部スクリーンを脇に保管します。
-


デバイスを再組立する際は、これらのインストラクションを逆の順番に従って作業を進めてください。
デバイスを再組立する際は、これらのインストラクションを逆の順番に従って作業を進めてください。
40 の人々がこのガイドを完成させました。
以下の翻訳者の皆さんにお礼を申し上げます:
100%

Midori Doiさんは世界中で修理する私たちを助けてくれています! あなたも貢献してみませんか?
翻訳を始める ›
チーム

Cal Poly, Team 18-3, Maness Fall 2009 Cal Poly, Team 18-3, Maness Fall 2009人のメンバー
CPSU-MANESS-F09S18G3
4 メンバー
28のガイドは作成済み
11 件のコメント
Unlike the DS Lite and later models, there is no reason to take apart the bottom portion of the original DS in order to remove the top screen. The first ten steps of this guide could be skipped.
PohTayToez - 返信
Thanks great advice
Can a ds lite screen be used to repair a ds??
Nope, Nintendo engineered the Lite as a refinement of the original. Therefore almost every component is different! Likely to become cheaper to manufacture.
Can a ds lite screen be used to repair a ds one?? Lots of ds lite screens about......
How do we go about repairing it though we only know how to get it out now
I followed the steps, but after getting everything put back together neither screen will light up. It will still take a charge and makes a noise when the start button is hit, but I can’t even get either screen to flash… any ideas what I did wrong here?
Make sure that the ribbon cables are properly and fully inserted - they may go in further than what you think.
If not the screens will not display anything.
How much do you think it would cost to get this fixed in store?
Where can I buy the replacement screens?
Amazing guide!!! I mashed 2 Broken Ds's together on my first try, it only took an hour. Thank you soooo much.