メインコンテンツにスキップ

Nintendo 64 Motherboard Replacement

必要な工具と部品

  1. Nintendo 64 Motherboard Replacement, Top Cover: 手順 1、 1の画像 1
    • Remove the expansion pack cover by pushing in the tab and pulling out.

  2. Nintendo 64 Motherboard Replacement: 手順 2、 1の画像 1
    • If your system uses a jumper pack, the same procedure applies to remove it.

    • A small spoon can be used in place of a spudger.

    • Lever the expansion pack out using a metal spudger.

  3. Nintendo 64 Motherboard Replacement: 手順 3、 1の画像 1
    • Remove the six screws on the bottom side indicated in the example with a gamebit head or screwdriver.

  4. Nintendo 64 Motherboard Replacement: 手順 4、 1の画像 1
    • Remove the two front feet of the N64.

  5. Nintendo 64 Motherboard Replacement: 手順 5、 1の画像 1
    • Rotate to top side up and lift off top cover.

  6. Nintendo 64 Motherboard Replacement, Metal Plate: 手順 6、 2の画像 1 Nintendo 64 Motherboard Replacement, Metal Plate: 手順 6、 2の画像 2
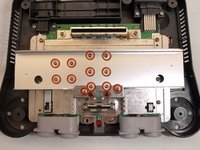
    • Remove the fourteen screws indicated in the example using the larger Phillips screwdriver.

  7. Nintendo 64 Motherboard Replacement: 手順 7、 2の画像 1 Nintendo 64 Motherboard Replacement: 手順 7、 2の画像 2
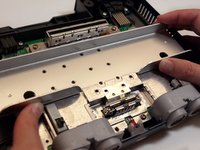
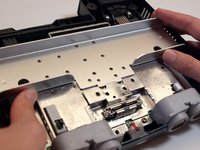
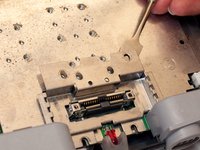
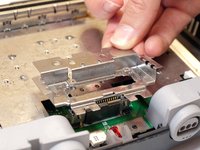
    • Remove the metal plate indicated in the example by sliding it back and then lifting it up.

  8. Nintendo 64 Motherboard Replacement: 手順 8、 1の画像 1
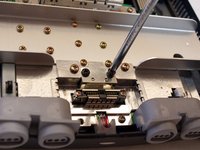
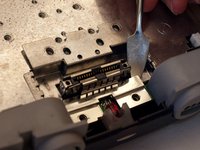
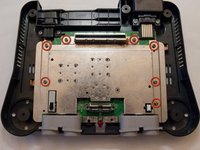
    • Remove the two screws indicated in the example using the smaller Phillips screwdriver.

  9. Nintendo 64 Motherboard Replacement: 手順 9、 1の画像 1
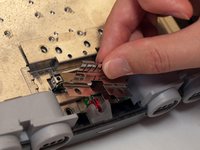
    • Remove the screw to the right of the LED light using the larger Phillips screwdriver.

  10. Nintendo 64 Motherboard Replacement: 手順 10、 1の画像 1
    • Remove the small metal bracket from the back of the expansion pack slot.

  11. Nintendo 64 Motherboard Replacement: 手順 11、 2の画像 1 Nintendo 64 Motherboard Replacement: 手順 11、 2の画像 2
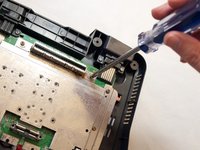
    • Remove the small metal bracket from the front of the expansion pack slot with the metal spudger.

  12. Nintendo 64 Motherboard Replacement: 手順 12、 2の画像 1 Nintendo 64 Motherboard Replacement: 手順 12、 2の画像 2
    • Remove the small metal bracket behind the expansion slot using the spudger.

  13. Nintendo 64 Motherboard Replacement: 手順 13、 2の画像 1 Nintendo 64 Motherboard Replacement: 手順 13、 2の画像 2
    • Remove the seven screws indicated in the example using the larger Phillips screwdriver.

  14. Nintendo 64 Motherboard Replacement: 手順 14、 1の画像 1
    • Lift off and remove the metal plate as indicated in the example.

  15. Nintendo 64 Motherboard Replacement, Motherboard: 手順 15、 1の画像 1
    • Remove the four screws indicated using the #1 Phillips screwdriver.

  16. Nintendo 64 Motherboard Replacement, Motherboard removal: 手順 16、 1の画像 1
    • Lift up and remove the motherboard.

終わりに

To reassemble your device, follow these instructions in reverse order.

36 の人々がこのガイドを完成させました。

作成者

11人の作成者と共同で作成されました。

tonymag28

メンバー登録日: 10/28/09

2,154 ポイント

3のガイドは作成済み

チーム

Cal Poly, Team 5-4, Regan Fall 2009 Cal Poly, Team 5-4, Regan Fall 2009人のメンバー

CPSU-REGAN-F09S5G4

7 メンバー

15のガイドは作成済み

2 件のコメント

4.2mm doesn't seem right. When I looked to purchase all I saw was 4.5mm and now that I have one in my hand it seems to fit very precisely on the screws on my N64.

negroslim - 返信

i got the second comment :whyy:

Sqwerks - 返信

コメントを追加

統計データ:

過去 24時間: 13

過去 7 日: 76

過去 30 日: 253

今までの合計 63,147