メインコンテンツにスキップ

Nintendo 3DS Left Shoulder Button Replacement

必要な工具と部品

  1. Nintendo 3DS Left Shoulder Button Replacement, Back Cover: 手順 1、 1の画像 1
    • Unscrew the four Phillips #00 screws along the top of the back cover.

    • The screws are held in place by locking washers, and will not come out of the back cover.

    • The comments section is full of unlucky souls who will tell you that the screws here through step 4 will strip incredibly easily. Press down fairly hard, and go slow.

  2. Nintendo 3DS Left Shoulder Button Replacement: 手順 2、 2の画像 1 Nintendo 3DS Left Shoulder Button Replacement: 手順 2、 2の画像 2
    • Hold the device in one hand and turn it over.

    • Grab the top edge of the back cover with your opposite hand so that the cover does not fall back into place.

    • Flip the 3DS over again so that the back cover is facing up.

    • Pull the back cover up and away from the rest of the device to remove it.

  3. Nintendo 3DS Left Shoulder Button Replacement, Battery: 手順 3、 3の画像 1 Nintendo 3DS Left Shoulder Button Replacement, Battery: 手順 3、 3の画像 2 Nintendo 3DS Left Shoulder Button Replacement, Battery: 手順 3、 3の画像 3
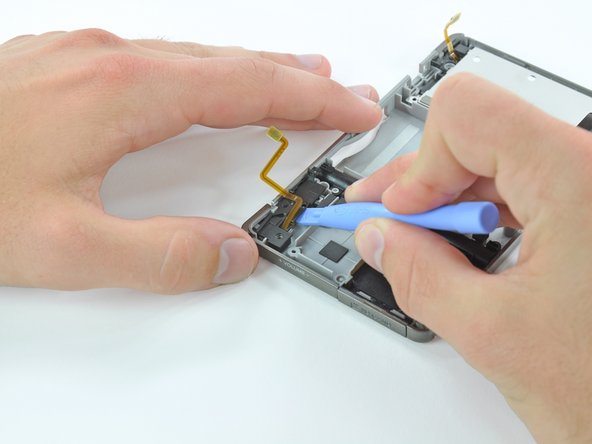
    • Insert a plastic opening tool into the notch in the lower case above the battery.

    • Pry the battery up with the plastic opening tool.

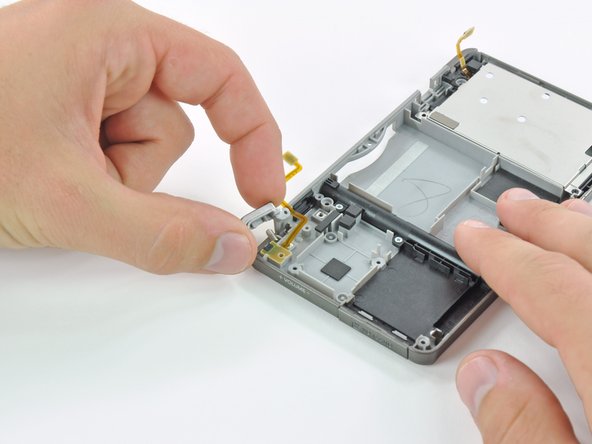
    • Grab the top edge of the battery and lift it out of the lower case.

  4. Nintendo 3DS Left Shoulder Button Replacement, Lower Case: 手順 4、 1の画像 1
    • Remove the nine 6.3 mm black Phillips screws from the lower case.

    • These screws will strip very easily unless you use the correct size bit. Apply pressure to the screws while turning to avoid stripping them.

    • Remove the 2.4 mm silver Phillips screw above the game cartridge slot.

  5. Nintendo 3DS Left Shoulder Button Replacement: 手順 5、 3の画像 1 Nintendo 3DS Left Shoulder Button Replacement: 手順 5、 3の画像 2 Nintendo 3DS Left Shoulder Button Replacement: 手順 5、 3の画像 3
    • Lift the bottom edge of the lower case off the rest of the 3DS.

    • There are still two ribbon cables connecting the mother board to the case, so be sure not to pull the lower case all the way off.

    • Use a plastic opening tool to pry the shoulder button ribbon cables off their sockets on the motherboard.

    • Remove the lower case from the device.

  6. Nintendo 3DS Left Shoulder Button Replacement, Left Shoulder Button: 手順 6、 1の画像 1
    • Remove the three 3.6 mm Phillips screws from the button housing.

  7. Nintendo 3DS Left Shoulder Button Replacement: 手順 7、 3の画像 1 Nintendo 3DS Left Shoulder Button Replacement: 手順 7、 3の画像 2 Nintendo 3DS Left Shoulder Button Replacement: 手順 7、 3の画像 3
    • Insert a plastic opening tool under the left side of the left shoulder button cover.

    • Pry the black plastic cover up from the lower case.

    • Grab the cover and lift it off of the lower case.

    • If the shoulder button contact and ribbon cable come off with the cover, be sure to reinstall them in the correct orientation.

  8. Nintendo 3DS Left Shoulder Button Replacement: 手順 8、 3の画像 1 Nintendo 3DS Left Shoulder Button Replacement: 手順 8、 3の画像 2 Nintendo 3DS Left Shoulder Button Replacement: 手順 8、 3の画像 3
    • Press lightly on the back of the button until it becomes unattached. Be careful not to lose the small spring and pin behind the plastic button.

終わりに

To reassemble your device, follow these instructions in reverse order.

42 の人々がこのガイドを完成させました。

作成者

8人の作成者と共同で作成されました。

David Hodson

メンバー登録日: 04/13/10

150,526 ポイント

127のガイドは作成済み

0 件のコメント

コメントを追加

統計データ:

過去 24時間: 15

過去 7 日: 158

過去 30 日: 689

今までの合計 53,994