はじめに
マザーボードの交換です。難易度は高く、デリケートなリボンケーブルにご注意ください。
必要な工具と部品
-
-
-
マザーボード右上コーナー付近にある、Joystickアセンブリを確認します。
-
Joystickの裏側から8mm #00 プラスネジを2本外します。
-
スパッジャーの平面側先端を使って、プラスチックの筐体よりJoystickパッドを剥がします。
-
-
-
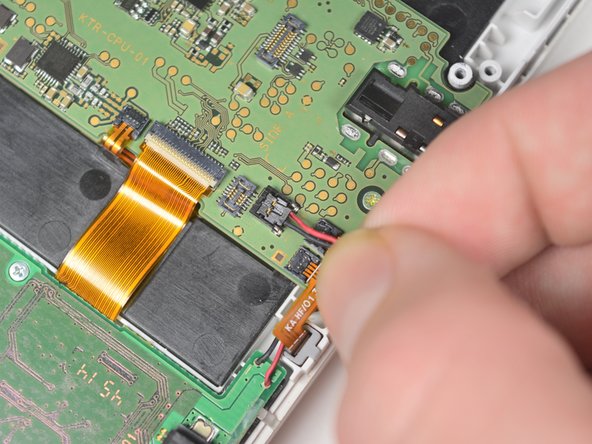
黒と赤いワイヤで印されたパワーケーブルを、慎重にコネクタから引き抜いて外します。
-
慎重にリボンケーブルを4本のZIFコネクタから引き抜きます。
is this possible to fix these connectors once they are “broken” ?
Another bump, but I am also wondering if it is possible to fix these ZIF connectors.
-
-
-
マザーボードを筐体に固定している、3mm#00ネジを3本外します。
-
ヘッドホンジャックからマザーボードを慎重に持ち上げます。
-
ZIFコネクタの固定タブを持ち上げて、デバイス背面にある2つのリボンを取り外します。
Far right screw was already missing. It appears this occurred in the demonstration unit as well, based on the image for step 12.
it's not missing ^^ it is an error by the writer or the article. this screw is actually matching with one of the outer casing
Is this motherboard the same as the xl?
Wondering this as well. Can’t seem to find a replacement board.
Joseph -
-


デバイスを再組立する際は、これらのインストラクションを逆の順番に従って作業を進めてください。
デバイスを再組立する際は、これらのインストラクションを逆の順番に従って作業を進めてください。
6 の人々がこのガイドを完成させました。
以下の翻訳者の皆さんにお礼を申し上げます:
100%

Midori Doiさんは世界中で修理する私たちを助けてくれています! あなたも貢献してみませんか?
翻訳を始める ›
チーム

Cal Poly, Team 4-6, Livingston Fall 2016 Cal Poly, Team 4-6, Livingston Fall 2016人のメンバー
CPSU-LIVINGSTON-F16S4G6
4 メンバー
35のガイドは作成済み