メインコンテンツにスキップ

Ninja Professional Blender BL660 Fan Replacement

必要な工具と部品

  1. Ninja Professional Blender BL660 Fan Replacement, Blender Base: 手順 1、 2の画像 1 Ninja Professional Blender BL660 Fan Replacement, Blender Base: 手順 1、 2の画像 2
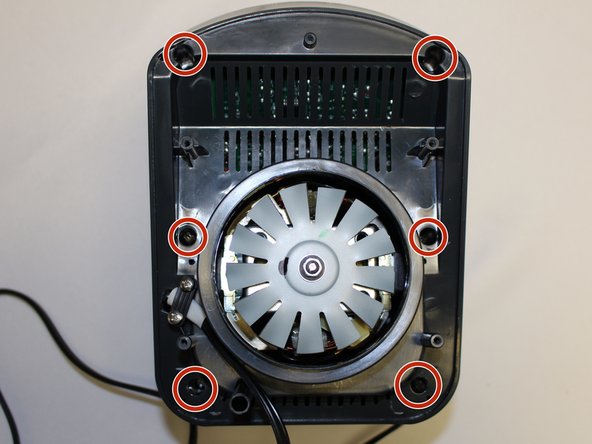
    • Using the Phillips #1 screwdriver, remove the 5 screws (13mm long, 6mm wide) holding the outer base.

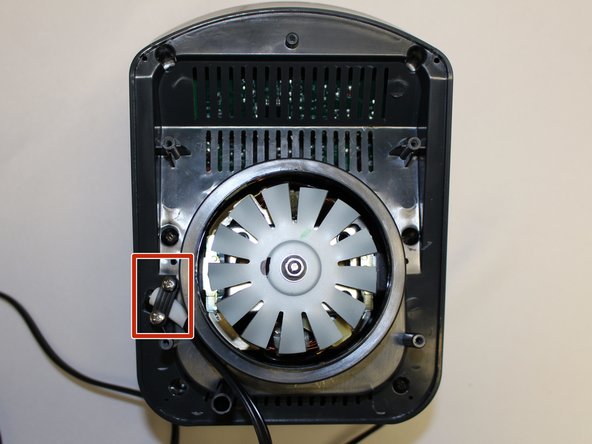
    • Lift the base up to remove it.

  2. Ninja Professional Blender BL660 Fan Replacement: 手順 2、 2の画像 1 Ninja Professional Blender BL660 Fan Replacement: 手順 2、 2の画像 2
    • Remove the midsection by pulling it up. If the section is stuck, use the iFixit plastic opening tool to pry it off.

    • Pull the power cord through the mid-section opening.

  3. Ninja Professional Blender BL660 Fan Replacement: 手順 3、 2の画像 1 Ninja Professional Blender BL660 Fan Replacement: 手順 3、 2の画像 2
    • Using the Phillips #1 screwdriver, remove the 6 screws (13 mm long, 6 mm wide).

  4. Ninja Professional Blender BL660 Fan Replacement: 手順 4、 2の画像 1 Ninja Professional Blender BL660 Fan Replacement: 手順 4、 2の画像 2
    • Using the Phillips #1 screwdriver, remove the two screws (5 mm long, 3 mm wide) holding the power cord onto the motor cover.

  5. Ninja Professional Blender BL660 Fan Replacement: 手順 5、 2の画像 1 Ninja Professional Blender BL660 Fan Replacement: 手順 5、 2の画像 2
    • Using the iFixit plastic opening tool, pry the motor cover off the general housing. Once it is loose, lift it up to remove it off the base.

    • Slide the cover all the way to the end of the power cord.

    • Please note that the power cord does not completely come off the cover.

  6. Ninja Professional Blender BL660 Fan Replacement, Fan: 手順 6、 1の画像 1
    • Use a wrench or a pair of pliers to help remove the nut on top of the fan. Holding the fan itself will help make the process easier.

    • The fan blades are sharp. Handle with care. Using a paper towel or cloth while handling is recommended.

  7. Ninja Professional Blender BL660 Fan Replacement: 手順 7、 1の画像 1
    • Use the plastic opening tool to loosen the washer.

  8. Ninja Professional Blender BL660 Fan Replacement: 手順 8、 2の画像 1 Ninja Professional Blender BL660 Fan Replacement: 手順 8、 2の画像 2
    • Remove washer then slide the fan off the screw.

    • Replace the fan as needed.

    • The fan has a keyed hole, thus it fits on the shaft in a specific way. Ensure you put it on correctly.

終わりに

To reassemble your device, follow these instructions in reverse order.

作成者

4人の作成者と共同で作成されました。

Mikey Marquiss

メンバー登録日: 09/22/17

219 ポイント

2のガイドは作成済み

チーム

コメント 1 件

I did that but the other fan is the one that is lock and do not turn on. The white one in the middle. How can I fix it.

Tania Polanco - 返信

コメントを追加

統計データ:

過去 24時間: 1

過去 7 日: 3

過去 30 日: 12

今までの合計 746