メインコンテンツにスキップ

Ninja Master Prep QB900B button replacement

必要な工具と部品

  1. Ninja Master Prep QB900B button replacement, The Ninja Master Prep QB900B: 手順 1、 1の画像 1
    • Place the blender to the side.

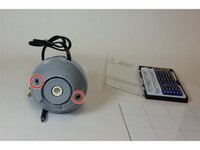
  2. Ninja Master Prep QB900B button replacement: 手順 2、 2の画像 1 Ninja Master Prep QB900B button replacement: 手順 2、 2の画像 2
    • Remove the two highlighted screws with a Phillips #2 Screw Driver

    • Gently pull off the top.

  3. Ninja Master Prep QB900B button replacement, Button: 手順 3、 1の画像 1
    • Remove the highlighted screws.

  4. Ninja Master Prep QB900B button replacement: 手順 4、 1の画像 1
    • Pull out the highlighted spring.

    • Now wash the button with soap and water, and follow the guide backwards to reassemble.

終わりに

To reassemble your device, follow these instructions in reverse order.

2 の人々がこのガイドを完成させました。

作成者

3人の作成者と共同で作成されました。

Kamal Taha

メンバー登録日: 08/27/15

679 ポイント

5のガイドは作成済み

チーム

USF Tampa, Team 1-3, Sullivan Fall 2015 USF Tampa, Team 1-3, Sullivan Fall 2015人のメンバー

USFT-SULLIVAN-F15S1G3

3 メンバー

5のガイドは作成済み

2 件のコメント

mine has different screws and they won’t come out easily. looks like it might have a star head. thought it was hex and now the screws are stripped :(

Stephen Filippone - 返信

turns out it was a security torx. how annoying.

Stephen Filippone - 返信

コメントを追加

統計データ:

過去 24時間: 0

過去 7 日: 0

過去 30 日: 2

今までの合計 1,934