メインコンテンツにスキップ

この修理ガイドは変更されています。最新の未承認バージョンに切り替えます。

Nikon D610 Autofocus Drive Motor Replacement

必要な工具と部品

  1. Nikon D610 Autofocus Drive Motor Replacement, Battery: 手順 1、 1の画像 1
    • First, power off the device.

  2. Nikon D610 Autofocus Drive Motor Replacement: 手順 2、 3の画像 1 Nikon D610 Autofocus Drive Motor Replacement: 手順 2、 3の画像 2 Nikon D610 Autofocus Drive Motor Replacement: 手順 2、 3の画像 3
    • Set the camera so that it is sitting on its side.

    • Open the battery compartment door by sliding the release button towards the lens.

    • This will cause the door to "pop" open slightly

  3. Nikon D610 Autofocus Drive Motor Replacement: 手順 3、 2の画像 1 Nikon D610 Autofocus Drive Motor Replacement: 手順 3、 2の画像 2
    • Now lift open the battery compartment door.

    • Push the yellow tab lock towards the center to release the battery.

    • This will cause the battery to jump up as there is a spring at the bottom.

    • Pull straight out, slowly on the battery.

    • Make sure you pay attention to which way the battery goes .

  4. Nikon D610 Autofocus Drive Motor Replacement, Outer Case: 手順 4、 1の画像 1
    • After removal of the battery. Pull the battery compartment door away from the lens.

    • There are eleven Philips head screws that hold the bottom cover on, including a few inside the battery compartment.

    • Remove all the screws and the bottom face should pop off easily.

  5. Nikon D610 Autofocus Drive Motor Replacement: 手順 5、 3の画像 1 Nikon D610 Autofocus Drive Motor Replacement: 手順 5、 3の画像 2 Nikon D610 Autofocus Drive Motor Replacement: 手順 5、 3の画像 3
    • Then next step is removing the seven Philips #00 screws that hold the rear face plate on.

    • There are screws hidden in three separate spots.

    • One is under the rubber doors on the left side of the camera. the next one at the eye hole.

    • The final one involves taking off the small dial that is about half an inch to the right of the eye hole.

    • Removing this dial involves putting a spungder tool behind it and applying a gradual amount of pressure.

  6. Nikon D610 Autofocus Drive Motor Replacement: 手順 6、 2の画像 1 Nikon D610 Autofocus Drive Motor Replacement: 手順 6、 2の画像 2
    • The rear face plate will include the LCD display it separates from the body of the camera with a small tug.

    • Do not pull to hard otherwise you risk breaking the ribbon wire that connects the controls and the screen.

    • Once there is enough space it will be possible to gently pull the ribbon cable out of their ports.

  7. Nikon D610 Autofocus Drive Motor Replacement: 手順 7、 2の画像 1 Nikon D610 Autofocus Drive Motor Replacement: 手順 7、 2の画像 2
    • The next piece to come off is the front plate and the red grip.

    • The front plate is held on by 2 Philips #00 screws on the front and two more beneath the flash bulb.

    • Remove the two Phillips #00 screws holding on the grip and it slides off easily.

    • After removing the screws the face plate comes off by pulling it straight off to avoid damage.

  8. Nikon D610 Autofocus Drive Motor Replacement: 手順 8、 2の画像 1 Nikon D610 Autofocus Drive Motor Replacement: 手順 8、 2の画像 2
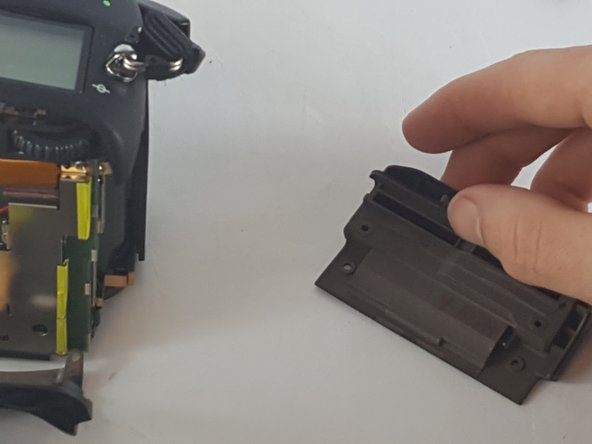
    • It is now possible to remove the last three Philips #00 screws that are hidden under the memory card slot door.

    • The screws come out and the cover comes straight off.

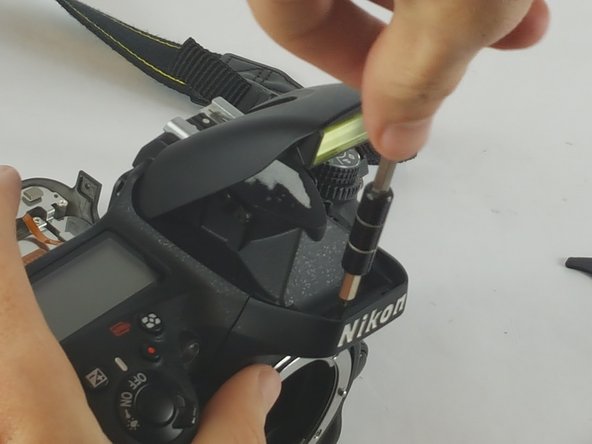
    • The last cover plate is the top. The top is held on by two screws located just beneath the rim of the cover.

    • The top should be pulled off very slowly. There are several electronic components that connect between the body and the top.

    • There are three wires that need to be disconnected.

  9. Nikon D610 Autofocus Drive Motor Replacement, Motherboard: 手順 9、 2の画像 1 Nikon D610 Autofocus Drive Motor Replacement, Motherboard: 手順 9、 2の画像 2
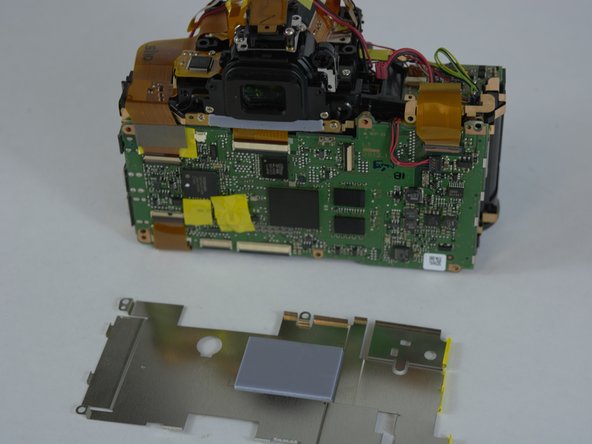
    • The rear side of the camera is where the motherboard is located. It is visible after you have taken off the rear face plate.

    • Remove the shield that protects it from static first.

    • This shield has six Philips #00 screws that are positioned around the edge of the shield.

    • After removal of the screws the shield will come free from the motherboard.

  10. Nikon D610 Autofocus Drive Motor Replacement: 手順 10、 2の画像 1 Nikon D610 Autofocus Drive Motor Replacement: 手順 10、 2の画像 2
    • The six screws that were removed in the previous step also hold the motherboard in place.

    • There are a few ribbon cables that connect to the motherboard to the rest of the camera with some of them hiding under other ribbon cables.

    • Be very careful when removing the ribbon wires. If they break it can cause problems with needing more repairs.

  11. Nikon D610 Autofocus Drive Motor Replacement, Autofocus Drive Motor: 手順 11、 3の画像 1 Nikon D610 Autofocus Drive Motor Replacement, Autofocus Drive Motor: 手順 11、 3の画像 2 Nikon D610 Autofocus Drive Motor Replacement, Autofocus Drive Motor: 手順 11、 3の画像 3
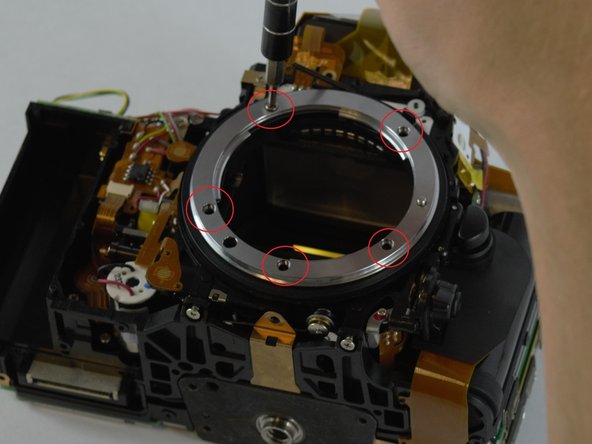
    • The focus motor is located in between the right hand grip and the lens socket and requires several parts to be replaced as a whole because it is unreachable.

    • Begin by removing the silver ring around the lens socket by unscrewing the five screws supporting it.

  12. Nikon D610 Autofocus Drive Motor Replacement: 手順 12、 1の画像 1
    • Several screw and ribbon cables and the bottom portion of the camera need to be removed as shown in the picture

  13. Nikon D610 Autofocus Drive Motor Replacement: 手順 13、 3の画像 1 Nikon D610 Autofocus Drive Motor Replacement: 手順 13、 3の画像 2 Nikon D610 Autofocus Drive Motor Replacement: 手順 13、 3の画像 3
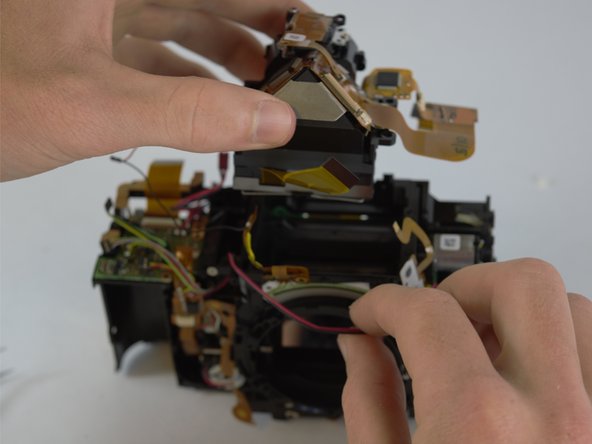
    • Now that the bottom is prepped we move onto the top.

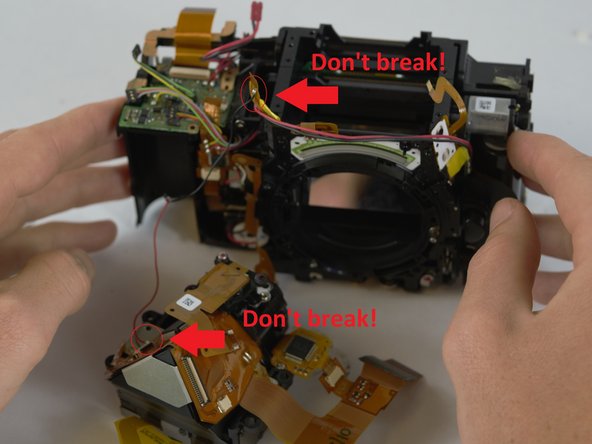
    • Here we have more ribbon cables and screws that need to be removed that will end up releasing the top viewing lens area.

    • Some of the ribbon cables reach back around to the motherboard and may need to be removed there.

    • Also, there is a wire that runs along the top that just needs to be shifted out of the way.

    • be careful not to break the red or black wire attached to some of the ribbon cables as they will need to be re-soldered if broken.

  14. Nikon D610 Autofocus Drive Motor Replacement: 手順 14、 2の画像 1 Nikon D610 Autofocus Drive Motor Replacement: 手順 14、 2の画像 2
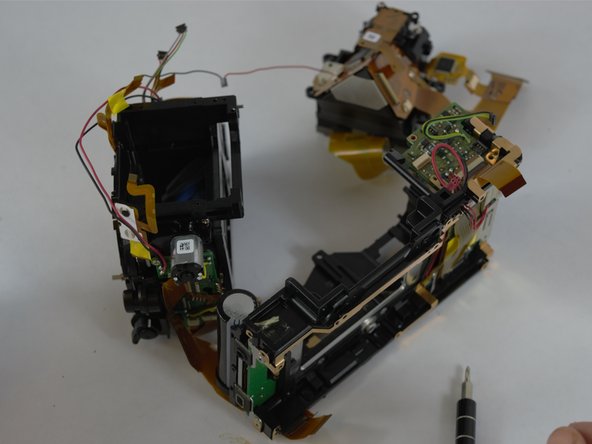
    • This is where having the motherboard off is necessary as the screws we need are burrowed at the very heart of the camera.

    • Four more screws and two ribbon cables marked by the red circles need to be removed to release what we need.

    • The blue circles indicate the screws that don't need to be undone to get to what we need.

  15. Nikon D610 Autofocus Drive Motor Replacement: 手順 15、 2の画像 1 Nikon D610 Autofocus Drive Motor Replacement: 手順 15、 2の画像 2
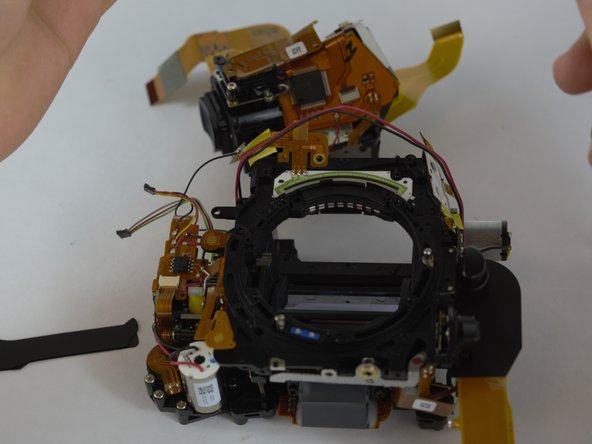
    • At last, the holy grail. We finally have the part that we want.

    • At this point, damage to the camera becomes highly probable if we were to continue to take it apart and we recommend replacing the entire lens housing.

    • We do not recommend tearing down any further as damage is likely to occur.

終わりに

To reassemble your device, follow these instructions in reverse order.

4 の人々がこのガイドを完成させました。

作成者

4人の作成者と共同で作成されました。

Daniel Eagan

メンバー登録日: 02/10/16

606 ポイント

5のガイドは作成済み

チーム

USF Tampa, Team 4-4, Lacy Spring 2016 USF Tampa, Team 4-4, Lacy Spring 2016人のメンバー

USFT-LACY-S16S4G4

3 メンバー

6のガイドは作成済み

コメント 1 件

I had a D610 where the mirror wouldn't go down properly after is was knocked, I had a look at fixing it but it is basically unserviceable apart from the most basic and superficial repairs repairs, shame really, it was a nice old camera, but to be honest I wasn't surprised. I'm going to buy another second hand and keep the bits for spares or as a memento mori.

Marvin T P Android - 返信

コメントを追加

統計データ:

過去 24時間: 3

過去 7 日: 11

過去 30 日: 53

今までの合計 5,496