メインコンテンツにスキップ

Nikon Coolpix S3500 LCD Screen Replacement

必要な工具と部品

  1. Nikon Coolpix S3500 LCD Screen Replacement, Remove Bottom Screws: 手順 1、 2の画像 1 Nikon Coolpix S3500 LCD Screen Replacement, Remove Bottom Screws: 手順 1、 2の画像 2
    • Make sure to remove the battery - memory card - strap from the unit.

    • Remove 2 (4mm) screws from the bottom of the camera.

    • Remove 2 (4mm) screws from the bottom side of the camera.

  2. Nikon Coolpix S3500 LCD Screen Replacement, Remove Side Screws: 手順 2、 2の画像 1 Nikon Coolpix S3500 LCD Screen Replacement, Remove Side Screws: 手順 2、 2の画像 2
    • Remove 2 (4mm) screws from the right side of the camera.

    • Remove 2 (4mm) screws from the left side of the camera.

  3. Nikon Coolpix S3500 LCD Screen Replacement, Remove Rear Cover: 手順 3、 3の画像 1 Nikon Coolpix S3500 LCD Screen Replacement, Remove Rear Cover: 手順 3、 3の画像 2 Nikon Coolpix S3500 LCD Screen Replacement, Remove Rear Cover: 手順 3、 3の画像 3
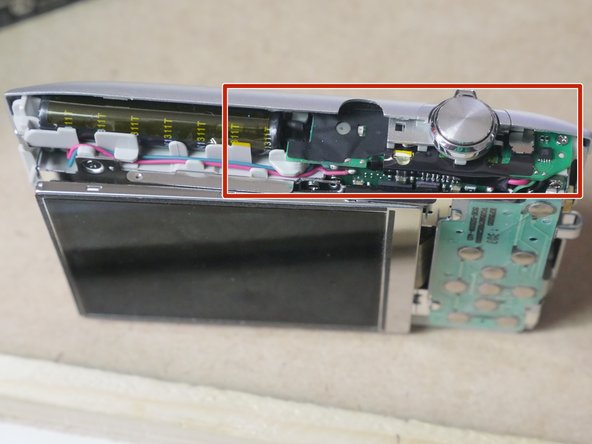
    • Use a spudger or other plastic tool and carefully work your way around the seam and carefully Pry off the rear case.

    • Carefull not to loose the A/V Out cover. Remove it and set it aside.

  4. Nikon Coolpix S3500 LCD Screen Replacement: 手順 4、 2の画像 1 Nikon Coolpix S3500 LCD Screen Replacement: 手順 4、 2の画像 2
    • Shock Hazard! Do not touch anywhere along the top panel. Capacitor will still hold a residual charge that will shock you if touched. It is best to discharge the capacitor using the two metal solder joints on the top panel in front of the black tape

    • Remove 1 (3mm) screw from the right side of unit.

  5. Nikon Coolpix S3500 LCD Screen Replacement: 手順 5、 3の画像 1 Nikon Coolpix S3500 LCD Screen Replacement: 手順 5、 3の画像 2 Nikon Coolpix S3500 LCD Screen Replacement: 手順 5、 3の画像 3
    • Release Flex Cable from socket. Remove carefully. Just pull it out using tweezers or similar tool.

    • Slide the Rear Buttons ASSY to the right and them remove it

  6. Nikon Coolpix S3500 LCD Screen Replacement: 手順 6、 3の画像 1 Nikon Coolpix S3500 LCD Screen Replacement: 手順 6、 3の画像 2 Nikon Coolpix S3500 LCD Screen Replacement: 手順 6、 3の画像 3
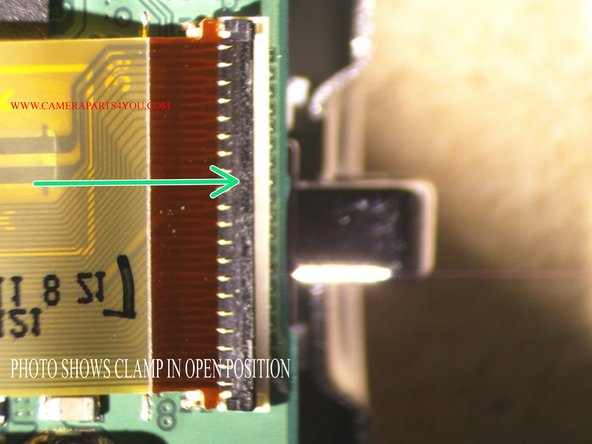
    • Release the cable clamp using a spudger or similar tool.. or just use your fingernail. Be careful because the clamp breaks easily. Another way to release the cable is to just pull the LCD cable out carefully... this will automatically release the clamp without the risk of damaging the clamp

    • If you decide to pull the cable out make sure you hold the flex cable tightly and pull horizontal to its installed position away from the clamp. Do not hold the LCD!!! Hold only the flex cable and hold it tight.

    • Example photos of open and closed ziff socket clamps

  7. Nikon Coolpix S3500 LCD Screen Replacement, Install New Screen: 手順 7、 1の画像 1
    • Remove the LCD and Install the replacement Screen. Reverse the instructions to Assemble the unit

終わりに

To reassemble your device, follow these instructions in reverse order.

作成者

2人の作成者と共同で作成されました。

Sales Cameraparts4you

メンバー登録日: 07/01/16

3,150 ポイント

20のガイドは作成済み

コメント 1 件

The screen worked great. However, it now displays in negative. Images stored are in the proper colors. Do I need to back to re-check any item(s)?

Emil Scully - 返信

コメントを追加

統計データ:

過去 24時間: 0

過去 7 日: 8

過去 30 日: 21

今までの合計 1,144