メインコンテンツにスキップ

Nikon Coolpix L830 Shutter Button Replacement

必要な工具と部品

  1. Nikon Coolpix L830 Shutter Button Replacement, Back Casing: 手順 1、 1の画像 1
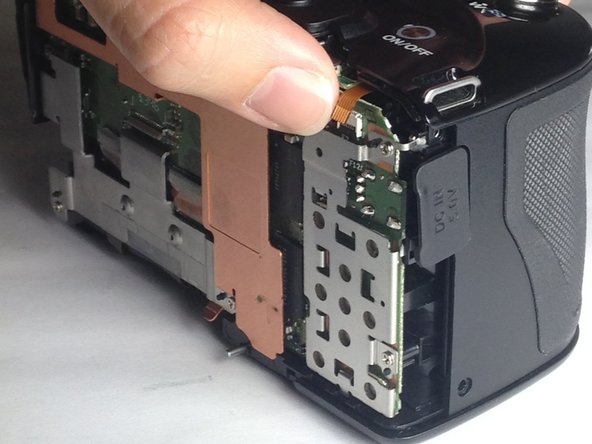
    • Use a Phillips #000 screwdriver to unscrew the two 3.0mm Phillips screws located on the side of the camera with the HDMI port.

    • The HDMI port side will be on the left if you are looking at the back of the camera with the LCD monitor.

    • One screw is located under the gray flap.

  2. Nikon Coolpix L830 Shutter Button Replacement: 手順 2、 1の画像 1
    • Unscrew the five 3.0mm Phillips #000 screws that are located on the bottom side of the camera.

  3. Nikon Coolpix L830 Shutter Button Replacement: 手順 3、 1の画像 1
    • Unscrew the 4.0mm Phillips #000 screw located underneath the grey flap on the side of the camera with the "DC IN 5.0 V" marker.

    • This will be on the right if you are looking at the back LCD monitor side.

    • Unscrew the exposed 3.0mm Phillips #000 screw on the same side.

  4. Nikon Coolpix L830 Shutter Button Replacement: 手順 4、 1の画像 1
    • Press the flash button to open the flash component.

    • Remove the 3.0mm Phillips #000 screw located directly in-between the two arms.

  5. Nikon Coolpix L830 Shutter Button Replacement: 手順 5、 1の画像 1
    • Open the LCD monitor to reveal two 2.0mm Phillips screws.

    • Remove the 2.0mm Phillips #000 screws.

  6. Nikon Coolpix L830 Shutter Button Replacement: 手順 6、 2の画像 1 Nikon Coolpix L830 Shutter Button Replacement: 手順 6、 2の画像 2
    • Make sure to open the plastic grey flaps on either side of the camera before proceeding with this step.

    • Insert a plastic opening tool between the back and front surface components of the camera.

    • Wiggle the plastic opening tool backwards and forwards along the top edge until the back surface comes off.

    • Remove the back casing gently to not damage the LCD ribbon connector or inner camera components.

  7. Nikon Coolpix L830 Shutter Button Replacement: 手順 7、 2の画像 1 Nikon Coolpix L830 Shutter Button Replacement: 手順 7、 2の画像 2
    • Gently pull the LCD ribbon connector up to allow the back casing to be completely removed.

  8. Nikon Coolpix L830 Shutter Button Replacement, Shutter Button: 手順 8、 1の画像 1
    • Open the battery panel on the bottom of the camera by pushing the slider up and tugging the battery panel to the right.

    • Remove the 3.0mm Phillips screw in the top battery panel.

    • The screw is located in the dark recesses at the end of the battery chamber, which will make screw removal difficult. Be gentle to avoid stripping screw.

  9. Nikon Coolpix L830 Shutter Button Replacement: 手順 9、 1の画像 1
    • Remove the 3.0mm Phillips #000 screw located above the grey power flap on the side of the camera.

  10. Nikon Coolpix L830 Shutter Button Replacement: 手順 10、 2の画像 1 Nikon Coolpix L830 Shutter Button Replacement: 手順 10、 2の画像 2
    • Use your finger to gently pull up the wire ribbon which connects the shutter button to the motherboard.

    • The wire ribbon is located at the top right corner of the motherboard.

  11. Nikon Coolpix L830 Shutter Button Replacement: 手順 11、 2の画像 1 Nikon Coolpix L830 Shutter Button Replacement: 手順 11、 2の画像 2
    • Insert the blue plastic opening tool between the main casing and the shutter component.

    • Wiggle the plastic opening tool up and down to pry off the shutter component.

  12. Nikon Coolpix L830 Shutter Button Replacement: 手順 12、 2の画像 1 Nikon Coolpix L830 Shutter Button Replacement: 手順 12、 2の画像 2
    • Unscrew the single 2.0mm Phillips #000 screw located on the dark brown strip on the back of the shutter button panel.

    • Once the Phillips screw is removed, gently take off the metal component with your hand or a wedge tool.

    • The on/off switch is not connected to the metal component, so be sure to keep track of it when removing.

    • Once the metal component is removed, the shutter button should be the only remaining part connected to the black shutter casing.

  13. Nikon Coolpix L830 Shutter Button Replacement: 手順 13、 2の画像 1 Nikon Coolpix L830 Shutter Button Replacement: 手順 13、 2の画像 2
    • Remove the final two 2.0mm Phillips #000 screws, releasing the shutter button.

    • The shutter component has a spring attached. Be sure to carefully remove the shutter button and keep track of the small spring.

終わりに

To reassemble your device, follow these instructions in reverse order.

作成者

3人の作成者と共同で作成されました。

Taylor Hetrick

メンバー登録日: 10/30/16

324 ポイント

2のガイドは作成済み

チーム

Baylor, Team 4-4, Williams Fall 2016 Baylor, Team 4-4, Williams Fall 2016人のメンバー

BU-WILLIAMS-F16S4G4

3 メンバー

10のガイドは作成済み

0 件のコメント

コメントを追加

統計データ:

過去 24時間: 0

過去 7 日: 8

過去 30 日: 27

今までの合計 1,792