メインコンテンツにスキップ
リペアコミュニティに参加 - アカウントの作成

Nikon Coolpix L820 Settings Buttons Replacement

必要な工具と部品

  1. Nikon Coolpix L820 Settings Buttons Replacement, Settings Buttons: 手順 1、 3の画像 1 Nikon Coolpix L820 Settings Buttons Replacement, Settings Buttons: 手順 1、 3の画像 2 Nikon Coolpix L820 Settings Buttons Replacement, Settings Buttons: 手順 1、 3の画像 3
    • Remove the battery before beginning.

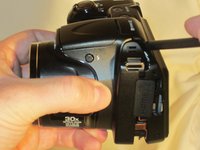
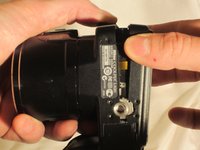
    • Use a Phillips #0 screwdriver to remove the screws on the front casing. There are 10 screws around the casing. 3 are located on the left side of the camera, 6 are located on the bottom near the product label, and 1 is located on the right side of the camera.

  2. Nikon Coolpix L820 Settings Buttons Replacement: 手順 2、 2の画像 1 Nikon Coolpix L820 Settings Buttons Replacement: 手順 2、 2の画像 2
    • Next, remove the screw held on top of the camera above the Nikon logo.

    • Moving to the bottom of the camera, open the empty battery slot, and locate the 4 screws in the compartment. Begin removing the 4 screws located within.

  3. Nikon Coolpix L820 Settings Buttons Replacement: 手順 3、 3の画像 1 Nikon Coolpix L820 Settings Buttons Replacement: 手順 3、 3の画像 2 Nikon Coolpix L820 Settings Buttons Replacement: 手順 3、 3の画像 3
    • Using the spudger, begin prying the case from the device, carefully separating the rear housing from the camera assembly. Once the rear housing is separated, the camera's physical buttons will be accessible for replacement.

    • Be sure to only apply pressure to the casing panels, not internal electronics. Doing so can damage the internal components of the camera.

終わりに

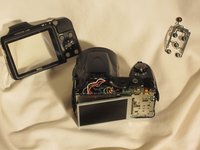
To reassemble your device, follow these instructions in reverse order.

ある他の人がこのガイドを完成しました。

作成者

5人の作成者と共同で作成されました。

Marc

メンバー登録日: 03/23/15

430 ポイント

3のガイドは作成済み

チーム

UMass Dartmouth, Team 1-4, Miles Spring 2015 UMass Dartmouth, Team 1-4, Miles Spring 2015人のメンバー

UMASSD-MILES-S15S1G4

3 メンバー

10のガイドは作成済み

0件のガイドコメント

コメントを追加

統計データ:

過去 24時間: 1

過去 7 日: 9

過去 30 日: 49

今までの合計 1,629