メインコンテンツにスキップ

Nikon Coolpix L820 Device Ports Replacement

必要な工具と部品

  1. Nikon Coolpix L820 Device Ports Replacement, Settings Buttons: 手順 1、 3の画像 1 Nikon Coolpix L820 Device Ports Replacement, Settings Buttons: 手順 1、 3の画像 2 Nikon Coolpix L820 Device Ports Replacement, Settings Buttons: 手順 1、 3の画像 3
    • Remove the battery before beginning.

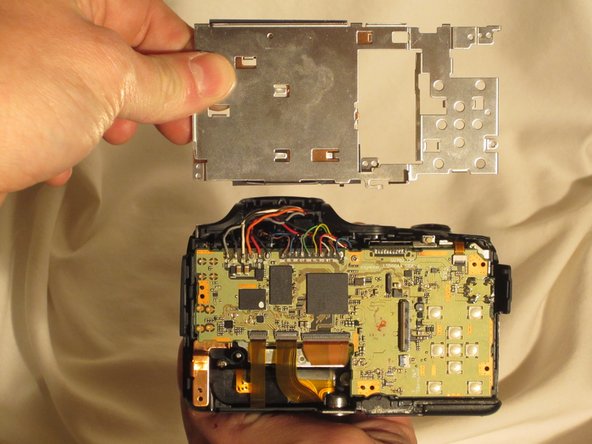
    • Use a Phillips #0 screwdriver to remove the screws on the front casing. There are ten screws, three on the left side, two on the bottom, and one on the right side of the camera.

  2. Nikon Coolpix L820 Device Ports Replacement: 手順 2、 2の画像 1 Nikon Coolpix L820 Device Ports Replacement: 手順 2、 2の画像 2
    • Remove the front top Phillips screw with the screwdriver.

    • Open the empty battery slot on the bottom of the camera, revealing four additional screws.

    • Unscrew the four Phillips screws with the screwdriver.

  3. Nikon Coolpix L820 Device Ports Replacement: 手順 3、 3の画像 1 Nikon Coolpix L820 Device Ports Replacement: 手順 3、 3の画像 2 Nikon Coolpix L820 Device Ports Replacement: 手順 3、 3の画像 3
    • Using the spudger, move around the casing, carefully separating the rear housing from the camera assembly.

    • Be sure to only apply pressure to the casing panels and not the sensitive internal electronics.

    • Once the rear housing is separated, the settings buttons will be accessible for replacement.

  4. Nikon Coolpix L820 Device Ports Replacement, LCD screen: 手順 4、 3の画像 1 Nikon Coolpix L820 Device Ports Replacement, LCD screen: 手順 4、 3の画像 2 Nikon Coolpix L820 Device Ports Replacement, LCD screen: 手順 4、 3の画像 3
    • Remove the front casing to expose the LCD screen and wires.

    • Do not damage the exposed wires.

  5. Nikon Coolpix L820 Device Ports Replacement: 手順 5、 3の画像 1 Nikon Coolpix L820 Device Ports Replacement: 手順 5、 3の画像 2 Nikon Coolpix L820 Device Ports Replacement: 手順 5、 3の画像 3
    この手順で使用する道具:
    Tweezers
    $4.99
    購入する
    • Using the tweezers, lift the hinges connecting the two ribbon wires to the camera.

  6. Nikon Coolpix L820 Device Ports Replacement: 手順 6、 2の画像 1 Nikon Coolpix L820 Device Ports Replacement: 手順 6、 2の画像 2
    • Once the flexible ribbon wires are disconnected, remove the LCD screen.

  7. Nikon Coolpix L820 Device Ports Replacement, Device Ports: 手順 7、 1の画像 1
    • Begin by removing these five screws

  8. Nikon Coolpix L820 Device Ports Replacement: 手順 8、 1の画像 1
    • From there, the panel covering the motherboard can be removed.

  9. Nikon Coolpix L820 Device Ports Replacement: 手順 9、 2の画像 1 Nikon Coolpix L820 Device Ports Replacement: 手順 9、 2の画像 2
    • Using the pointed end of the spudger, lift the hinges that secure these four flex circuits.

  10. Nikon Coolpix L820 Device Ports Replacement: 手順 10、 2の画像 1 Nikon Coolpix L820 Device Ports Replacement: 手順 10、 2の画像 2
    • Once the flex circuits are removed, the motherboard can be lifted and the device can be accessed for replacement.

終わりに

To reassemble your device, follow these instructions in reverse order.

2 の人々がこのガイドを完成させました。

作成者

1人の作成者と共同作成されました。

Marc

メンバー登録日: 03/23/15

430 ポイント

3のガイドは作成済み

チーム

UMass Dartmouth, Team 1-4, Miles Spring 2015 UMass Dartmouth, Team 1-4, Miles Spring 2015人のメンバー

UMASSD-MILES-S15S1G4

3 メンバー

10のガイドは作成済み

コメント 1 件

Could you explain how the power button is changed? Thank you!!

minigalinda - 返信

コメントを追加

統計データ:

過去 24時間: 5

過去 7 日: 8

過去 30 日: 24

今までの合計 1,842