メインコンテンツにスキップ

Nikon Coolpix L810 LCD Replacement

必要な工具と部品

  1. Nikon Coolpix L810 LCD Replacement, LCD: 手順 1、 2の画像 1 Nikon Coolpix L810 LCD Replacement, LCD: 手順 1、 2の画像 2
    • Remove two 5 mm Phillips #000 screws on the right hand side of the camera located near the power button.

    • Use of precision tweezers to help remove loosened screws is suggested.

  2. Nikon Coolpix L810 LCD Replacement: 手順 2、 2の画像 1 Nikon Coolpix L810 LCD Replacement: 手順 2、 2の画像 2
    • Remove two 5 mm Phillips #000 screws near the audio/video inputs on the opposite side near the flash component.

  3. Nikon Coolpix L810 LCD Replacement: 手順 3、 2の画像 1 Nikon Coolpix L810 LCD Replacement: 手順 3、 2の画像 2
    • Remove three 5 mm Phillips #000 screws on the bottom end of the camera.

  4. Nikon Coolpix L810 LCD Replacement: 手順 4、 1の画像 1
    • Carefully detach the back side of the camera by lifting both ends, with moderate force wobble until loosened enough to remove.

  5. Nikon Coolpix L810 LCD Replacement: 手順 5、 2の画像 1 Nikon Coolpix L810 LCD Replacement: 手順 5、 2の画像 2
    • With the LCD screen facing towards you, flip the screen to the right.

  6. Nikon Coolpix L810 LCD Replacement: 手順 6、 3の画像 1 Nikon Coolpix L810 LCD Replacement: 手順 6、 3の画像 2 Nikon Coolpix L810 LCD Replacement: 手順 6、 3の画像 3
    • Remove three 5 mm Phillips #000 screws located on the bracket.

    • Hold the camera with the lens facing downward to prevent the bracket from falling off once all screws are removed.

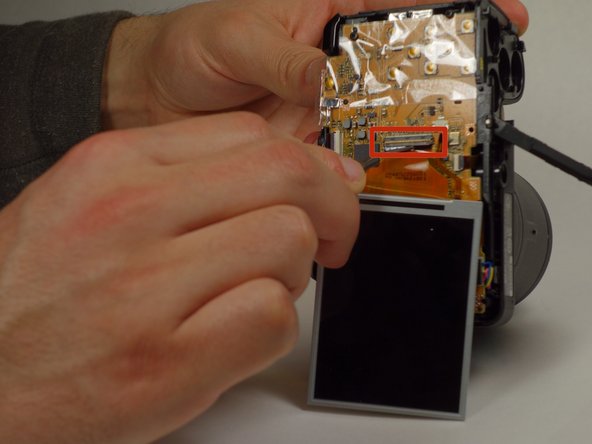
  7. Nikon Coolpix L810 LCD Replacement: 手順 7、 2の画像 1 Nikon Coolpix L810 LCD Replacement: 手順 7、 2の画像 2
    • Disconnect the ribbons that connect the LCD screen to the camera gently using precision tweezers or fingers.

終わりに

To reassemble your device, follow these instructions in reverse order.

3 の人々がこのガイドを完成させました。

作成者

3人の作成者と共同で作成されました。

Emilio Mena

メンバー登録日: 01/14/15

752 ポイント

4のガイドは作成済み

チーム

UW Tacoma, Team 3-1, Rose Winter 2015 UW Tacoma, Team 3-1, Rose Winter 2015人のメンバー

UWT-ROSE-W15S3G1

4 メンバー

8のガイドは作成済み

2 件のコメント

I love ifixit instructions so much more than youtube. These are so easy and straightfoward and I love how screw sizes are carefully specified.

Susan - 返信

Congratulations! Perfect lesson !

I need HELP presentation abowt desassembler / remove motherboard and other parts to repair the lenz move mechanism. Unfortunately NIKON left Brazil and the resident Suport tecnician besides not being good, stay in quarentine (corona virus)! Special Thanks for you help! Best regards

ramos.eng - 返信

コメントを追加

統計データ:

過去 24時間: 0

過去 7 日: 5

過去 30 日: 16

今までの合計 2,592