メインコンテンツにスキップ

Nikon Coolpix L26 Camera Back Cover Replacement

必要な工具と部品

  1. Nikon Coolpix L26 Camera Back Cover Replacement, Back Cover: 手順 1、 3の画像 1 Nikon Coolpix L26 Camera Back Cover Replacement, Back Cover: 手順 1、 3の画像 2 Nikon Coolpix L26 Camera Back Cover Replacement, Back Cover: 手順 1、 3の画像 3
    • Remove the batteries from the battery compartment by sliding the white battery compartment switch up and then move the panel toward the right.

  2. Nikon Coolpix L26 Camera Back Cover Replacement: 手順 2、 1の画像 1
    • Using the Phillips #000 screwdriver, unscrew the two 2mm screws next to the battery compartment on the right side of the camera.

  3. Nikon Coolpix L26 Camera Back Cover Replacement: 手順 3、 1の画像 1
    • Unscrew the two 2mm screws on the opposite side.

  4. Nikon Coolpix L26 Camera Back Cover Replacement: 手順 4、 1の画像 1
    • Flip over the rubber AV cover at the bottom of the camera. Unscrew the last two 2mm screws on the bottom of the camera.

  5. Nikon Coolpix L26 Camera Back Cover Replacement: 手順 5、 3の画像 1 Nikon Coolpix L26 Camera Back Cover Replacement: 手順 5、 3の画像 2 Nikon Coolpix L26 Camera Back Cover Replacement: 手順 5、 3の画像 3
    • Using your hands, open the camera slightly by using the indentation above the camera compartment.

  6. Nikon Coolpix L26 Camera Back Cover Replacement: 手順 6、 2の画像 1 Nikon Coolpix L26 Camera Back Cover Replacement: 手順 6、 2の画像 2
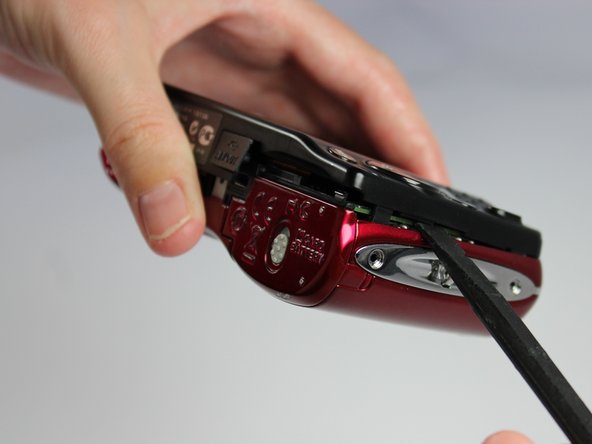
    • Wedge the flat end of the spudger in between the front and back cover. Carefully push the spudger downward, which will lift the back cover off the camera.

  7. Nikon Coolpix L26 Camera Back Cover Replacement: 手順 7、 1の画像 1
    • Gently pull the cover off the camera.

終わりに

To reassemble your device, follow these instructions in reverse order.

5 の人々がこのガイドを完成させました。

作成者

4人の作成者と共同で作成されました。

Sadie

メンバー登録日: 02/16/15

427 ポイント

3のガイドは作成済み

チーム

San Diego State, Team 1-3, Sheppard Winter 2015 San Diego State, Team 1-3, Sheppard Winter 2015人のメンバー

SDSU-SHEPPARD-W15S1G3

2 メンバー

6のガイドは作成済み

3 件のコメント

my battery compartment will not close. can I buy a new one

brendadawsonitp - 返信

Thanks. I appreciate the help, but… The pin seems to be the toughest item to remove. You didn’t get that far.

srfrjoe57 - 返信

This worked for the pin. I’m guessing it pushes through the front of the body behind the screen. I didn’t get that far. It for sure will not pull out of the back. I cut the pin and pulled it out (yes it did damage the plastic). I cut a small nail (brad) the put it through the cover and placed the brad in where the old pin was and placed a bit of super glue on it to hold it in place (don’t get any on the new cover). In a while I will assemble the camera and add more super glue. Yes, the super glue will be visible, but it will take some searching to find it and will look much better that a tie-wrap or tape. I hope that helps.

srfrjoe57 - 返信

コメントを追加

統計データ:

過去 24時間: 0

過去 7 日: 4

過去 30 日: 18

今までの合計 1,834