メインコンテンツにスキップ

Nikon COOLPIX P7700 Focusing Screen Replacement

必要な工具と部品

  1. Nikon COOLPIX P7700 Focusing Screen Replacement, Back Casing: 手順 1、 2の画像 1 Nikon COOLPIX P7700 Focusing Screen Replacement, Back Casing: 手順 1、 2の画像 2
    • Turn camera to the left side and remove the two 4.3 mm black side screws using the Phillips #00 screwdriver.

    • Remove the side panel.

  2. Nikon COOLPIX P7700 Focusing Screen Replacement: 手順 2、 1の画像 1
    • Open the touch screen, and remove the three 4.3 mm black screws inside using the Phillips #00 screwdriver.

  3. Nikon COOLPIX P7700 Focusing Screen Replacement: 手順 3、 1の画像 1
    • Remove the 4.3 mm black screw on top of the camera, right above where the screen folds out. Use the Phillips #00 screwdriver.

  4. Nikon COOLPIX P7700 Focusing Screen Replacement: 手順 4、 1の画像 1
    • Remove the two 4.3 mm black screws on the right side of the camera using the Phillips #00 screwdriver.

  5. Nikon COOLPIX P7700 Focusing Screen Replacement: 手順 5、 1の画像 1
    • Remove the 4.3 mm black screws on the bottom of the camera using the Phillips #00 screwdriver.

  6. Nikon COOLPIX P7700 Focusing Screen Replacement: 手順 6、 2の画像 1 Nikon COOLPIX P7700 Focusing Screen Replacement: 手順 6、 2の画像 2
    • Begin separating the camera into two parts.

    • It is okay to remove the orange ribbon. This will be easily put back into place when re-assembling.

  7. Nikon COOLPIX P7700 Focusing Screen Replacement: 手順 7、 1の画像 1
    • Remove the back casing.

  8. Nikon COOLPIX P7700 Focusing Screen Replacement, Focusing Screen: 手順 8、 1の画像 1
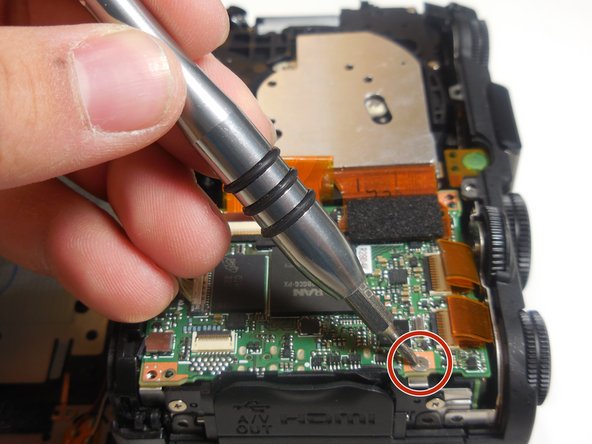
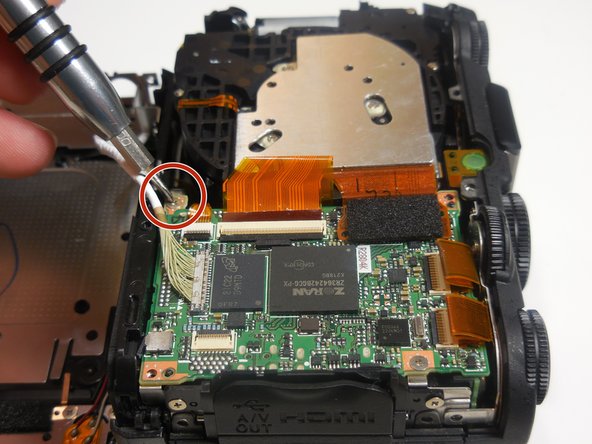
    • Once the back casing is off, locate the 4.3 mm silver screw near the top of the camera and remove it using the Phillips #00 screwdriver.

  9. Nikon COOLPIX P7700 Focusing Screen Replacement: 手順 9、 1の画像 1
    • Remove the metal sheet from the camera.

    • It is okay to remove the orange ribbon from the camera.

  10. Nikon COOLPIX P7700 Focusing Screen Replacement: 手順 10、 3の画像 1 Nikon COOLPIX P7700 Focusing Screen Replacement: 手順 10、 3の画像 2 Nikon COOLPIX P7700 Focusing Screen Replacement: 手順 10、 3の画像 3
    • Remove the four 4.3 mm silver screws located on the ends of the chip using the Phillips #00 screwdriver.

  11. Nikon COOLPIX P7700 Focusing Screen Replacement: 手順 11、 2の画像 1 Nikon COOLPIX P7700 Focusing Screen Replacement: 手順 11、 2の画像 2
    • Remove the two 4.3 mm silver screws on the far right side of the camera using the Phillips #00 screwdriver.

  12. Nikon COOLPIX P7700 Focusing Screen Replacement: 手順 12、 2の画像 1 Nikon COOLPIX P7700 Focusing Screen Replacement: 手順 12、 2の画像 2
    • Lift and detach connector from board as shown.

  13. Nikon COOLPIX P7700 Focusing Screen Replacement: 手順 13、 1の画像 1
    • Remove the board from the camera to locate lens opening

  14. Nikon COOLPIX P7700 Focusing Screen Replacement: 手順 14、 1の画像 1
    • Remove the 4.3 mm screws from the metal sheet using the Phillips #00 screwdriver.

  15. Nikon COOLPIX P7700 Focusing Screen Replacement: 手順 15、 1の画像 1
    • Lift the metal sheet up and out of the camera.

  16. Nikon COOLPIX P7700 Focusing Screen Replacement: 手順 16、 1の画像 1
    • Locate the reflective lens.

  17. Nikon COOLPIX P7700 Focusing Screen Replacement: 手順 17、 1の画像 1
    • Remove the lens from the camera.

終わりに

To reassemble your device, follow these instructions in reverse order.

2 の人々がこのガイドを完成させました。

作成者

4人の作成者と共同で作成されました。

Dustin Wahl

メンバー登録日: 03/11/15

775 ポイント

4のガイドは作成済み

チーム

Colorado Springs, Team 2-7, Panko Spring 2015 Colorado Springs, Team 2-7, Panko Spring 2015人のメンバー

UCCS-PANKO-S15S2G7

3 メンバー

10のガイドは作成済み

2 件のコメント

Hey I have a P7700 that shows a lens error and focusing doesn't work.

I took it apart and removed the focus motor and it seems that the focus lens moves as it should but when turning it on the picture will be blurry for a second until the lens error comes up.

What issue is fixed by replacing this focus lens?

Dominik Bessler - 返信

Hello.

Do you have a service procedure to fix the exposure dial in this camera?

Hugo - 返信

コメントを追加

統計データ:

過去 24時間: 0

過去 7 日: 5

過去 30 日: 22

今までの合計 1,724