このバージョンは誤った内容を含んでいる可能性があります。最新の承認済みスナップショットに切り替えてください。
必要な工具と部品
-
この手順は未翻訳です。 翻訳を手伝う。
-
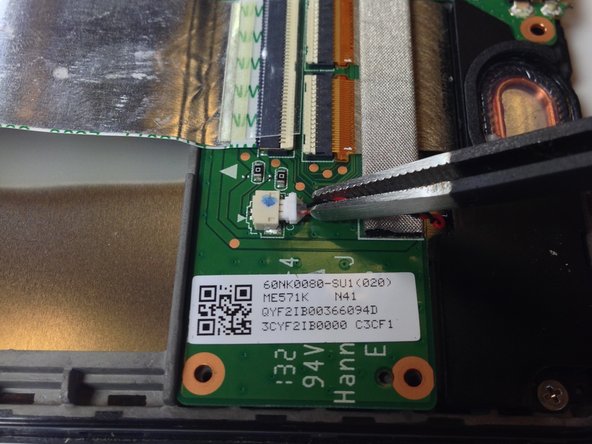
Use the flat end of a spudger or your fingernail to flip up the clear protective flap on the ribbon cable ZIF socket.
-
Using the flat end of a spudger or your fingernail, flip up the thin portion of the connector (the white part, opposite of the side where the cable inserts) to release the cable from its socket.
-
Slide the cable out of the ZIF socket.
-
-


34 の人々がこのガイドを完成させました。
チーム

Cal Poly, Team 20-16, Maness Winter 2015 Cal Poly, Team 20-16, Maness Winter 2015人のメンバー
CPSU-MANESS-W15S20G16
4 メンバー
24のガイドは作成済み
15 件のコメント
Very great guide on the teardown for swapping the motherboard. I have 2 questions if you wouldn't mind clearing up.
1. When you remove the back cover from the screen, is it glued into place or does it use small snaps to hold onto the device? How hard is it to reattach the back cover?
2. After buying a new motherboard for installation will I need to flash it with bios/firmware/OS to get it working or will it come as a ready-to-go motherboard?
Thanks for your help!
Great guide, excellent pictures, helped me resurrect my Nexus stuck on the Google screen. Thank you!
However, it should be emphasized that steps 10-15 are completely unnecessary and should be skipped if you are only looking to replace the motherboard.
Agree on skipping steps 10-15 for motherboard replacement. The daughterboard was not in the way at all.
Great guide and good instructions. I was able to swap out a faulty motherboard without any problems.
Two things I found that might need some addition/update on the instructions;
1) I found a #00 Phillips easier to use than the recommended #0 Phillips
2) You should probably add one more step to explain how the camera is attached with a ZIP socket to the underside of the motherboard. That would help in reconstructing the tablet in case, like me, your camera does not come up with the motherboard.
Great work and thanks for the help!