メインコンテンツにスキップ

Nexus 5X Front-Facing Camera Replacement

必要な工具と部品

  1. Nexus 5X Front-Facing Camera Replacement, SIM Card Tray: 手順 1、 3の画像 1 Nexus 5X Front-Facing Camera Replacement, SIM Card Tray: 手順 1、 3の画像 2 Nexus 5X Front-Facing Camera Replacement, SIM Card Tray: 手順 1、 3の画像 3
    • Insert a SIM card ejection tool into the hole on the SIM card tray, located on the left edge of the phone.

    • Press in to eject the SIM card tray.

    • Remove the SIM card tray.

  2. Nexus 5X Front-Facing Camera Replacement, Rear Panel: 手順 2、 3の画像 1 Nexus 5X Front-Facing Camera Replacement, Rear Panel: 手順 2、 3の画像 2 Nexus 5X Front-Facing Camera Replacement, Rear Panel: 手順 2、 3の画像 3
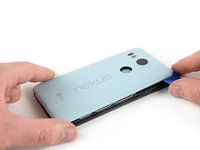
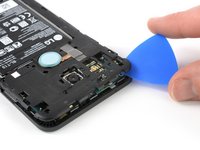
    • Place an opening pick in the opening of the SIM card tray slot and twist it sideways to release the first plastic clip that holds the rear panel in its place.

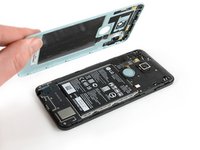
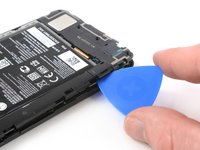
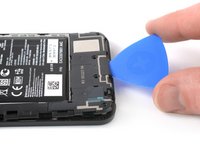
    • Slide the opening pick around the top edge of the phone to release the plastic clips that secure the rear panel.

  3. Nexus 5X Front-Facing Camera Replacement: 手順 3、 3の画像 1 Nexus 5X Front-Facing Camera Replacement: 手順 3、 3の画像 2 Nexus 5X Front-Facing Camera Replacement: 手順 3、 3の画像 3
    • Continue to slide the opening pick around all sides of the phone to release all clips that secure the rear panel.

  4. Nexus 5X Front-Facing Camera Replacement: 手順 4、 2の画像 1 Nexus 5X Front-Facing Camera Replacement: 手順 4、 2の画像 2
    • Tilt the opening pick to lift the rear panel a little bit.

    • There are two more plastic clips next to the fingerprint sensor. Release them by gently pulling the rear panel.

    • Remove the rear panel.

  5. Nexus 5X Front-Facing Camera Replacement, Midframe: 手順 5、 1の画像 1
    • Remove the ten 3.6 mm Phillips screws that secure the midframe.

  6. Nexus 5X Front-Facing Camera Replacement: 手順 6、 2の画像 1 Nexus 5X Front-Facing Camera Replacement: 手順 6、 2の画像 2
    • Insert an opening pick into the SIM card tray slot and twist the opening pick sideways to release the plastic clips.

  7. Nexus 5X Front-Facing Camera Replacement: 手順 7、 2の画像 1 Nexus 5X Front-Facing Camera Replacement: 手順 7、 2の画像 2
    • Continue sliding the opening pick around the upper part of the midframe to release the plastic clips.

  8. Nexus 5X Front-Facing Camera Replacement: 手順 8、 2の画像 1 Nexus 5X Front-Facing Camera Replacement: 手順 8、 2の画像 2
    • Use the plastic pick to pry open the plastic clips on the long edge of the midframe and on the bottom edge.

    • Make sure the clips on the long edge are released. The midframe is prone to break here if they are not disconnected properly.

  9. Nexus 5X Front-Facing Camera Replacement: 手順 9、 2の画像 1 Nexus 5X Front-Facing Camera Replacement: 手順 9、 2の画像 2
    • Make sure all the clips are free.

    • Carefully remove the midframe.

  10. Nexus 5X Front-Facing Camera Replacement, Battery Disconnect: 手順 10、 2の画像 1 Nexus 5X Front-Facing Camera Replacement, Battery Disconnect: 手順 10、 2の画像 2
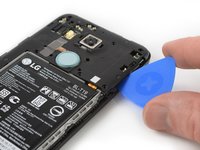
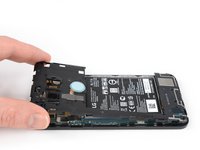
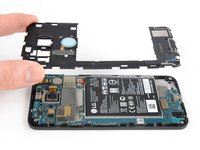
    • Use the edge of a spudger to pry up and disconnect the battery flex cable located at the bottom right of the motherboard.

  11. Nexus 5X Front-Facing Camera Replacement, Front Facing Camera: 手順 11、 2の画像 1 Nexus 5X Front-Facing Camera Replacement, Front Facing Camera: 手順 11、 2の画像 2
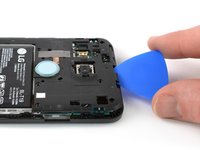
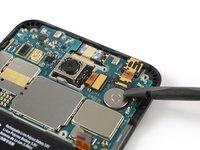
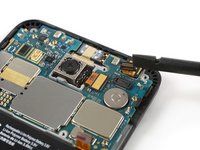
    • Use the flat end of a spudger to pry up and disconnect the front-facing camera flex cable.

  12. Nexus 5X Front-Facing Camera Replacement: 手順 12、 1の画像 1
    • Use a pair of tweezers to remove the front-facing camera from its recess.

終わりに

If possible, turn on your phone and test your repair before installing new adhesive and resealing the phone.

To reassemble your device, follow these instructions in reverse order.

Repair didn’t go as planned? Check out our Nexus 5X Answers community for troubleshooting help.

3 の人々がこのガイドを完成させました。

作成者

6人の作成者と共同で作成されました。

Dominik Schnabelrauch

メンバー登録日: 11/23/16

203,250 ポイント

682のガイドは作成済み

チーム

iFixit iFixit人のメンバー

Staff

135 メンバー

16,817のガイドは作成済み

0 件のコメント

コメントを追加

統計データ:

過去 24時間: 1

過去 7 日: 1

過去 30 日: 4

今までの合計 2,224