この翻訳は、ソースガイドの最新の更新を反映していない可能性があります。 翻訳の更新に協力してください。 または ソースガイドを参照してください。
はじめに
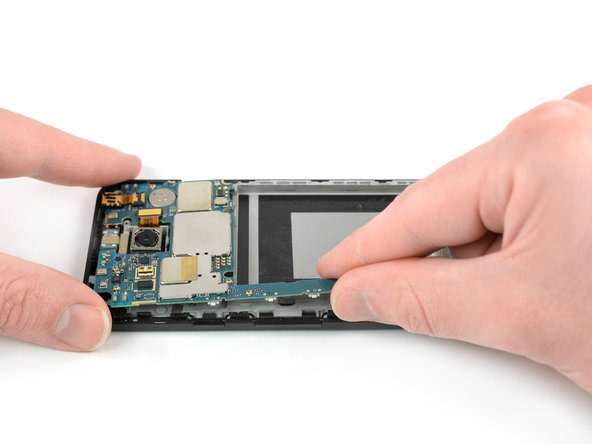
Nexus 5X のマザーボードを取り出すには、このガイドをご利用ください。
このガイド中の画像はデバイスからすでにバッテリーが取り出されています。この手順では、バッテリーを取り出す必要は ありません。
デバイスを再組み立てする際は、コンポーネントを再組み立てするために、接着剤を交換する必要があります。
必要な工具と部品
-
-
SIMカードトレイスロットの開口部分にピックを差し込んで、リアパネルを固定している最初のプラスチック製クリップを外すため、横向きにピックを捻ります。
-
開口ピックをデバイス上部端に差し込み、スライドしながら、リアパネルを固定しているプラスチックのクリップを外します。
Here’s a photo of the location of the 18 tabs that hold the back cover in place
Twisting sideways didn’t do it for me, but sliding along the edge did. However, at first I didn’t realize that the pick was between the motherboard and midframe, rather than between midframe and back cover like it was supposed to. This led to breaking off a spring-loaded connector on the motherboard, connecting to an antenna (I guess) in the back cover. So far I haven’t noticed any reception issues, but I can’t say for sure.
In essence: be careful to get the pick towards the back cover, and not “straight in” under the midframe.
-
-
-
開口ピックをSIMカードトレイのスロットに差し込み、ピックを斜めにひねりながら、プラスチックのクリップを外します。
The photo seems to show that the person is opening from the top, which is the opposite of your advice. So, just want to be clear.
yes, open from bottom first... the pic above shows the finished product after reaching top of phone. I found it best to actually start close to the right of the usbC connector. Pushing inbetween the 2 tabs and up will release the shell.. then work clockwise.
Chris, your advice to start to the right of the usbC connector was excellent, thank you!
I found that my middle panel was already broken at the narrowest part just to the left of the 2-D scan code on the battery, perhaps from some ham-fisted previous repair. This seems of little consequence, there do not seem to be any electrical connections running through this part.
After a long amount of prying, I discoved that, if used gently, a jimmy can really help get the plastic off
I could not remove the cover with the opening tool but had success with the opening picks (the triangle parts). Just slide them under the cover and gently bend and twist the pick to release the cover from the locks. By the way: it’s perfectly normal for the bottom cover part to come loose from the top cover part. It’s designed that way (they interlock).
Here’s a photo of the location of the 20 tabs that hold the middle assembly in place, and the pry angle needed.
This is the scariest part but it is the same process of taking a bike tire off the rim: lift up one part of the cover then put a wedge under the lifted section to hold it up then continue around the frame lifting it up and holding it up with the blue picks. You’ll find that after you life the bottom you can wriggle free the rest by hand.
The 10 screws came out quickly using the IFIXIT.com magnetic screwdriver.
-
-
可能であれば、デバイスに接着剤を付けて密封する前に、修理が上手くいったか電源を入れて点検してください。
デバイスを再組み立てする際は、これらのインストラクションを逆の順番に従って作業を進めてください。再組み立ての際は、必要な箇所に新しい接着剤を付けてください。
修理が上手く進みませんか?トラブルシュートのヘルプには、Nexus 5Xのアンサーコミュニティを参照してください。
可能であれば、デバイスに接着剤を付けて密封する前に、修理が上手くいったか電源を入れて点検してください。
デバイスを再組み立てする際は、これらのインストラクションを逆の順番に従って作業を進めてください。再組み立ての際は、必要な箇所に新しい接着剤を付けてください。
修理が上手く進みませんか?トラブルシュートのヘルプには、Nexus 5Xのアンサーコミュニティを参照してください。
61 の人々がこのガイドを完成させました。
以下の翻訳者の皆さんにお礼を申し上げます:
85%
Midori Doiさんは世界中で修理する私たちを助けてくれています! あなたも貢献してみませんか?
翻訳を始める ›
40 件のコメント
Anyone with the bootloop problem has been successful on returning the 5X to life by replacing the motherboard?
that's a stupid question. new motherboard means new operating system. maybe you should just use fastboot and flash stock firmware on your phone easy
where can I get a new motherboard at?????
in most 'google image boot' issues, it is a hardware issue, not software. besides, the phone will not allow a bootloader option.
yes …….and its the only way after bootloop
yes…….and its the only way after bootloop
same here! if anybody has luck fixing the bootloop problem by replacing the motherboard please let us know
hello, today my phone came out of service with bootloop problem . they changed the motherboard , now everything is good
Has the motherboard part been removed from the "Parts" section??? Not available for purchase anymore??? That would render this guide useless
What do you mean by useless? Mobos from other suppliers require different take apart?
I had bootloops within the year of buying this phone but because the LG webpage RA system wasn't working I missed out by a couple days and they want to charge me $180 to repair the phone. They won't budge and I will never buy an LG again. Has anyone found replacement motherboards or fixed this phone?
LG offered me free repair as long as there's no physical/cosmetic/liquid damage.
Warranty expired 20 days ago btw.
my phone was 8 months out of warranty and they just fixed as if in warranty.
Hi Alek Kels - 12/23/2016 - "maybe you should just use fastboot and flash stock firmware on your phone easy"
How do I do this? I'm having the bootloop problem atm.
Thanks!
Sand.
Don't worry about learning, because it is a hardware issue, not software. The phone will not boot proper past the fastboot.
It is probably a hardware problem. You can try redoing the software. It didn't work for me. You need to cook your phone. Sounds stupid right? But it works. One of the contacts for the ram or cpu is no longer good. Cooking it will melt the solder and fix it for at least a while. At least it worked for me.
I followed the instructions on a blog. Dev Alex - Oven fresh Nexus 5x.
This is an age old fix for crappy solder points connecting to CPUs or GPUs (most notably in HP laptops). Disassemble the phone and heat the snapdragon chip with a heat gun for 10 seconds. The chip is beneath a metal shield that pops up with a flat screwdriver. I am working to complete this now.. .will let you know how it works.
..alot of work for a little action. Got the phone to boot after heating the CPU for 15sec, stayed on for 4 minutes before rebooting again. ~sigh~
Found this forum comment re the rebooting sequence fix...
"The LG G4, V10, and the Nexus 5X are all affected by the bonded flipchip substrate breaking off of the BGA package under the CPU, which usually manifests in bootlooping or screen corruption, and eventually a complete brick. It’s not solder related; the only way to fix it is by completely replacing the CPU package with one that isn’t defective. – FrankTheCat"
Flashing stock image doesn't work for everybody with the bootloop issue. In my case, I can reboot into bootloader and have already installed 3 different stock images successfully and am STILL getting stuck on bootloop. From what I've researched it does seem to be a hardware issue.
Trying the oven bake fix now, just started bootlooping. I'm not counting on it working for long, already ordered a pixel. Thanks for the great guide!
Hi, I know is very complicated but, is it possible to get the data from old motherboard memory storage? any type of hack or something...
put it in the freezer for about 20 mins
How much it cost to replace motherboard of nexus 5x if it is not in warranty? and what is warranty period for newly replaced part?
today i have gone to lg service center and they were askin for 12k rs. for mother board replacement but after bargaining they agreed at 6
damneetsingh 2000 where is that service centre
uday -
I need a mother boad nexus 5x. From where can i get it
Does anyone knows where I can buy the motherboard for my Nexus 5X.
STEP 4 photo, second window on the bottom of the phone from right, (between two red circles) there is little opening (there are few on phone) and there a little device looking as a spring or something. By replacing battery this thing felt off.
I was very careful not to damage anything, but still... so careful… Device looks like to be clued there, I would love to know what is it for, can someone help, please? it looks like a senzor or something
do a websearch on repairing the nexus 5x bootloop… in the oven! I removed the shield from the side facing the screen, put flux all over especially the samsung chip, and baked it at 400F for 6.5 minutes - samsung chip side up, now the phone is working properly again, enough to backup all files. Eventually replacing samsung chip with new one will be necessary to get good solder contacts.
Bootloop problem sorted!! Thanks OP
Dec 14, 2017:
Encompass Supply Chain Solutions is parts supplier for LG for the US East Coast time zone area.
Went to their parts web page for the Nexus 5x (LGH790) - https://lg.encompass.com/model/LGELGH790
Motherboard (refurbished) costs $270 and ships in 60 days.
Do you know if is it possible to change 16 Gb main board by 32 Gb mainboard?
i need to purchase the motherboard international
okay mr ifixit.


