メインコンテンツにスキップ

この翻訳は、ソースガイドの最新の更新を反映していない可能性があります。 翻訳の更新に協力してください。 または ソースガイドを参照してください

Nexus 10の正面カメラの交換

必要な工具と部品

  1. この手順は未翻訳です。 翻訳を手伝う。

    Nexus 10の正面カメラの交換, 正面カメラ: 手順 1、 3の画像 1 Nexus 10の正面カメラの交換, 正面カメラ: 手順 1、 3の画像 2 Nexus 10の正面カメラの交換, 正面カメラ: 手順 1、 3の画像 3
    • Remove the plastic cover located on the back of the device by prying off one side of the cover with a plastic opening device and peeling it back.

  2. この手順は未翻訳です。 翻訳を手伝う。

    Nexus 10の正面カメラの交換: 手順 2、 3の画像 1 Nexus 10の正面カメラの交換: 手順 2、 3の画像 2 Nexus 10の正面カメラの交換: 手順 2、 3の画像 3
    • Pry the device apart by inserting a plastic opening tool in the seam between the plastic backing and display assembly. Use the tool to unclip the plastic tabs in between the backing and the display.

    • Pull the the plastic backing off the display assembly using your hands.

    • Do not do this step with only your hands. You will require a significant amount of force to separate the device.

  3. この手順は未翻訳です。 翻訳を手伝う。

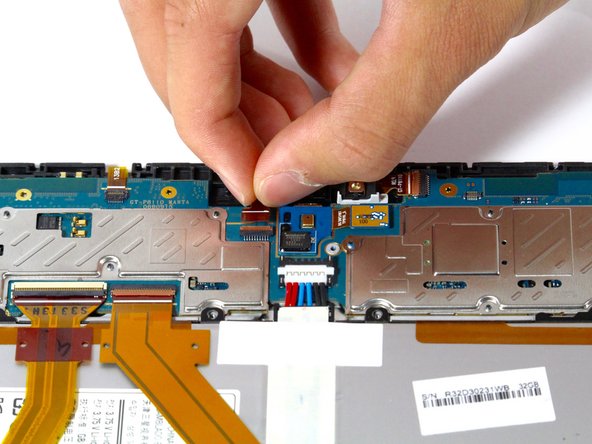
    Nexus 10の正面カメラの交換: 手順 3、 3の画像 1 Nexus 10の正面カメラの交換: 手順 3、 3の画像 2 Nexus 10の正面カメラの交換: 手順 3、 3の画像 3
    • Lift latch on front-facing camera connector.

    • Pull the connector toward the top of the device and remove the front-facing camera.

終わりに

デバイスを再度組み立てるには、この説明書の逆の順番で組み立ててください。

以下の翻訳者の皆さんにお礼を申し上げます:

en jp

50%

railgunさんは世界中で修理する私たちを助けてくれています! あなたも貢献してみませんか?
翻訳を始める ›

作成者

4人の作成者と共同で作成されました。

Benjamin Troller

メンバー登録日: 04/11/16

2,181 ポイント

5のガイドは作成済み

チーム

Cal Poly, Team 34-18, Maness Spring 2016 Cal Poly, Team 34-18, Maness Spring 2016人のメンバー

CPSU-MANESS-S16S34G18

4 メンバー

5のガイドは作成済み

0 件のコメント

コメントを追加

統計データ:

過去 24時間: 0

過去 7 日: 7

過去 30 日: 12

今までの合計 590