メインコンテンツにスキップ

この修理ガイドは変更されています。最新の未承認バージョンに切り替えます。

Nexus 10 Display Replacement

必要な工具と部品

  1. Nexus 10 Display Replacement, Battery: 手順 1、 3の画像 1 Nexus 10 Display Replacement, Battery: 手順 1、 3の画像 2 Nexus 10 Display Replacement, Battery: 手順 1、 3の画像 3
    • Using a plastic opening tool, remove the thin plastic cover from back of the tablet by prying up from its small tab.

  2. Nexus 10 Display Replacement: 手順 2、 1の画像 1
    • Remove the five 2mm screws on the back of the device using a PH00 screwdriver.

  3. Nexus 10 Display Replacement: 手順 3、 3の画像 1 Nexus 10 Display Replacement: 手順 3、 3の画像 2 Nexus 10 Display Replacement: 手順 3、 3の画像 3
    • Pry the device apart by inserting a plastic opening tool in the seam between the plastic backing and display assembly. Use the tool to unclip the plastic tabs in between the backing and the display.

    • Pull the the plastic backing off the display assembly using your hands.

    • Do not do this step with only your hands. You will require a significant amount of force to separate the device.

  4. Nexus 10 Display Replacement: 手順 4、 3の画像 1 Nexus 10 Display Replacement: 手順 4、 3の画像 2 Nexus 10 Display Replacement: 手順 4、 3の画像 3
    • Detach the three connector ribbons passing over the battery using the plastic opening tool.

  5. Nexus 10 Display Replacement: 手順 5、 1の画像 1
    • Remove the twelve 2mm screws around the perimeter of the battery with a PH00 screwdriver.

  6. Nexus 10 Display Replacement: 手順 6、 2の画像 1 Nexus 10 Display Replacement: 手順 6、 2の画像 2
    • Disconnect the battery by lifting it upward and pulling it away from the connector.

  7. Nexus 10 Display Replacement, Headphone Jack: 手順 7、 1の画像 1
    • Remove one screw on the logic board with a PH00 screwdriver.

  8. Nexus 10 Display Replacement: 手順 8、 3の画像 1 Nexus 10 Display Replacement: 手順 8、 3の画像 2 Nexus 10 Display Replacement: 手順 8、 3の画像 3
    • Disconnect right speaker connector ribbon from logic board.

    • Lift the speaker out by pulling up on its corner.

  9. Nexus 10 Display Replacement: 手順 9、 3の画像 1 Nexus 10 Display Replacement: 手順 9、 3の画像 2 Nexus 10 Display Replacement: 手順 9、 3の画像 3
    • Disconnect connectors around the perimeter of the motherboard.

  10. Nexus 10 Display Replacement: 手順 10、 2の画像 1 Nexus 10 Display Replacement: 手順 10、 2の画像 2
    • Remove motherboard by gently pulling upward under its corner.

  11. Nexus 10 Display Replacement: 手順 11、 1の画像 1
    • Remove the three 2mm screws along the right side of the device using a PH00 screwdriver.

  12. Nexus 10 Display Replacement: 手順 12、 2の画像 1 Nexus 10 Display Replacement: 手順 12、 2の画像 2
    • Unseat the small vibrator motor by gently applying upward pressure with a spudger.

  13. Nexus 10 Display Replacement: 手順 13、 2の画像 1 Nexus 10 Display Replacement: 手順 13、 2の画像 2
    • Lift the assembly by gently applying upward pressure with the spudger on the assembly.

  14. Nexus 10 Display Replacement: 手順 14、 2の画像 1 Nexus 10 Display Replacement: 手順 14、 2の画像 2
    • Gently pull battery-audio jack-USB assembly upward, detaching it from its adhesive.

  15. Nexus 10 Display Replacement, Display: 手順 15、 2の画像 1 Nexus 10 Display Replacement, Display: 手順 15、 2の画像 2
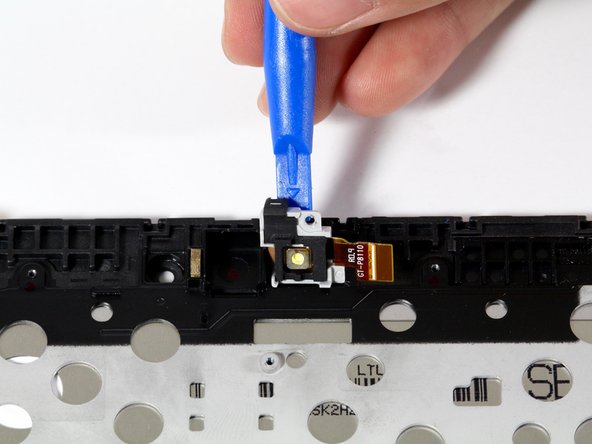
    • Detach LCD connector ribbon by pressing upward on connector latch using a plastic opening tool.

  16. Nexus 10 Display Replacement: 手順 16、 2の画像 1 Nexus 10 Display Replacement: 手順 16、 2の画像 2
    • Unscrew the two 2mm Phillips #00 screws holding the ribbon in place.

    • Remove the board by tilting it forward and pulling outward.

  17. Nexus 10 Display Replacement: 手順 17、 1の画像 1
    • Remove second speaker by gently tilting and pulling upward.

  18. Nexus 10 Display Replacement: 手順 18、 3の画像 1 Nexus 10 Display Replacement: 手順 18、 3の画像 2 Nexus 10 Display Replacement: 手順 18、 3の画像 3
    • Unscrew the two 2mm screws securing the micro HDMI connector with a #PH00 screwdriver.

    • Remove the connector by liberally applying upward pressure.

  19. Nexus 10 Display Replacement: 手順 19、 3の画像 1 Nexus 10 Display Replacement: 手順 19、 3の画像 2 Nexus 10 Display Replacement: 手順 19、 3の画像 3
    • Unscrew the 2mm Phillips #00 screw that holds the flash enclosure.

    • Remove the flash assembly with a plastic opening tool by lifting the assembly upward.

終わりに

To reassemble your device, follow these instructions in reverse order.

6 の人々がこのガイドを完成させました。

作成者

5人の作成者と共同で作成されました。

Benjamin Troller

メンバー登録日: 04/11/16

2,181 ポイント

5のガイドは作成済み

チーム

Cal Poly, Team 34-18, Maness Spring 2016 Cal Poly, Team 34-18, Maness Spring 2016人のメンバー

CPSU-MANESS-S16S34G18

4 メンバー

5のガイドは作成済み

3 件のコメント

I’m waiting for the instructions regarding how to remove the old screen and insert the new - it seems to be missing

John Walker - 返信

It seems you just have to buy a replacement for that whole front housing, including the screen assembly

Oliver Nichol -

Still waiting to see how the screen is remove

Frank - 返信

コメントを追加

統計データ:

過去 24時間: 1

過去 7 日: 3

過去 30 日: 20

今までの合計 8,184