メインコンテンツにスキップ

Nextbook Premium 7SE Charging Port Replacement

必要な工具と部品

  1. Nextbook Premium 7SE Charging Port Replacement, Back Cover: 手順 1、 3の画像 1 Nextbook Premium 7SE Charging Port Replacement, Back Cover: 手順 1、 3の画像 2 Nextbook Premium 7SE Charging Port Replacement, Back Cover: 手順 1、 3の画像 3
    • Insert the plastic opening tool into the middle of the bottom edge of the device. The tool should be inserted within the seam between the back and front covers.

    • Slide the opening tool to the right and slowly continue to separate the back cover from the device.

    • Avoid prying on the buttons, as they are easily damaged.

  2. Nextbook Premium 7SE Charging Port Replacement: 手順 2、 1の画像 1
    • Pull the cover off of the device once about three quarters of the cover has been pried open using the plastic opening tool.

  3. Nextbook Premium 7SE Charging Port Replacement, Battery: 手順 3、 1の画像 1
    • Remove masking tape from the battery.

  4. Nextbook Premium 7SE Charging Port Replacement: 手順 4、 3の画像 1 Nextbook Premium 7SE Charging Port Replacement: 手順 4、 3の画像 2 Nextbook Premium 7SE Charging Port Replacement: 手順 4、 3の画像 3
    • Pry the battery from the base using the nylon spudger and move it away from the motherboard.

    • Handle the battery with care to avoid damaging it.

  5. Nextbook Premium 7SE Charging Port Replacement: 手順 5、 3の画像 1 Nextbook Premium 7SE Charging Port Replacement: 手順 5、 3の画像 2 Nextbook Premium 7SE Charging Port Replacement: 手順 5、 3の画像 3
  6. Nextbook Premium 7SE Charging Port Replacement, Motherboard: 手順 6、 3の画像 1 Nextbook Premium 7SE Charging Port Replacement, Motherboard: 手順 6、 3の画像 2 Nextbook Premium 7SE Charging Port Replacement, Motherboard: 手順 6、 3の画像 3
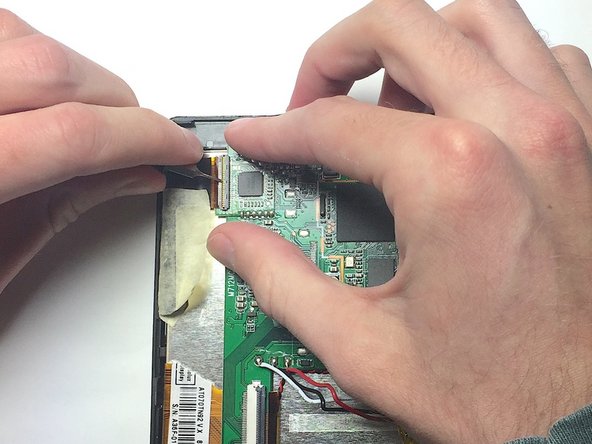
    • Remove the two ZIF connectors attached to the motherboard by flipping up the black tabs before pulling the ribbon cable away.

    • Only use a fingernail or nylon spudger to flip up the retaining flap. Using metal tools may damage delicate components.

  7. Nextbook Premium 7SE Charging Port Replacement: 手順 7、 1の画像 1
    • Use the nut driver and J00 bit to remove the three 4 mm screws.

  8. Nextbook Premium 7SE Charging Port Replacement: 手順 8、 3の画像 1 Nextbook Premium 7SE Charging Port Replacement: 手順 8、 3の画像 2 Nextbook Premium 7SE Charging Port Replacement: 手順 8、 3の画像 3
    • Peel back metal tape that is hiding the auxiliary port wires.

    • Remove tape that is holding the speaker wires in place.

    • Lift up on the motherboard to release it from the tablet.

  9. Nextbook Premium 7SE Charging Port Replacement, Replace Charging Port: 手順 9、 1の画像 1
    • Flip the motherboard over and locate the Micro USB port once the motherboard has been detached

    • De-solder the three contact points and remove the port.

    • See the following guide for instructions on how to solder. はんだ付けとはんだ除去の作業ガイド

    • Use caution when operating the soldering iron.

終わりに

To reassemble your device, follow these instructions in reverse order.

ある他の人がこのガイドを完成しました。

作成者

3人の作成者と共同で作成されました。

Daniel Valdez

メンバー登録日: 11/06/16

208 ポイント

1ガイドが承認済み

チーム

Baylor, Team 4-1, Williams Fall 2016 Baylor, Team 4-1, Williams Fall 2016人のメンバー

BU-WILLIAMS-F16S4G1

4 メンバー

14のガイドは作成済み

0 件のコメント

コメントを追加

統計データ:

過去 24時間: 0

過去 7 日: 1

過去 30 日: 2

今までの合計 3,532