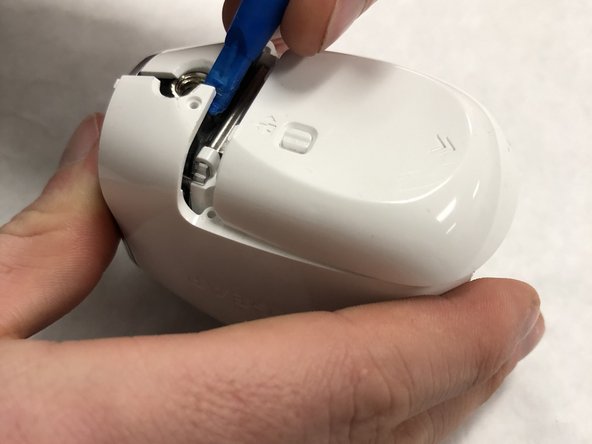
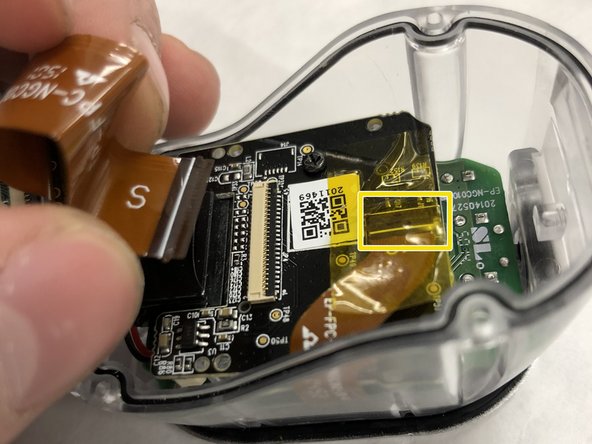
メインコンテンツにスキップ

Netgear Arlo Lens Assembly Replacement

必要な工具と部品

  1. Netgear Arlo Lens Assembly Replacement, Plastic Housing: 手順 1、 1の画像 1
    • Remove the 2 (3.5mm) housing screws with a J0 screwdriver.

  2. Netgear Arlo Lens Assembly Replacement: 手順 2、 2の画像 1 Netgear Arlo Lens Assembly Replacement: 手順 2、 2の画像 2
    • Slide the unlocked battery cover forward to remove 2 (3.5mm) screws, that are behind the cover.

  3. Netgear Arlo Lens Assembly Replacement: 手順 3、 1の画像 1
    • Open the battery cover and remove the 2 (3.5mm") screws from under the cover.

  4. Netgear Arlo Lens Assembly Replacement: 手順 4、 3の画像 1 Netgear Arlo Lens Assembly Replacement: 手順 4、 3の画像 2 Netgear Arlo Lens Assembly Replacement: 手順 4、 3の画像 3
    • Use a plastic opening tool to start separating the plastic housing from the front side of the battery cover.

    • Next, start separating the plastic cover from the rear of the plastic housing, and work your way down the seam line.

    • Make sure the plastics snaps on the front of the plastic get unhooked from the grey plastic ring around the front of the camera.

  5. Netgear Arlo Lens Assembly Replacement: 手順 5、 3の画像 1 Netgear Arlo Lens Assembly Replacement: 手順 5、 3の画像 2 Netgear Arlo Lens Assembly Replacement: 手順 5、 3の画像 3
    • Remove the screw (3.5mm) near the sync button holding the opposite side of the camera on.

    • Remove the second screw (3.5mm) on the back of the camera to remove the second housing.

    • Once the screws are removed use an opening tool to pry back the second plastic mount.

  6. Netgear Arlo Lens Assembly Replacement, Lens Assembly: 手順 6、 1の画像 1
    • Remove 4 (6mm) large screws with a J00 screwdriver.

    • There are 2 on each side. This will allow you to remove the clear housing from the white housing.

  7. Netgear Arlo Lens Assembly Replacement: 手順 7、 2の画像 1 Netgear Arlo Lens Assembly Replacement: 手順 7、 2の画像 2
    • Once screws are removed, pull apart the clear housing.

    • Remove rod from camera cover.

  8. Netgear Arlo Lens Assembly Replacement: 手順 8、 3の画像 1 Netgear Arlo Lens Assembly Replacement: 手順 8、 3の画像 2 Netgear Arlo Lens Assembly Replacement: 手順 8、 3の画像 3
    • Remove Large ribbon cable first to disconnect front of camera from main body.

    • Remove 4 (3.5mm) small black screws from motherboard of the camera unit.

    • Remove smaller ribbon cable from underneath yellow tape.

  9. Netgear Arlo Lens Assembly Replacement: 手順 9、 1の画像 1
    • Once all ribbon cables are removed, remove the motherboard and camera assembly by pulling up on the black camera motherboard.

終わりに

To reassemble your device, follow these instructions in reverse order.

作成者

3人の作成者と共同で作成されました。

Connor Krampen

メンバー登録日: 01/08/18

399 ポイント

3のガイドは作成済み

チーム

IUPUI, Team S1-G1, Freund Spring 2018 IUPUI, Team S1-G1, Freund Spring 2018人のメンバー

IUPUI-FREUND-S18S1G1

2 メンバー

6のガイドは作成済み

7 件のコメント

toller Tipp! Weiß jemand, wo man die Linse kaufen kann.?

familie - 返信

Wo bekomme ich ein neues Gehäuse?

piet - 返信

hi I took out the battery befor it was finished downloading new firmware, now there is no connection, no blue light. Can you help or is the camer garbage?

Rune Koppang - 返信

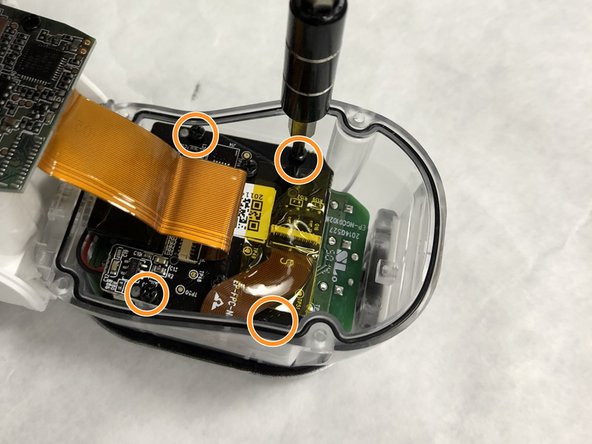
I struggled a bit with the ribbon cable connections, they need to be lifted up from the side the cable enters. They are sort of hinged like a door but lying on its side. Once it is stood up vertically, the cable will pull out. For the longer one I found it was important to lift as much of it up at once otherwise it will break if you lift one end and not the other. Once the cable is reinserted, they can just be pushed back down, same as before, supporting the full length when you do. If one comes off it is possible to push it back onto the hinge but it is very very tricky and took a while.

Richard Bailey - 返信

Where did you get the replacement lens?

G. N. - 返信

コメントを追加

統計データ:

過去 24時間: 1

過去 7 日: 5

過去 30 日: 24

今までの合計 4,765