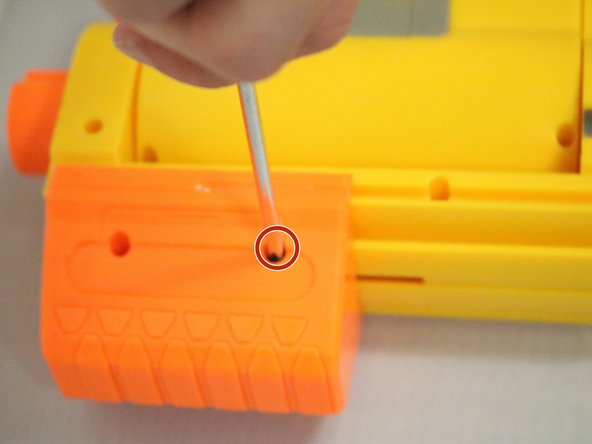
メインコンテンツにスキップ

Nerf N-Strike Deploy CS-6 Spring Mechanism Replacement

必要な工具と部品

  1. Nerf N-Strike Deploy CS-6 Spring Mechanism Replacement, Spring Mechanism: 手順 1、 1の画像 1
    • Proceed to take out hidden screws as shown.

    • Device must be collapsed in order to take out the hidden screws. Hidden screws measure out to 1.7 cm.

  2. Nerf N-Strike Deploy CS-6 Spring Mechanism Replacement: 手順 2、 1の画像 1
    • Proceed to take out all the necessary screws.

    • On the top left corner of the orange pump, there is another screw that will need to be taken out. The majority of the screws measure out to 1.3 cm.

  3. Nerf N-Strike Deploy CS-6 Spring Mechanism Replacement: 手順 3、 2の画像 1 Nerf N-Strike Deploy CS-6 Spring Mechanism Replacement: 手順 3、 2の画像 2
    • Removal of the pump is needed in order to get to the spring mechanism.

    • Locate the screws on the orange pump and proceed to take them out.

  4. Nerf N-Strike Deploy CS-6 Spring Mechanism Replacement: 手順 4、 1の画像 1
    • Once screws are removed from the pump part you can then remove the pump parts.

  5. Nerf N-Strike Deploy CS-6 Spring Mechanism Replacement: 手順 5、 1の画像 1
    • Once taken apart, the orange pump should be neatly placed on a safe surface.

  6. Nerf N-Strike Deploy CS-6 Spring Mechanism Replacement: 手順 6、 1の画像 1
    • Top extension part can now be taken off.

    • Once pulled apart, this is how the device should look.

    • Highlighted parts with will fit together into the other highlighted parts.

  7. Nerf N-Strike Deploy CS-6 Spring Mechanism Replacement: 手順 7、 1の画像 1
    • Locate your damage spring mechanism.

    • Once located, you may now pull it away from the device.

  8. Nerf N-Strike Deploy CS-6 Spring Mechanism Replacement: 手順 8、 1の画像 1
    • Spring has a small hook on the right side & must be placed on yellow holder.

    • Spring hook can be seen through same highlight whereas the yellow holder is located.

  9. Nerf N-Strike Deploy CS-6 Spring Mechanism Replacement: 手順 9、 1の画像 1
    • Place device cover back on.

    • When trying to close the cover back on top, push spring from the left towards the right to adjust cover in place.

    • You may use a screwdriver to pull the spring back as it is tad unpredictable in movement. May take a few times.

    • The screwdrive, as shown, is pushed forward to be put back into place.

終わりに

To reassemble your device, follow these instructions in reverse order.

ある他の人がこのガイドを完成しました。

作成者

3人の作成者と共同で作成されました。

Brenda

メンバー登録日: 09/28/16

71 ポイント

2のガイドは作成済み

チーム

Eastern Washington University, Team 2-5, Mathisen Fall 2016 Eastern Washington University, Team 2-5, Mathisen Fall 2016人のメンバー

EWU-MATHISEN-F16S2G5

4 メンバー

4のガイドは作成済み

0 件のコメント

コメントを追加

統計データ:

過去 24時間: 0

過去 7 日: 0

過去 30 日: 11

今までの合計 2,722