メインコンテンツにスキップ

Munchkin Mozart Magic Cube Sound Button Replacement

必要な工具と部品

  1. Munchkin Mozart Magic Cube Sound Button Replacement, Face plate: 手順 1、 2の画像 1 Munchkin Mozart Magic Cube Sound Button Replacement, Face plate: 手順 1、 2の画像 2
    • Remove two 6 mm Phillips #2 screws on either side of the On/Off Plate.

  2. Munchkin Mozart Magic Cube Sound Button Replacement: 手順 2、 1の画像 1
    • Remove the On/Off switch plate and save the screws so you can use them later to put the plate back on.

  3. Munchkin Mozart Magic Cube Sound Button Replacement: 手順 3、 1の画像 1
    • Gently pull out the battery cartridge and if needed, replace the batteries with 3 AA alkaline batteries.

  4. Munchkin Mozart Magic Cube Sound Button Replacement: 手順 4、 1の画像 1
    • Starting with the yellow face, insert the metal spudger between the yellow face and the white frame, prying the frame apart.

  5. Munchkin Mozart Magic Cube Sound Button Replacement: 手順 5、 1の画像 1
    • Insert the metal spudger in the space created by the plastic opening tool between the frame and face of the cube.

    • Pry the cube face from the frame.

  6. Munchkin Mozart Magic Cube Sound Button Replacement: 手順 6、 1の画像 1
    • After removing the square plates, you can unscrew the screws underneath.

    • Remove four 6 mm Phillips #2 screws, located on the sides.

  7. Munchkin Mozart Magic Cube Sound Button Replacement: 手順 7、 1の画像 1
    • Remove the rubber corners by simply pulling them off.

  8. Munchkin Mozart Magic Cube Sound Button Replacement, Sound Button: 手順 8、 1の画像 1
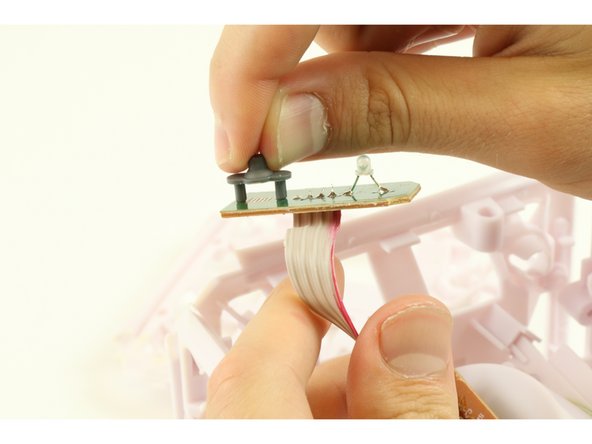
    • Flip the frame over so that green motherboard over so that the LED is face down and the brown side of the motherboard is face up using the Jimmy to remove the glue connecting the motherboard to the white frame.

  9. Munchkin Mozart Magic Cube Sound Button Replacement: 手順 9、 1の画像 1
    • Slide the motherboard out of the frame.

  10. Munchkin Mozart Magic Cube Sound Button Replacement: 手順 10、 2の画像 1 Munchkin Mozart Magic Cube Sound Button Replacement: 手順 10、 2の画像 2
    • To remove the button use your fingers or forceps to remove the gray rubber button piece on the green side of the motherboard.

終わりに

To reassemble your device, follow these instructions in reverse order.

作成者

4人の作成者と共同で作成されました。

Nikolas Soulandros

メンバー登録日: 08/27/15

291 ポイント

2のガイドは作成済み

チーム

USF Tampa, Team 1-4, Sullivan Fall 2015 USF Tampa, Team 1-4, Sullivan Fall 2015人のメンバー

USFT-SULLIVAN-F15S1G4

4 メンバー

14のガイドは作成済み

0 件のコメント

コメントを追加

統計データ:

過去 24時間: 0

過去 7 日: 0

過去 30 日: 0

今までの合計 621