メインコンテンツにスキップ

Mr. Coffee DW13 Power Cord Replacement

必要な工具と部品

  1. Mr. Coffee DW13 Power Cord Replacement, Base: 手順 1、 2の画像 1 Mr. Coffee DW13 Power Cord Replacement, Base: 手順 1、 2の画像 2
    • Before performing this repair, be sure that your machine is unplugged and dry and that your work space is clean.

    • Flip the Mr. Coffee DW13 over so that the lid is facing away from you and the base is facing toward you.

  2. Mr. Coffee DW13 Power Cord Replacement: 手順 2、 2の画像 1 Mr. Coffee DW13 Power Cord Replacement: 手順 2、 2の画像 2
    • Remove the eight 11 mm screws that secure the base of the machine with a Phillips Head #2 screwdriver.

  3. Mr. Coffee DW13 Power Cord Replacement: 手順 3、 1の画像 1
    • Gently lift the base cover to expose the inside of the coffee machine.

  4. Mr. Coffee DW13 Power Cord Replacement, Power Cord: 手順 4、 2の画像 1 Mr. Coffee DW13 Power Cord Replacement, Power Cord: 手順 4、 2の画像 2
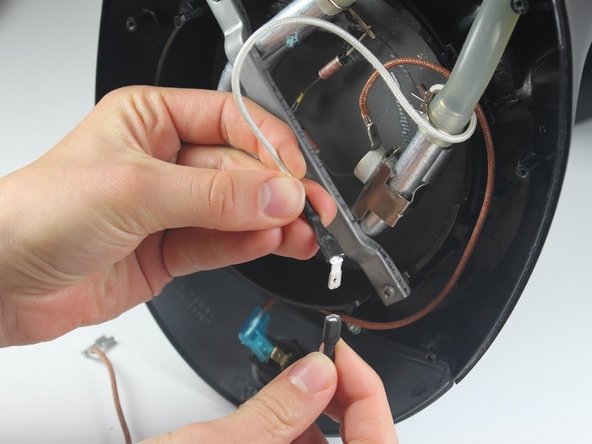
    • Locate the white tab that covers and holds the power cord in place. It has two screws on either side of it.

    • Use a #2 Philips Head screwdriver to unscrew the two 13mm screws holding the tab in place.

  5. Mr. Coffee DW13 Power Cord Replacement: 手順 5、 2の画像 1 Mr. Coffee DW13 Power Cord Replacement: 手順 5、 2の画像 2
    • Gently lift up on the white tab, removing it from the coffee machine.

  6. Mr. Coffee DW13 Power Cord Replacement: 手順 6、 2の画像 1 Mr. Coffee DW13 Power Cord Replacement: 手順 6、 2の画像 2
    • Locate the 2 electrical connectors running from the black plastic-coated power cord to the interior of the power switch.

    • One cord is copper colored and ends at the power switch in a silver metal square.

    • The other cord is white and ends at the power switch in a black plastic square.

  7. Mr. Coffee DW13 Power Cord Replacement: 手順 7、 2の画像 1 Mr. Coffee DW13 Power Cord Replacement: 手順 7、 2の画像 2
    • Grasp the copper cord close to the power switch. Lightly pull the silver end tab from the end to detach it.

  8. Mr. Coffee DW13 Power Cord Replacement: 手順 8、 2の画像 1 Mr. Coffee DW13 Power Cord Replacement: 手順 8、 2の画像 2
    • Lightly pull the white cord away from the power switch by grasping the black plastic-coated head.

    • There are two white cords attached to each other. Pull them apart by grasping the different black heads and separating them.

  9. Mr. Coffee DW13 Power Cord Replacement: 手順 9、 3の画像 1 Mr. Coffee DW13 Power Cord Replacement: 手順 9、 3の画像 2 Mr. Coffee DW13 Power Cord Replacement: 手順 9、 3の画像 3
    • Pull the power cord through the hole at the back of the base of the machine, followed by the two colored cords.

終わりに

To reassemble your device, follow these instructions in reverse order.

3 の人々がこのガイドを完成させました。

作成者

3人の作成者と共同で作成されました。

Tess Bradley

メンバー登録日: 01/26/14

373 ポイント

3のガイドは作成済み

チーム

Cal Poly, Team 10-31, Maness Winter 2014 Cal Poly, Team 10-31, Maness Winter 2014人のメンバー

CPSU-MANESS-W14S10G31

4 メンバー

6のガイドは作成済み

0 件のコメント

コメントを追加

統計データ:

過去 24時間: 0

過去 7 日: 1

過去 30 日: 23

今までの合計 3,172