メインコンテンツにスキップ

Motorola i560 Keypad Replacement

必要な工具と部品

  1. Motorola i560 Keypad Replacement, Battery: 手順 1、 1の画像 1
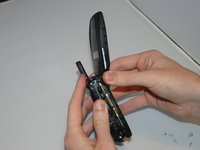
    • Place thumb on the rubber tab on the lower back of the phone.

    • Push away from the phone to release back panel.

  2. Motorola i560 Keypad Replacement: 手順 2、 1の画像 1
    • Lift the back panel of the phone to expose battery (not shown here).

  3. Motorola i560 Keypad Replacement, Motherboard: 手順 3、 1の画像 1
    • Pull the antenna up to reveal two of the six screws.

  4. Motorola i560 Keypad Replacement: 手順 4、 1の画像 1
    • Unscrew all six screws on the back side of the phone using a T-6 bit.

  5. Motorola i560 Keypad Replacement: 手順 5、 2の画像 1 Motorola i560 Keypad Replacement: 手順 5、 2の画像 2
    • Gently separate the front and back sides of the phone, as shown in the picture.

    • Be careful not to break or bend the ribbon cables.

  6. Motorola i560 Keypad Replacement: 手順 6、 2の画像 1 Motorola i560 Keypad Replacement: 手順 6、 2の画像 2
    • Detach the first ribbon cable by unplugging it from the motherboard.

  7. Motorola i560 Keypad Replacement: 手順 7、 2の画像 1 Motorola i560 Keypad Replacement: 手順 7、 2の画像 2
    • Detach the speaker ribbon cable from the motherboard.

  8. Motorola i560 Keypad Replacement: 手順 8、 1の画像 1
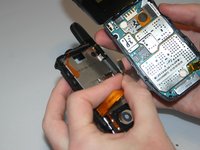
    • Remove the motherboard from the front half of the phone by gently shaking it loose. It should come out with little to no trouble.

  9. Motorola i560 Keypad Replacement, Keypad: 手順 9、 1の画像 1
    • Push lightly from the front of the keypad to remove it.

終わりに

To reassemble your device, follow these instructions in reverse order.

ある他の人がこのガイドを完成しました。

作成者

5人の作成者と共同で作成されました。

Haley S

メンバー登録日: 03/11/13

10 ポイント

4のガイドは作成済み

チーム

Clemson, Team 13-6, Benson Spring 2013 Clemson, Team 13-6, Benson Spring 2013人のメンバー

CLEM-BENSON-S13S13G6

3 メンバー

10のガイドは作成済み

0 件のコメント

コメントを追加

統計データ:

過去 24時間: 0

過去 7 日: 0

過去 30 日: 1

今までの合計 149