メインコンテンツにスキップ

このバージョンは誤った内容を含んでいる可能性があります。最新の承認済みスナップショットに切り替えてください。

必要な工具と部品

  1. この手順は未翻訳です。 翻訳を手伝う。

    : 手順 1、 1の画像 1
    • Locate the silver button on the back of the phone, near the bottom.

    • Depress the silver button with one hand and slide the back cover of the phone away from the antenna.

    • The back cover should slide off easily.

  2. この手順は未翻訳です。 翻訳を手伝う。

    : 手順 2、 1の画像 1
    • Insert a plastic spudger near one corner of the battery (preferably one furthest from the phone's antenna).

    • Gently pry the battery up and away from the phone. The battery should easily raise out of its place.

    • Now that the battery is exposed, use your fingers to remove the it from the phone.

  3. この手順は未翻訳です。 翻訳を手伝う。

    : 手順 3、 2の画像 1 : 手順 3、 2の画像 2
    • Note the metal connections on the phone, which are now exposed with the battery removed.

    • There are corresponding metal connectors on the replacement battery.

    • When you install the battery, be sure both connectors are matched up. Otherwise, your battery will be unable to supply power to your phone.

  4. この手順は未翻訳です。 翻訳を手伝う。

    : 手順 4、 1の画像 1
    • Use a spudger to remove the rubber plug from the upper left corner of the back of the phone.

  5. この手順は未翻訳です。 翻訳を手伝う。

    : 手順 5、 1の画像 1
    • Use a Torx T6 screwdriver to remove the 4 screws that secure the back plate of the phone.

  6. この手順は未翻訳です。 翻訳を手伝う。

    : 手順 6、 3の画像 1 : 手順 6、 3の画像 2 : 手順 6、 3の画像 3
    • Three tabs will hold the back plastic plate in.

    • To remove the back plate, pull the tabs towards the outside of the phone and lift the plate up simultaneously

    • Be careful when removing the back plate; don't put too much stress on the back plate or the plastic may snap

  7. この手順は未翻訳です。 翻訳を手伝う。

    : 手順 7、 3の画像 1 : 手順 7、 3の画像 2 : 手順 7、 3の画像 3
    • Use a spudger to remove the ribbon cable from the motherboard.

    • Be delicate while removing the ribbon cable because it is slightly fragile and it is necessary for the phone to function

  8. この手順は未翻訳です。 翻訳を手伝う。

    : 手順 8、 1の画像 1
    • Gently peel back the motherboard from the main part of the phone.

  9. この手順は未翻訳です。 翻訳を手伝う。

    : 手順 9、 1の画像 1
    • Remove the keypad from the bottom half of the phone.

  10. この手順は未翻訳です。 翻訳を手伝う。

    : 手順 10、 2の画像 1 : 手順 10、 2の画像 2
    • Detach the bottom half of the phone by pulling out on the bottom half and pulling up on the top half.

    • A small amount of force is necessary to pull the two pieces apart, but be careful because the plastic may break.

  11. この手順は未翻訳です。 翻訳を手伝う。

    : 手順 11、 2の画像 1 : 手順 11、 2の画像 2
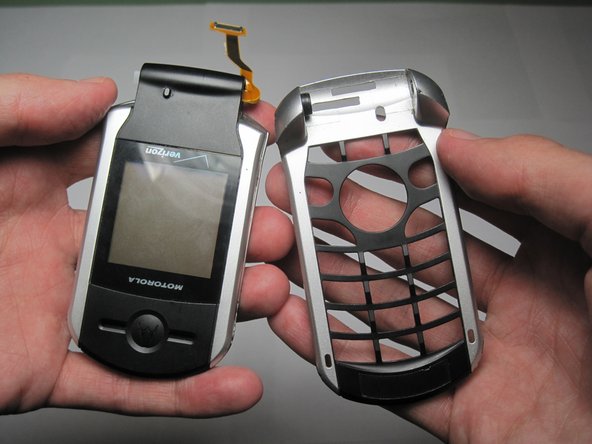
    • Use a plastic opening tool to remove the front cover of the phone.

  12. この手順は未翻訳です。 翻訳を手伝う。

    : 手順 12、 2の画像 1 : 手順 12、 2の画像 2
    • Remove the four screws holding in the metal cover.

  13. この手順は未翻訳です。 翻訳を手伝う。

    : 手順 13、 1の画像 1
    • Use a spudger to remove the plastic protector case around the camera.

  14. この手順は未翻訳です。 翻訳を手伝う。

    : 手順 14、 1の画像 1
    • Use a plastic opening tool to peel off the gold tape that holds the flex cable in place.

  15. この手順は未翻訳です。 翻訳を手伝う。

    : 手順 15、 1の画像 1
    • Slide the ribbon cable through the tiny slit located in the hole on the side of the frame.

  16. この手順は未翻訳です。 翻訳を手伝う。

    : 手順 16、 2の画像 1 : 手順 16、 2の画像 2
    • Slide the ribbon cable through the rectangular hole in the bottom half of the frame.

  17. この手順は未翻訳です。 翻訳を手伝う。

    : 手順 17、 1の画像 1
    • Remove the ribbon cable and the motherboard (still connected) from the frame of the phone.

  18. この手順は未翻訳です。 翻訳を手伝う。

    : 手順 18、 2の画像 1 : 手順 18、 2の画像 2
    • Use a spudger to detach the ribbon cable from the motherboard.

ゴール

作成者

4人の作成者と共同で作成されました。

Jonathan Cheung

メンバー登録日: 04/11/10

1 ポイント

3のガイドは作成済み

チーム

Cal Poly, Team 27-96, Amido Spring 2010 Cal Poly, Team 27-96, Amido Spring 2010人のメンバー

CPSU-AMIDO-S10S27G96

4 メンバー

15のガイドは作成済み

0 件のコメント

コメントを追加

統計データ:

過去 24時間: 1

過去 7 日: 3

過去 30 日: 4

今までの合計 1,378