メインコンテンツにスキップ

Motorola V190 Display Screen Replacement

必要な工具と部品

  1. Motorola V190 Display Screen Replacement, Display Screen: 手順 1、 3の画像 1 Motorola V190 Display Screen Replacement, Display Screen: 手順 1、 3の画像 2 Motorola V190 Display Screen Replacement, Display Screen: 手順 1、 3の画像 3
    • Remove the four 6.3mm TR6 Torx screws surrounding the screen.

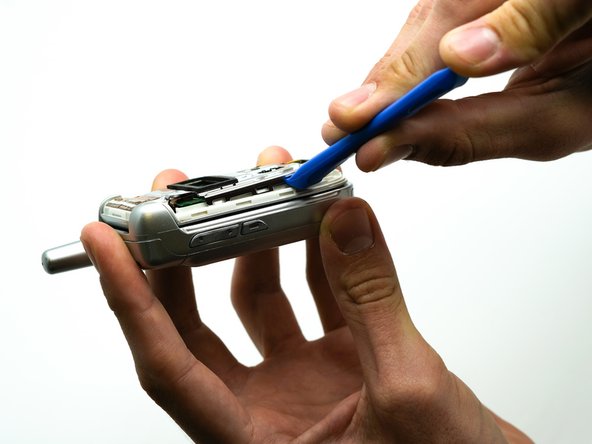
    • Use the iFixit opening tool to separate the casing.

    • To further separate the casing, start at the top of the screen, and run the opening tool along the edges.

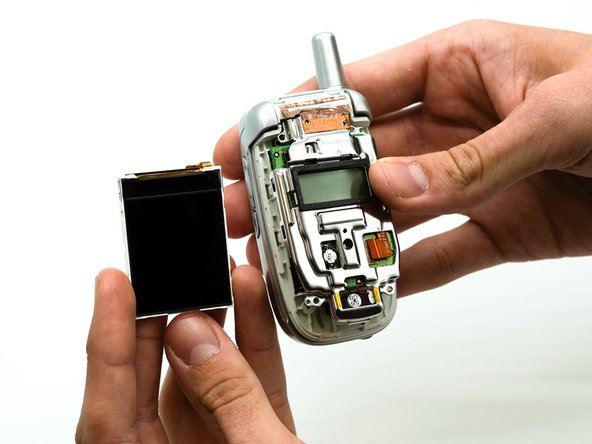
    • Remove the face plate by pulling it from the top hinge.

  2. Motorola V190 Display Screen Replacement: 手順 2、 1の画像 1
    • Use the soldering iron to separate the ribbon from the phone.

  3. Motorola V190 Display Screen Replacement: 手順 3、 1の画像 1
    • Use the iFixit opening tool to remove the screen from the plastic casing .

  4. Motorola V190 Display Screen Replacement: 手順 4、 1の画像 1
    • Use the precision tweezers set to remove the black rectangular piece from the phone casing.

  5. Motorola V190 Display Screen Replacement: 手順 5、 1の画像 1
    • Use the precision tweezers set to remove the rectangular ribbon from the green display board.

  6. Motorola V190 Display Screen Replacement: 手順 6、 2の画像 1 Motorola V190 Display Screen Replacement: 手順 6、 2の画像 2
    • Remove the display screen from the phone.

終わりに

To reassemble your device, follow these instructions in reverse order.

作成者

3人の作成者と共同で作成されました。

Michael Pollock

メンバー登録日: 08/28/19

545 ポイント

5のガイドは作成済み

チーム

University of North Texas, Team S1-G1, Friess Fall 2019 University of North Texas, Team S1-G1, Friess Fall 2019人のメンバー

UNT-FRIESS-F19S1G1

2 メンバー

5のガイドは作成済み

0 件のコメント

コメントを追加

統計データ:

過去 24時間: 0

過去 7 日: 2

過去 30 日: 3

今までの合計 201