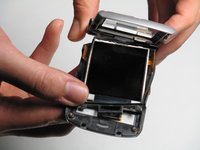
メインコンテンツにスキップ

Motorola Razr V3c Upper Casing (CDMA) Replacement

必要な工具と部品

  1. Motorola Razr V3c Upper Casing (CDMA) Replacement, Upper Casing (CDMA): 手順 1、 1の画像 1
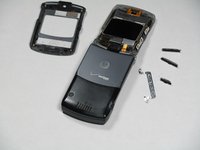
    • Remove the four rubber pieces from all corners of the area around the screen.

  2. Motorola Razr V3c Upper Casing (CDMA) Replacement: 手順 2、 1の画像 1
    • Use a T4 screwdriver to carefully unscrew all four screws on the outer screen.

    • Be sure that you do not strip or damage the screws.

  3. Motorola Razr V3c Upper Casing (CDMA) Replacement: 手順 3、 1の画像 1
    • Carefully pry the screen away from the phone using a plastic spudger.

    • Pry slowly, as too much bending will crack the screen. There are also two fragile ribbon cables that connect the screen and camera to the phone.

  4. Motorola Razr V3c Upper Casing (CDMA) Replacement: 手順 4、 3の画像 1 Motorola Razr V3c Upper Casing (CDMA) Replacement: 手順 4、 3の画像 2 Motorola Razr V3c Upper Casing (CDMA) Replacement: 手順 4、 3の画像 3
    • Take the screen housing off of the casing.

    • Watch for small pieces falling out of the screen during this step. Keep track of these pieces.

終わりに

To reassemble your device, follow these instructions in reverse order.

4 の人々がこのガイドを完成させました。

作成者

17人の作成者と共同で作成されました。

krisko

メンバー登録日: 01/14/10

104 ポイント

4のガイドは作成済み

チーム

Cal Poly, Team 11-4, Forte Winter 2010 Cal Poly, Team 11-4, Forte Winter 2010人のメンバー

CPSU-FORTE-W10S11G4

3 メンバー

8のガイドは作成済み

0 件のコメント

コメントを追加

統計データ:

過去 24時間: 0

過去 7 日: 0

過去 30 日: 0

今までの合計 5,199