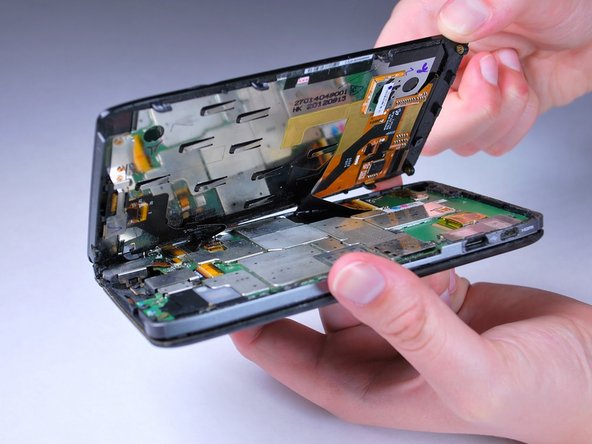
メインコンテンツにスキップ

Motorola RAZR Maxx HD Rear-Facing Camera Replacement

必要な工具と部品

  1. Motorola RAZR Maxx HD Rear-Facing Camera Replacement, Screen Removal: 手順 1、 2の画像 1 Motorola RAZR Maxx HD Rear-Facing Camera Replacement, Screen Removal: 手順 1、 2の画像 2
    • Use the Torx T5 Screwdriver to remove two 5.0 mm screws at the bottom of the phone.

  2. Motorola RAZR Maxx HD Rear-Facing Camera Replacement: 手順 2、 2の画像 1 Motorola RAZR Maxx HD Rear-Facing Camera Replacement: 手順 2、 2の画像 2
    • To remove the SIM card, use an unfolded paperclip to press down on the metal plate on the left side of the phone until it pops up.

  3. Motorola RAZR Maxx HD Rear-Facing Camera Replacement: 手順 3、 2の画像 1 Motorola RAZR Maxx HD Rear-Facing Camera Replacement: 手順 3、 2の画像 2
    • Gently push the screen toward the top edge of the phone and tilt the screen to reveal the black flex cables.

    • Do NOT remove the screen all the way or the flex cables will be damaged.

  4. Motorola RAZR Maxx HD Rear-Facing Camera Replacement: 手順 4、 2の画像 1 Motorola RAZR Maxx HD Rear-Facing Camera Replacement: 手順 4、 2の画像 2
    • Release the two black ribbon flex cables by gently pulling up on the connection using the spudger. Then lift the screen to remove.

    • Make sure to remove the flex cables before completely removing the screen.

    • When reassembling, align the white bands on the edge of the screen so that a connection is made.

  5. Motorola RAZR Maxx HD Rear-Facing Camera Replacement, Rear-Facing Camera: 手順 5、 2の画像 1 Motorola RAZR Maxx HD Rear-Facing Camera Replacement, Rear-Facing Camera: 手順 5、 2の画像 2
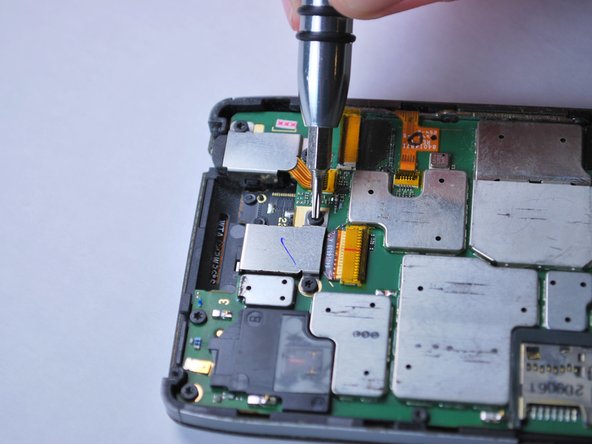
    • Using a T5 Torx screwdriver, unscrew the two 4.0mm screws on the rear-facing camera cover.

  6. Motorola RAZR Maxx HD Rear-Facing Camera Replacement: 手順 6、 2の画像 1 Motorola RAZR Maxx HD Rear-Facing Camera Replacement: 手順 6、 2の画像 2
    • Use tweezers to remove the rear-facing camera cover.

  7. Motorola RAZR Maxx HD Rear-Facing Camera Replacement: 手順 7、 2の画像 1 Motorola RAZR Maxx HD Rear-Facing Camera Replacement: 手順 7、 2の画像 2
    • Use the spudger to gently lift the rear-facing camera until it is detached from the back cover.

    • Release the yellow ribbon cable by lifting up on the connection to the motherboard with the spudger.

  8. Motorola RAZR Maxx HD Rear-Facing Camera Replacement: 手順 8、 2の画像 1 Motorola RAZR Maxx HD Rear-Facing Camera Replacement: 手順 8、 2の画像 2
    • Use tweezers to gently remove the rear-facing camera by lifting it up off of the motherboard.

終わりに

To reassemble your device, follow these instructions in reverse order.

2 の人々がこのガイドを完成させました。

作成者

3人の作成者と共同で作成されました。

Hristo

メンバー登録日: 02/01/15

150 ポイント

1ガイドが承認済み

チーム

Cal Poly, Team 8-40, Amido Winter 2015 Cal Poly, Team 8-40, Amido Winter 2015人のメンバー

CPSU-AMIDO-W15S8G40

5 メンバー

18のガイドは作成済み

0 件のコメント

コメントを追加

統計データ:

過去 24時間: 0

過去 7 日: 3

過去 30 日: 3

今までの合計 383