メインコンテンツにスキップ

Motorola Photon 4G MB855 Headphone Jack Replacement

必要な工具と部品

  1. Motorola Photon 4G MB855 Headphone Jack Replacement, Removing the Back Cover: 手順 1、 2の画像 1 Motorola Photon 4G MB855 Headphone Jack Replacement, Removing the Back Cover: 手順 1、 2の画像 2
    • Insert a plastic opening tool into the indentation at the bottom of the phone between the front and rear covers.

    • Lift the back cover from the bottom and remove it from the phone.

  2. Motorola Photon 4G MB855 Headphone Jack Replacement, Removing the Battery: 手順 2、 2の画像 1 Motorola Photon 4G MB855 Headphone Jack Replacement, Removing the Battery: 手順 2、 2の画像 2
    • Insert a plastic opening tool, or your finger, into the notch in between the sim card and the battery and lift the battery upward.

    • Remove the battery from your phone.

  3. Motorola Photon 4G MB855 Headphone Jack Replacement, Removing Screw Covers: 手順 3、 3の画像 1 Motorola Photon 4G MB855 Headphone Jack Replacement, Removing Screw Covers: 手順 3、 3の画像 2 Motorola Photon 4G MB855 Headphone Jack Replacement, Removing Screw Covers: 手順 3、 3の画像 3
    • Remove all five screw covers with tweezers located in the picture.

  4. Motorola Photon 4G MB855 Headphone Jack Replacement, Removing the Midframe: 手順 4、 3の画像 1 Motorola Photon 4G MB855 Headphone Jack Replacement, Removing the Midframe: 手順 4、 3の画像 2 Motorola Photon 4G MB855 Headphone Jack Replacement, Removing the Midframe: 手順 4、 3の画像 3
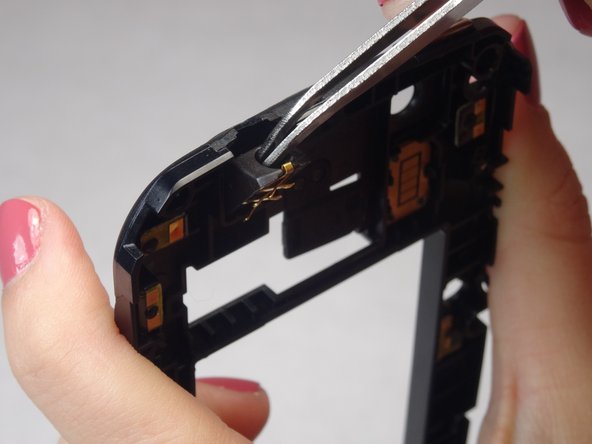
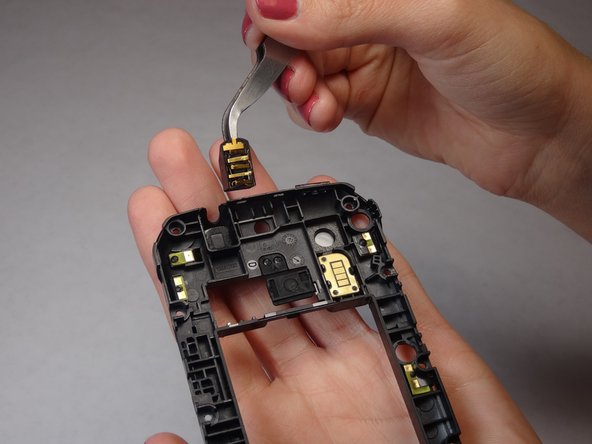
    • Remove the 10 T4 Torx screws securing the midframe to the display assembly.

    • Gently pry the midframe from the display assembly and remove it.

  5. Motorola Photon 4G MB855 Headphone Jack Replacement, Locating Headphone Jack: 手順 5、 1の画像 1
    • Locate Headphone Jack attached to Midframe.

  6. Motorola Photon 4G MB855 Headphone Jack Replacement, Removing Headphone Jack: 手順 6、 3の画像 1 Motorola Photon 4G MB855 Headphone Jack Replacement, Removing Headphone Jack: 手順 6、 3の画像 2 Motorola Photon 4G MB855 Headphone Jack Replacement, Removing Headphone Jack: 手順 6、 3の画像 3
    • Use Tweezers to gently remove Headphone Jack from the Midframe.

    • The Headphone Jack is attached with adhesive, remove carefully.

終わりに

To reassemble your device, follow these instructions in reverse order.

ある他の人がこのガイドを完成しました。

作成者

1人の作成者と共同作成されました。

Eddie Krause

メンバー登録日: 10/07/14

260 ポイント

3のガイドは作成済み

チーム

USF Tampa, Team 8-6, Leahy Fall 2014 USF Tampa, Team 8-6, Leahy Fall 2014人のメンバー

USFT-LEAHY-F14S8G6

3 メンバー

10のガイドは作成済み

0 件のコメント

コメントを追加

統計データ:

過去 24時間: 0

過去 7 日: 1

過去 30 日: 3

今までの合計 313