メインコンテンツにスキップ

Motorola Moto Z2 Play Motherboard Replacement

必要な工具と部品

  1. Motorola Moto Z2 Play Motherboard Replacement, Eject the SIM tray: 手順 1、 3の画像 1 Motorola Moto Z2 Play Motherboard Replacement, Eject the SIM tray: 手順 1、 3の画像 2 Motorola Moto Z2 Play Motherboard Replacement, Eject the SIM tray: 手順 1、 3の画像 3
    • Insert a SIM eject tool, bit, or a straightened paperclip into the hole in the SIM tray, located at the top left edge of the phone.

    • Double-check to make sure that you are not mistakenly inserting the tool into the microphone hole.

    • Push firmly to eject the tray.

    • Pull the tray straight out to remove the tray.

  2. Motorola Moto Z2 Play Motherboard Replacement, Screen Removal: 手順 2、 1の画像 1
    • Power off your phone before you complete any replacement steps.

  3. Motorola Moto Z2 Play Motherboard Replacement: 手順 3、 1の画像 1
    • Heat the edges of your Motorola Moto Z2 Play screen for two to three minutes with a heat gun. You adjust the heat gun to 85 degrees centigrade, and be careful not to hold the heat gun on one position for too long; to avoid damaging, or "hotspotting" the LCD. The screen should be very warm, but not painful, to the touch. Reheat as necessary.

    • If screen is cracked put strong adhesive tape across the screen in order to avoid breaking the screen further and receiving cuts.

    • If you don’t have access to a heat gun, a hair dryer can be used.

  4. Motorola Moto Z2 Play Motherboard Replacement: 手順 4、 1の画像 1
    • Place suction cup in the middle of the screen and press down.

  5. Motorola Moto Z2 Play Motherboard Replacement: 手順 5、 3の画像 1 Motorola Moto Z2 Play Motherboard Replacement: 手順 5、 3の画像 2 Motorola Moto Z2 Play Motherboard Replacement: 手順 5、 3の画像 3
    • Pry the screen by wedging the plastic opening tool under the screen at the charging port.

    • Work your way around the screen with the plastic opening tool.

    • When you pry near the top-right and bottom-right corners, be careful not to pry too far, or you risk damaging the display cable.

    • Complete these steps carefully because the screen is delicate and can easily crack. If the screen begins to resist prying, reheat the adhesive with your heat gun.

  6. Motorola Moto Z2 Play Motherboard Replacement: 手順 6、 3の画像 1 Motorola Moto Z2 Play Motherboard Replacement: 手順 6、 3の画像 2 Motorola Moto Z2 Play Motherboard Replacement: 手順 6、 3の画像 3
    この手順で使用する道具:
    Plastic Cards
    $2.99
    購入する
    • Use a suction cup to lift up screen from left to right.

    • If you don’t have a suction cup, wedge a spudger or a small plastic card under the screen and lift slowly.

    • Failure to lift screen from left to right can cause damage to interior wires of your phone.

  7. Motorola Moto Z2 Play Motherboard Replacement: 手順 7、 3の画像 1 Motorola Moto Z2 Play Motherboard Replacement: 手順 7、 3の画像 2 Motorola Moto Z2 Play Motherboard Replacement: 手順 7、 3の画像 3
    • Identify ribbon connector at the top right of the phone.

    • Pry the black locking bar up gently with a plastic opening tool.

    • Remove the ribbon wires by pulling them out of the connector with a tweezer.

    • The locking bar is the small black bar located on the digitizer’s ZIF connector.

    • Be sure to push the locking bar back down using a spudger after you put the ribbon wire back in since the lock does not lock automatically.

  8. Motorola Moto Z2 Play Motherboard Replacement: 手順 8、 3の画像 1 Motorola Moto Z2 Play Motherboard Replacement: 手順 8、 3の画像 2 Motorola Moto Z2 Play Motherboard Replacement: 手順 8、 3の画像 3
    • Identify the ribbon cable, located at the bottom right of the phone.

    • If present, remove kapton (orange) tape covering the cable connector.

    • Flip up the small locking flap on the ZIF connector and use tweezers to slide the cable straight out of its socket.

    • Excessive force is not needed.

  9. Motorola Moto Z2 Play Motherboard Replacement: 手順 9、 1の画像 1
    • Lift the screen from the phone to completely detach.

    • If screen doesn't detach, go back to step 7 and 8 to make sure the bar is unlocked and ribbon connector is fully detached.

    • During reassembly, you may need to apply or replace the display adhesive on your display assembly. Use our display adhesive application guide to apply the adhesive and reseal your device.

  10. Motorola Moto Z2 Play Motherboard Replacement, Battery: 手順 10、 2の画像 1 Motorola Moto Z2 Play Motherboard Replacement, Battery: 手順 10、 2の画像 2
    • Remove the orange tape, located at the bottom right of the phone, using tweezers.

    • Do not discard tape.

    If you discard the gold tape it can cause the phone to reset after repair

    JT Harper - 返信

  11. Motorola Moto Z2 Play Motherboard Replacement: 手順 11、 2の画像 1 Motorola Moto Z2 Play Motherboard Replacement: 手順 11、 2の画像 2
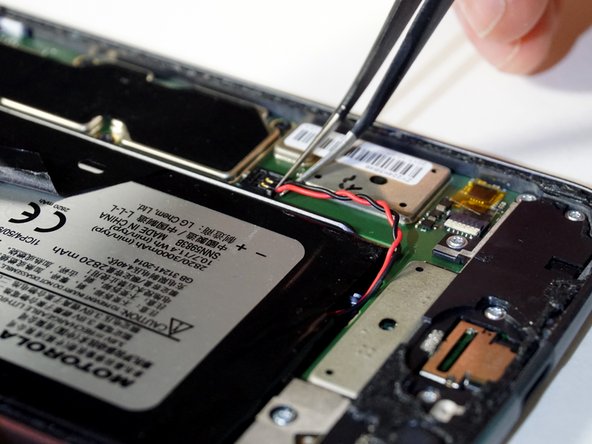
    • Detach the red and black battery wire by lifting up with tweezers.

    What if the whole black box came off. I think i broke it! :( is this fixable?

    Rachael Vigar - 返信

  12. Motorola Moto Z2 Play Motherboard Replacement: 手順 12、 2の画像 1 Motorola Moto Z2 Play Motherboard Replacement: 手順 12、 2の画像 2
    • Peel back the black tape that is located on the battery.

    • Make sure you pull back gently so you can reuse the tape with reassembly.

  13. Motorola Moto Z2 Play Motherboard Replacement: 手順 13、 3の画像 1 Motorola Moto Z2 Play Motherboard Replacement: 手順 13、 3の画像 2 Motorola Moto Z2 Play Motherboard Replacement: 手順 13、 3の画像 3
    • Lift the black tape and slide a card under the battery.

    • Align the card parallel and under the battery.

    • Wedge the card further under the battery.

    • Lift the card up to assist in removing the battery from the adhesive.

  14. Motorola Moto Z2 Play Motherboard Replacement: 手順 14、 1の画像 1
    • Lift to remove the battery from the device completely.

    Why can't they just go back to the phones where you can snap off the back and simply replace the battery? I'm afraid to do it myself and Verizon won't do it for me. Now I have to find someone whom I will have to pay to replace a battery. This is ridiculous. It should not be so difficult to replace a battery and I should not have to jeopardize my phone to replace a battery. Why? Sorry, I just needed to vent. I miss simplicity.

    spallatto - 返信

    I agree with both of you guys, but it’s the breaking point between performance, convenience, and safety. Older phones had batteries with hard protective casings that wouldn’t leave them vulnerable to pocket-fire if your keys jammed the battery.

    Unfortunately, with phones getting more powerful(requiring a higher-capacity battery), AND slimmer, the protective casing for the battery is literally the casing on the phone. Look at the battery above; it could easily be pierced and dangerously vent.

    I’m with you in wishing I could just pop a spare in, but those days have passed. =/

    Mike Ponce - 返信

    I suggest NOT to do this. Followed the directions exactly, with the slight deviation of my cable into the battery crumbling so I carefully pulled out the lose pieces with the tweezers and had NO problem putting it back together. My phone was WORKING with the exploded, puffy battery with NO deficits. Now? No charging (but checked it with the multi-meter so I know it is not the fault of the new battery). Only reaction I get is the phone making a vibrating sound when I plug it in to charge. Will NOT turn on. Will NOT react. F*CKED.

    Jeanne M Taylor - 返信

    Without knowing what I was getting into I ordered a replacement battery, toolkit, and screen adhesive. Thanks to this guide I was actually able to remove the screen, replace the battery, and get it sealed back up relatively easily. Definitely nerve-wracking as I haven’t attempted anything like this before, but my phone was at the end of the battery life so I figured why not give it a shot.

    Thank you for the easy instructions!

    Alex Anderson - 返信

    i followed the guide step by step, but unfortunately i touched the lcd in one place ... with the result that the screen went KO can i fix it somehow?

    erryedelia - 返信

  15. Motorola Moto Z2 Play Motherboard Replacement, Speaker: 手順 15、 1の画像 1
    • Remove the three silver 2.6 mm T3 Torx screws on the speaker shell at the top of the phone with a screwdriver by turning counterclockwise.

    • Remove the four black 3.5 mm T3 Torx screws on the speaker shell at the top of the phone with a screwdriver by turning counterclockwise.

    • It is helpful to keep screws on a magnetic surface to avoid losing them.

  16. Motorola Moto Z2 Play Motherboard Replacement: 手順 16、 1の画像 1
    • Lift up the silver metallic tape using the tweezers.

  17. Motorola Moto Z2 Play Motherboard Replacement: 手順 17、 3の画像 1 Motorola Moto Z2 Play Motherboard Replacement: 手順 17、 3の画像 2 Motorola Moto Z2 Play Motherboard Replacement: 手順 17、 3の画像 3
    • Lift gently to completely remove speaker housing using tweezers.

    • Try lifting the speaker housing from both sides slightly before removing completely.

  18. Motorola Moto Z2 Play Motherboard Replacement: 手順 18、 2の画像 1 Motorola Moto Z2 Play Motherboard Replacement: 手順 18、 2の画像 2
    • Place the housing upside down in order to continue working.

    • Pry the speaker from the housing with a plastic opening tool.

    • When reassembling, make sure the metal connectors of speaker are in the bottom left and right corners (correct orientation).

    • Speaker clicks in on reassembly.

  19. Motorola Moto Z2 Play Motherboard Replacement, Audio Jack: 手順 19、 1の画像 1
    • Remove the seven silver 2.6 mm T3 Torx screws on the black battery cable cover at the bottom of the phone with a screwdriver by turning counterclockwise.

    • Remove the single black 3.5 mm T3 Torx screw on the black battery cable cover at the bottom of the phone with a screwdriver by turning counterclockwise.

    • It is helpful to keep screws on a magnetic surface to avoid losing them.

  20. Motorola Moto Z2 Play Motherboard Replacement: 手順 20、 3の画像 1 Motorola Moto Z2 Play Motherboard Replacement: 手順 20、 3の画像 2 Motorola Moto Z2 Play Motherboard Replacement: 手順 20、 3の画像 3
    • Lift the battery cover with tweezers starting on the right side slightly to dislodge the cover.

    • Lift the battery cover with tweezers from the left side slightly to dislodge the cover.

    • Remove the battery cover with tweezers by solidly gripping the left side of the cover and lifting up.

  21. Motorola Moto Z2 Play Motherboard Replacement: 手順 21、 3の画像 1 Motorola Moto Z2 Play Motherboard Replacement: 手順 21、 3の画像 2 Motorola Moto Z2 Play Motherboard Replacement: 手順 21、 3の画像 3
    • Tilt the front of the black audio jack up with tweezers.

    • Lift the audio jack out of its housing with tweezers.

    • Little force is required to remove the audio jack.

  22. Motorola Moto Z2 Play Motherboard Replacement, Motherboard: 手順 22、 2の画像 1 Motorola Moto Z2 Play Motherboard Replacement, Motherboard: 手順 22、 2の画像 2
    • Remove the three black 2.6 mm T3 Torx screws on the motherboard panel at the side of the phone with a screwdriver by turning counterclockwise.

  23. Motorola Moto Z2 Play Motherboard Replacement: 手順 23、 1の画像 1
    • Place a plastic opening tool under the edge of the motherboard.

  24. Motorola Moto Z2 Play Motherboard Replacement: 手順 24、 1の画像 1
    • Lift the motherboard from the right edge like a book towards the left.

    • Identify the connector on the top left of the device.

  25. Motorola Moto Z2 Play Motherboard Replacement: 手順 25、 2の画像 1 Motorola Moto Z2 Play Motherboard Replacement: 手順 25、 2の画像 2
    • Detach the connection on the bottom of the motherboard.

終わりに

To reassemble your device, follow these instructions in reverse order.

ある他の人がこのガイドを完成しました。

作成者

7人の作成者と共同で作成されました。

mitch miller

メンバー登録日: 01/24/18

2,055 ポイント

8のガイドは作成済み

チーム

Cal Poly, Team S19-G5, Livingston Winter 2018 Cal Poly, Team S19-G5, Livingston Winter 2018人のメンバー

CPSU-LIVINGSTON-W18S19G5

4 メンバー

30のガイドは作成済み

コメント 1 件

Dear sir

I need Moto Z2 play mother board for golden colour hand set want to know the price

sudarsan kk Sudarsan - 返信

コメントを追加

統計データ:

過去 24時間: 0

過去 7 日: 2

過去 30 日: 13

今までの合計 4,145