この翻訳は、ソースガイドの最新の更新を反映していない可能性があります。 翻訳の更新に協力してください。 または ソースガイドを参照してください。
はじめに
このガイドを使って、Motorola Moto X Pureエディションの消耗したバッテリーを取り出して交換します。バッテリーが膨張している場合は、適切な方法で処理してください。
デバイスを再組み立てする前に、バッテリーの残量を25%以下まで放電してください。充電されたリチウムイオンバッテリー は引火の原因となったり、アクシデントで穴を開けてしまうと爆発の恐れがあります。
必要な工具と部品
-
-
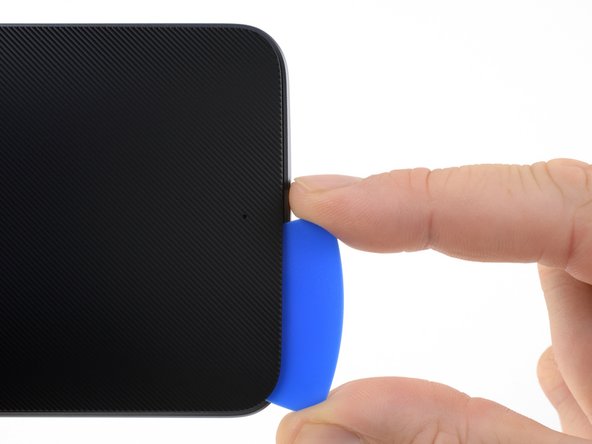
先端が鋭利なピンセットを閉じたまま、先端をSIMカードスロット付近のバックカバーの端についた小さなホールに差し込みます。
-
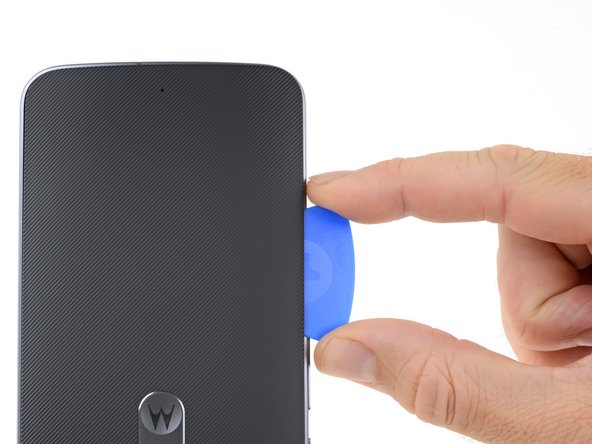
ピンセットを使って、わずかにカバーを持ち上げます。そして開口ピックをカバーとフレームの隙間に差し込んで、スライドします。
Insert only one of the tweezers’ point into the hole. Once the rubber backing is lifted high enough, slip a corner of the opening pick under the rubber backing. Leave the first pick near the corner while you use a second pick as directed in Step 6.
-
-
-
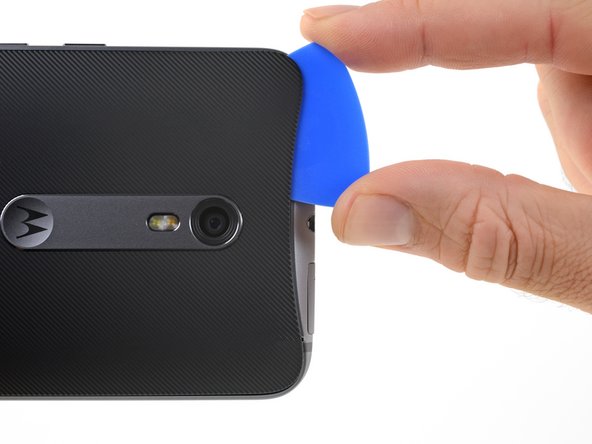
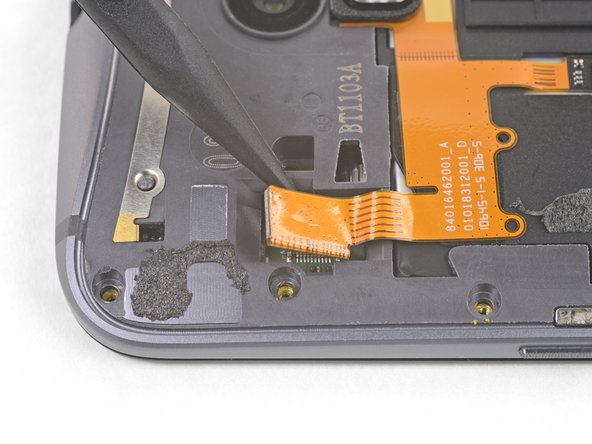
開口ピックをデバイスの端にそってスライドして、バックカバーに付けられた接着剤を切開します。
-
カバーの中央に向かって、できる限り深く開口ピックを挿入してください。カバーの中央に厚い接着剤が付けられており、これを剥がさなければなりません。
I did not have a pick, used a few old credit cards, leaving them in place to keep the phone back separated.
Used a hair dryer to heat up a little, one section at a time, was enough to remove. Pulled apart slowly.
Left adhesive on the back and on the phone, where possible, using a tiny screw driver to separate. Reused whatever adhesive remained to reattach.
-
-
-
-
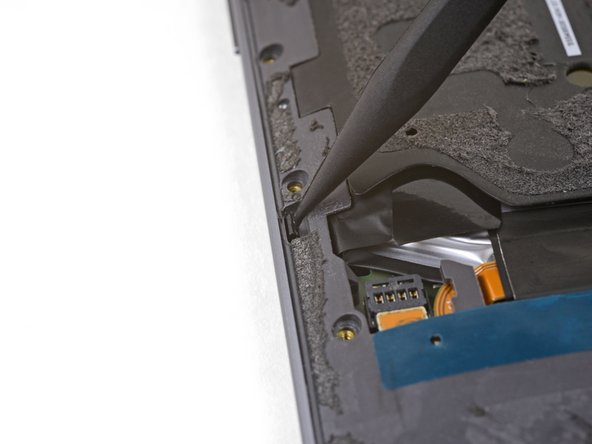
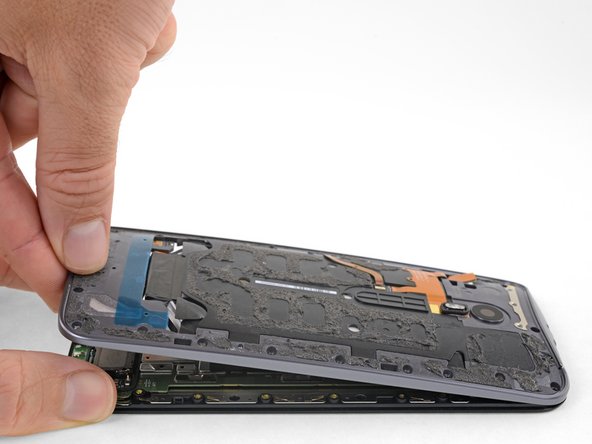
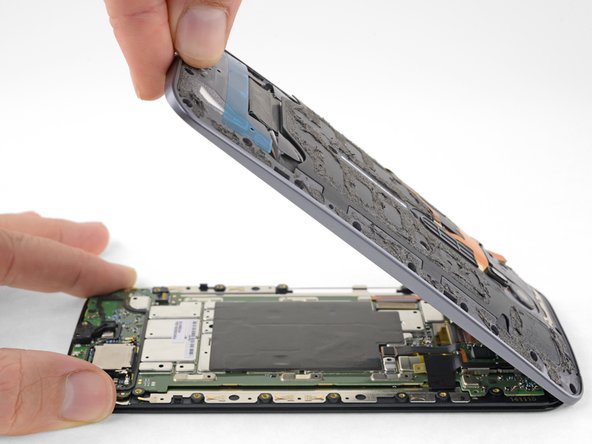
デバイスからカバーを慎重にこじ開けます。
-
まず、ピンセットとスパッジャーを使用して、リアカバーとデバイス筐体の両方に残っている接着剤を剥がし取ります。
-
次に、高濃度のイソプロピルアルコール(90%以上)と糸くずの出ない布で接着エリアを綺麗に拭き取ります。 拭き取る際は、前後ではなく、一方向に動かしてください。 新しい接着剤を付けるため表面を準備してくれます。
-
交換用の接着剤は、バックカバーの形状完全フィットするようにプレカットされたシートで提供されてます。 このプレカットシートがない場合は、Tesa 61395などの高接着両面テープを使用できます。バックカバーにプレカットした接着剤を取り付ける前に、メタルインサートを外してください。 接着剤を装着してから、インサートを交換します。
-
バックカバーを取り付けた後、デバイスに強い安定した圧力を数分間加えて、接着剤をしっかりと接着させます。
Had the pre-cut adhesive sheet for reinstalling the Moto X Pure’s back cover. It seemed like the most “original” option at the time. I tried and tried to get it aligned inside the back cover, but found it virtually impossible to do. You pretty much have to get it perfectly aligned and then stick it down all at once. If it makes contact with the cover before it’s perfectly aligned, it’s all over. You’ll never get it back off without destroying it.
After failing with the pre-cut sheet, I resorted to the die-cut strips and corner pieces. This worked just fine.
-
-
-
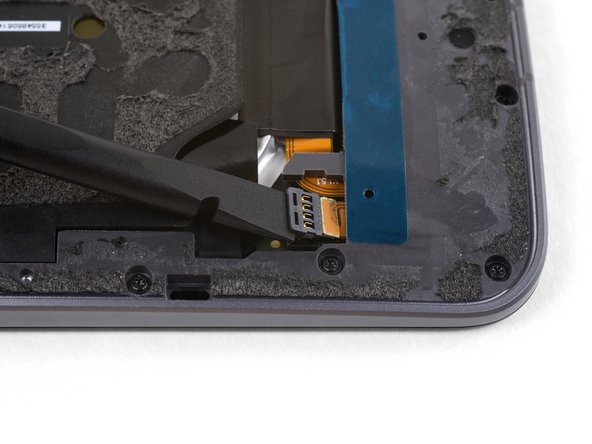
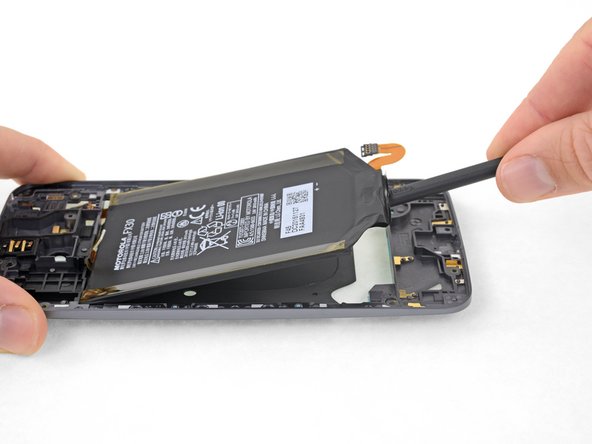
スパッジャーの平面側先端を使って、ソケットからバッテリーコネクタをまっすぐ持ち上げて取り出します。
Reconnecting the battery was difficult, did not align exactly. Note there are 2 slots that line up and 4 pins. Used a 10x magnifying lens with LED light, purchased to do this job. This step (reassembly) is where the magnifier came in handy. Had to move battery around a bit to get it to line up. Ended up removing adhesive tape from battery, so I could get in place to attach the connector. Battery held in place with screws and phone case, so far so good.
this is the difficult part. I find it is easier to remove this connector as the midframe and phone screen are separating (see step 19). Be also careful in prying this mine got broken luckily it is connected to the old battery which I replaced anyway
Broke the battery plug right off the motherboard! Trying to do a 2nd battery replacement. Only push up gently on the edge of the tab and straight up. Shopping for a new phone.
-
-
-
T3トルクスネジ用ドライバーを使って、2.4mmネジを20本外します。
Need to add a step for removing the bar holding the buttons in place. Step 5 from the tear down. Still can’t take the mid frame off though.
I stripped the threads on one of the 20 screws, had to drill it out. (Managed to do this without cracking the screen, completed battery replacement, all ok.)
Careful removing the screws, be sure of tight grip. I saw T4 torx suggested on another site for Moto X Pure, this might grip better? Try both.
I did not have to remove the screw holding the volume buttons bar in place. These stay attached, not needed for replacing the battery. Just the 20 screws shown.
DO NOT REMOVE THE SILVER SCREW HOLDING IN THE VOLUME AND ON-OFF BUTTON. If these buttons fall out there are 4 very small springs that will pop out and are very hard to reinsert. If they do pop out do not use tweezers to reinsert but use a magnetic screw driver bit to reinsert.
This is extremely easy to overlook. This screw is a different color (silver versus black) but when you’re in the swing of removing all the screws it’s tempting to just remove ALL the screws. I goofed, had the buttons fall out, could only find 3 of the springs. Put two back in the volume rocker and only one in the power button since it’s smaller, seems like it wouldn’t need two as much. Everything still works, maybe just slightly less tactile than before. Even without the the springs, there’s still some mechanical return to the buttons, so if you do lose them don’t despair.
This is not working, got two out. Most just strip.
Update. The driver provided is not the right size. I had some tools laying around and found one that fit. This allowed me to get all the screws out except the six I stripped using the driver provided by ifiixit. Turns out they come out pretty easy if you have the right size bit. Would have been an easy fix had I not bought the tools…. go figure.
What is the right size bit?
The T3 Torx Driver was bundled in the bag with the Alcohol Prep Pad, not with the rest of the drivers! So look before you there before you call support like I did.
pixilated1 - 返信
T4 works better, T3 also works. Try both and proceed carefully, get a good grip before turning.
-
-
-
スパッジャーの先端を使って、ミッドフレームの左側を固定している小さなクリップを外しながら、デバイスの端側に押し出します。
On reassembly, these did not really click back in place. Held tight when reattaching the 20 (19 in my case) screws).
I had to push rather hard to release both clips. The tip of the spudger bent under the pressure I had to apply. But the the clips did finally release without damage.
-
-
-
ディスプレイの端を持って、ディスプレイからミッドフレームを慎重に持ち上げて外します。
-
ディスプレイからミッドフレームを外します。
My mid-frame and display were separated on the long sides but seemed a little bit stuck on the top and bottom. I used the flat end of the spudger to carefully pry the two assemblies apart at either end.
In my case, stuck in the middle. Pulled apart very slowly, giving the adhesive a chance to separate, and not tearing whatever it was in there. Kept an eye on the inside middle, and very SLOW let it separate. Or was that the battery? In either case, go slow on all steps.
Yeah, everything went according to the guide until this step. I lifted the midframe away from the screen assembly as shown and something in the center didn’t separate at all. I spent a good half hour terrified that I had missed a step or a screw or that there was something different about my phone. In the end I read the comments and very slowly and patiently lifted the midframe until something uncoupled and the two parts cleanly separated. I was certain that permanent damage must have been done, but upon reassembling everything seems to be working perfectly.
Note to self - check that ALL (20) screws have been removed… especially if midframe is stubborn lifting up - i (almost) forgot about the one near the display cable (and it’s threaded into the motherboard instead of the frame) :)
In my unit, the midframe released from the display nicely just as described in the instructions.
-
-
-
スパッジャーの先端を、バッテリーに留められた音量ボタンのコネクタボードの角の下にゆっくりとスライドして差し込みます。
-
ボードをわずかに持ち上げて、バッテリーからボードを乖離します。
The entire copper assembly shown next to the spudger is glued to the battery. It will detach with light force.
The flash is adhered to the battery as well. Be careful when pulling the battery away, or detach the flash first.
thanks that is very helpful i will sure to be carful
The starting point for lifting it off is the top of the pad that’s glued to the battery, not the one coming from the side.
Greg Bandy - 返信
what if I broke the cable? could this be the reason my phone won’t turn on?
John, I am having the same problem. After replacing flex cable for volume, my phone keep flashing, when charging battery. Did you find a solution??
Greetings from Lars, a devoted Motorola Fan.
-
-
-
バッテリーの接着タブの1本を指でつかみ、バッテリーからゆっくりとデバイス下部に向かって引きます。
-
バッテリーとミッドフレームの間からストリップが抜け出るまで、ストリップの張力を一定に保ち、しっかりと引っ張ります。 ベストな結果を得るには、他のコンポーネントに引っ掛けずに、できる限り低い角度でストリップを引っ張ることです。
-
取り外し中にバッテリーの接着タブが破損した場合、指または先の尖っていないピンセットを使用して接着剤の残りの長さを取り出して、引っ張ります。
When re-assembling, I wasn’t sure how to properly place this connector. I could see where it supposed to connect on the other panel, so I just tried to measure from the nearest screw hole. But how does one know if this part was placed properly?
Thank you all, couldn’t have done it without you….
-
-
-
残りの接着ストリップを同じ手順で外します。
The thin, orange ribbon cable from the three buttons disconnected from its connector when the battery was removed. I don’t know if anything could have been done to prevent this, especially since the adhesive pull tabs never come out completely. So it was touch and go there for a few minutes until I figured out how that cable reconnects to its connector. (small white tab on connector needs to be lifted up and then the cable reinserted.
the nfc adhesive antenna is attached to the battery, between the battery and the back plate. there are two black tab pulls at the bottom of the battery that protect the nfc antenna. any break to the protective strips for the antenna (while pulling the battery off the back plate) will destroy your nfc. pry from the back plate very slowly and carefully, from bottom, up. to reattach, place the antenna in its cutout well in the back plate, then place the battery on top. NB: you will need to carefully bend the edges of the new battery to match the curvature of the back plate. compare with your original battery.
when reinstalling the nfc antenna, use the two pinholes on the back plate, and their matching pin holes in the nfc antenna backing to properly allign the nfc antenna. next, place the battery on top of the antenna and carefully match the placement of the antenna contacts on the battery to ensure they connect with their contacts on the motherboard when the back plate is placed back on the display board.
-
-
-
開口ピックをNFCコネクタの下にスライドして、バッテリーからコネクタを剥がします。
The position of the NFC connector is really critical. Before removing the NFC connector from the old battery, make measurements from some reference points on the midframe, so you can reinstall it in the EXACT original position. If it’s not in the right spot, it won’t make contact with the two pins on the motherboard.
-
-
-
スパッジャーの平面側先端を使って、ミッドフレームからバッテリーを持ち上げます。
-
バッテリーを固定している接着剤がまだ残っている場合は、バッテリーを変形させないように注意しながら、ミッドフレームからバッテリーを慎重に取り出します。
The volume ribbon connector mentioned in step 15 is adhered to the back of the battery. You must separate these two carefully with either a thin flat tool or a thin tweezer set. Pulling on the battery without doing this could damage the ribbon connector.
Danny Post - 返信
Before you use adhesive on the new battery, be sure to check the position of the battery and cable with respect to the battery cable socket. My replacement battery was a touch shorter than the OEM so the initial placement with the new adhesive left the battery cable in a position where it would not go into the socket.
To form a replacement battery that comes completely flat, place the new flat battery on the curved side of the OEM battery. Make sure yo have the cables matching. Then very gently with your fingers/hand, flex the new battery down on the edges until it has the same shape as the old battery. After I did this the new battery fit perfectly in the phone.
-


交換用のパーツとオリジナルのパーツを見比べてください。残りのコンポーネントを移植する必要があるか、パーツを装着する前に接着剤の裏張りを取る必要があります。
デバイスを再組み立てする際は、これらの手順を逆の順番に従って作業を進めてください。
この修理ガイドを完成したら、新しく装着したバッテリーのキャリブレーションを行なってください。
e-wasteを処理する場合は、認可済みリサイクルセンターR2を通じて廃棄してください。
修理が上手く進みませんか?トラブルシュートのヘルプには、アンサーコミュニティを参照してください。
交換用のパーツとオリジナルのパーツを見比べてください。残りのコンポーネントを移植する必要があるか、パーツを装着する前に接着剤の裏張りを取る必要があります。
デバイスを再組み立てする際は、これらの手順を逆の順番に従って作業を進めてください。
この修理ガイドを完成したら、新しく装着したバッテリーのキャリブレーションを行なってください。
e-wasteを処理する場合は、認可済みリサイクルセンターR2を通じて廃棄してください。
修理が上手く進みませんか?トラブルシュートのヘルプには、アンサーコミュニティを参照してください。
70 の人々がこのガイドを完成させました。
以下の翻訳者の皆さんにお礼を申し上げます:
88%

Midori Doiさんは世界中で修理する私たちを助けてくれています! あなたも貢献してみませんか?
翻訳を始める ›

42 件のコメント
Rayan thank you, although I am not yet ready to replace the battery (about a year to go) yet, I would like to know if there are better batteries than those that came with the unit from the manufacturer? An upgrade that holds a better charge on a daily basis? Marty
Do you have a link to buy a battery? I've been looking but I'm still not confident with me results. Preferably one that includes the necessary tools, but so long as it's definitely the correct battery. I need to replace my battery, NOW!
Battery now available. Please see link on this page or here:Moto X Pure Edition Battery - Genuine
Has anyone bought a 3rd party battery for this phone? I got one from Germany brand name "vhbw", however it is not curved and so will not fit. It is quite soft and so am wondering if it is safe to bend such batteries? Not sure if I should risk it, though.
Alex, I bent my new battery to make it fit. It seems to be working just fine.
I found a Motorola brand FX30 battery labeled as "new" on ebay for $30 from a seller with good reputation. Reading the amazon reviews for 3rd party batteries I saw a lot of comments complaining the battery isn't curved like the original and only sort of fits. The FX30 battery I bought is exactly like the one I took out and so is a perfect fit.
New Lithium Ion cells require 5 or 6 charge cycles to properly condition so I won't know if this truly is a good battery for a few days. But at least it fit like a glove!
I replaced the screen+digitizer and they both seems to work allright. But after that, I'm facing a battery problem: It can't charge to 100% and is continously discharging the battery. I changed the battery, but the problem continued. I think that the battery and charging connector are both ok. Any ideas???
I have same problem as dal, something “infected” my battery information partition and I suspect it is the same manufacturer malware pushed by apple to sell more phones. In their mindset they think that what they are doing is justified by some forced legal agreement and on the money side of things they think that purposefully obsoleting equipment will force you to purchase newer models.
Something is storing my battery information and I can’t seem to fix it. Also the charging icon is forever stuck on and NO QUICKCHARGE device works with it. It only happens on Nougat!!! And the quick-charge icon is permanently on.
I force downgraded to Marshmallow and problem gone! So it could be a developer oversight or it could be Apples agenda set in software now.
Apple pushes battery degrading malware right before a new release like clockwork, so it is how they got caught, but because of legal agreements that you are forced to accept no one can do anything about it.
I suspect Motorola is doing the same thing here.
I have the same problem as dal and I suspect malware, manufacturer sponsored malware to be the culprit.
I know asking for information on here is like going to a church and praying for help but I would like to know WHERE the battery information is stored, in what partition on the emmc? It is NOT store on the data partition that is for sure. There is a special partition designed just for charging and it is a heavily striped down version of android, it also is the PRIMARY target for malware and CENTRAL OPS targeting.
For MTD and EMMC devices, the partition layout and the partition names can be retrieved by reading the /proc/mtd and /proc/emmc files .
So can anyone tell me where the actuall battery informatio is store on motorola devices? I would really like to know as I suspect something needs to be checked here.
I oredered a battery from Bigupgadegts on this page.
If you are taking the back off, which you need to do to replace the battery, or replace the screen. Then you will need a new adhesive for the back. I have found one: https://amzn.to/2F6nFY5
Are you sure the reassembly is simply these steps in reverse order? Will the adhesive from the back plate reattach, or must you really have to buy new a new adhesive sheet for the Moto X?
Hi Alex, I just went through this procedure. As for the adhesive, I used mineral spirits to completely remove the old adhesive off the phone’s plastic backing. Clean w/alcohol after. Then used new adhesive from Amazon—around $5-6 for 2-3 sets of adhesive. The old adhesive sort of splits between the plastic backing and the inside of the phone leaving behind a velvety kind of texture that isn’t very sticky. It may work w/o new adhesive. BTW I found a Motorola branded battery for $35 on Amazon via a Marketplace seller, too, for anyone shopping around. Sort of difficult to find one (Ebay is all China stuff)
Just completed this replacement. Screws in ours were a great fit for a T4 bit , and came out with just gentle rotational force. A potential issue: There was some adhesive on the back of the battery that adhered to the thin ribbon cable that runs from the Power and Volume buttons to the black connector in the center of the photo for Step 4. When I had the frame flipped over and lifted out the battery, it tugged that cable out of the black connector. The cable fell back on top of the connector so it was not apparent that it was disconnected. When plugged into a charger, the screen worked and the battery indicated it was charging, but the buttons would not power up the phone. It was only after close inspection of the buttons cable that I could see that the end of that cable had been disconnected and had to be reinserted into that black connector in the center of the phone body. I then put the small piece of orange tape back over the connection to secure it. All was great after those uh-oh moments!
that was super helpful. thx so much.
I thought my phone was bricked until I read your comment.
tom -
The guide was perfect, except, it failed to mention that the connection junctions, shown in the first image of step 3, is glued to the battery. It should have been circled also. It will be pulled when the battery becomes unseated. The risk of damage is high.
In regards to the adhesive, if you use a heat gun prior to removing the backing it doesn't destroy the adhesive too much. Also prior to reassembly if you heat the backing and the remaining adhesive material on the phone itself it all goes back together pretty well. At least in my experience
I would not have known where to even begin the change out this battery without these instructions. My replacement was successful but it was touch and go for a few minutes since the small ribbon cable from the 3 buttons was disconnected when the old battery was removed. The new battery was a perfect fit and it seems to be well secured even without any extra adhesive.
This is what motorola chat told me this morning
Rosanna: Please be informed that the battery for Moto X Pure edition is not removable.
.
Ha, I’ve seen a few youtube videos and this website that shows it can be replaced.
Very sad that the people working for the company that made the phone aren’t trained enough to realize this battery can be changed.
Now I need a screen replacement that is already connected to the frame, if any knows where I can get a real OEM one, please let me know.
You’re in luck! Our screen replacement kit includes all the tools you need, plus an OEM part! We don’t yet have a complete guide, but we’ll let you know when it’s available!
Hi Rosanna, good news! We have an updated screen replacement guide, as well as a kit with an OEM part! I know Motorola also offers repair solutions on their support site. Thanks for the comment and good luck with your repair, let us know how it goes!
Was pretty good and I replaced my battery. I do recommend recounting the amount of screws, since the one in sim tray doesn’t actually exist, and maybe a better why of explaining on how to remove the adhesive.
Hello, the kit that I recieved came with a T5 bit but not a T3 one that the guide calls for.
Never mind, it was packaged in a different part of the kit
Just finished the battery replacement in my MXP. Went smoother than I anticipated, I always have a screw left over when I fix stuff, but not this time. Also satisfied with the battery itself - appears OEM and not recycled third party. A few notes, 1. watching a few other youtube vids helped fill in any gaps, even with dumb stuff like how to align/apply the new cover adhesive, 2. the pointed spudger is pretty soft and doesn’t hold up well when pushing side tabs, 3. the adhesive is a PITA, I tried using alcohol, but ultimately just patiently pushed in a single direction with a finger until it all pulled up (about 80% of project time spent pushing adhesive), and 4. my new battery ribbon was kinked out of the package but still worked. Replacement took all of 30 to 45 mins, most of it wrestling with adhesive. I’m satisfied with the iFixit solution and will return when I need another non-fixable item fixed.
Jim Kelley - 返信
thank you thank you thank you. Bought the battery replacement kit & I couldn’t be more happy with the results. My Moto is like new showing 90+ battery after being on all day. I was ready to lay down another 400 bucks for a new phone. 2 comments I will make: time line is longer than 45 min to 1 hour as removing all the original adheasive takes time but MUST be done as you will have a better result when you re-attach the back cover. Also pay extra attention to step 23 that cable MUST be re-attached in EXACTLY the same location/position as it mates up with a pair of conductors on the MB & your phone will not work if it’s not
Just completed the battery replacement. Two things to remember - take your time teasing the adhesive back away (I agree with Eric Carlson). I took an hour and change. The advantage was that I didn’t have any glue on either back or frame when I was done. The second thing was that a jewelers loop came in very handy to see and set the connectors (I tried feeling / fit and it didn’t work well ;-) ).
My only issue was aligning the adhesive back and that was a pain.
Successful battery replacement. Similar to many other reports on here, removing the adhesive takes a very long time. It took me more than 2 hours, but I was trying to be as careful as possible and I’ve only ever replaced one other battery in a phone. I would also caution everyone to be EXTREMELY CAREFUL on steps 17 and 18. I think I damaged one of the clips and could’nt get both to ‘catch’ when I reassembled the phone. I’m not really worried about it because both clips have screws on either side of them. Phone has been in intermittent use for 14 hours and is at 67%, a huge improvement.
Thanks to the author for this disassembly guide! And thanks, also, to several of the commenters—especially John Fink on 05/16/2018 and Bill on Feb 16, 2019—for helping me avert disaster getting my old battery out for replacement. Unfortunately, there is a significant short coming in calling this a replacement guide: Reassembly requires more detail than just “…reverse the steps of disassembly.” I was fortunate enough to have found a good YouTube video with a sufficiently detailed description of that aspect, so I made it through just fine, but I don’t think that that video is detailed enough for the disassembly portion of the task either!
One final comment is that if you’re going to be replacing the glue with the sheet that’s in the iFixIt battery replacement kit, removing all of the old glue itself took me far longer than an hour, so take that into consideration before starting this little undertaking.
Great review, thank you! The only thing I’d add is to emphasize that it’s 30 screws plus the silver one. I couldn’t figure out why the frame wasn’t coming off until I read some reviews, then everything fell into place perfectly.
I had no problem following the instructions. The Torx screws were very hard to open, the Torx drivers that came with the battery were not good enough. Bought a set of Eklind drivers from Home Depot, they did the job. Had a hard time reconnecting the battery connector, everything else was fine, thank you.
Wonderful! Some notes by step:
3) The iOpener's great! 30 secs in a 1K-watt micro + gel side down (cloth’s not as hot) = back off fast: used a pick at the top only, then grabbed and patiently pulled for maybe 10 secs. No need to heat the left. Gently scraped all adhesive off the back and chassis with the blue opening tool, which proved best at this (tweezers too sharp, spudger too slow).
16) All but one screw came out easily with the T3. The one was stripped (obv during assembly); used my own T4 on that one and it came right out.
20) Thought the volume connector was socket based like the flash and battery connectors. No! Annoying until I realized it's glued onto the battery (like the NFC in Step 23). Deserves mention in the guide, as I'd have gone at it differently. Instead, I accidentally removed the tiny white guard. Didn't include it at reassembly (too tiny to work with, and the orange tape was plenty), and all’s fine.
1 hour and 15 mins later (25 mins on adhesive removal alone), my MXP is like new. Thanks!
Completed the procedure yesterday. The T3 bit was included in my kit, which is the screw head size on the MXP.
Three comments:
1. Whatever you do, do NOT remove the silver screw anchoring the silver bar that holds the power & volume rockers in place. One video on-line showed this, so like a dummy I removed it. There are 4 extremely fine springs (<1mm x 4mm) that tension the rockers; they will fly out and are very difficult to find.
2. Soak the inside of the back cover with Goo-Gone or similar, and let sit for 30 minutes, then use the blue case-cracker tool to push the gunk off. Letting it sit longer would be better still, as it will dissolve the adhesive to a greater degree.
3. I use a SupCase Unicorn Beetle on the phone, so I skipped the step of adhering the back onto the phone. The case holds it in place, and will be easy to get into the phone the next time for other maintenance.
Thank you all, couldn’t have done it without you….
This worked fine. The hardest part is getting off the old sticky tape. Took me about a little over an hour, but I wasn’t in a rush. Be very careful about keeping track of the 4 springs that go into the volume and power buttons. So tiny. Easy to lose.
Erik Rimes - 返信
I’m still using my Moto X pure after all these years. Yes it has huge bezels but it still gets the job done. What wasn’t getting the job done was the battery. I googled how to do it and came across this site. I studied it and decided it was doable. But before I ordered the kit and battery I decided to check out the price to have it done for me. I was quoted $69 plus tax. So I chickened out and had it done. Well the $69 turned into $98 total. The battery is now good to go but the wood back is coming off and the volume rocker is loose. Should’ve done it myself. Don’t be like me give it a try. If it doesn’t work at least you learned something.
My original battery went totally dead and I think protective electronics shut it down (reads 0V). So I just did this project, but now my phone won't charge! Also, the computer does not recognize when plugged in to the USB port. Not sure how I could have possibly damaged the USB port, save perhaps for the heat applied to get the back off, maybe (I don't think much, if any, was needed at the bottom). This is very disappointing. Is there some kind of battery/USB reset needed?
UPDATE: I just re-opened the phone and figured it out. Just coincidentally apparently, the micro USB port on this phone is going bad. No continuity on the positive (+) when the plug is in straight, but I can get power if it is in on angle to the left. Not clear why this happens to micro USB ports (though I believe it is a common way they start to fail), but fixing this is an SMB solder to the motherboard and another project entirely!
FYI - when I did this project, T4 fit very tightly into the 20 screws and slipped often, risking stripping the screwhead. Seven of the screws, T4 just would not fit in deep enough at all to turn without slipping, and I had to use T3 bit instead. After that, I noticed all the screws fit snugly into T3 and almost no slips! So maybe my particular bits are labeled wrong, or maybe the screws are actually T3? Have both on hand to complete the project.