この翻訳は、ソースガイドの最新の更新を反映していない可能性があります。 翻訳の更新に協力してください。 または ソースガイドを参照してください。
はじめに
このガイドを使って、Motorola Moto X PureエディションのLCDとデジタイザアセンブリを取り出して交換します。
デバイスを解体する前に、バッテリーの残量を25%以下まで放電してください。充電されたリチウムイオンバッテリー は引火の原因となったり、アクシデントで穴を開けてしまうと爆発の恐れがあります。
作業を始める前に、最後の手順を確認してくださいそして、交換用パーツが画像のものと一致するか比較してください。 このガイドは、新しいフレームにすでに付けられたスクリーン/ディスプレイを交換する方法です。裸のディスプレイを交換用に購入している場合は、古いディスプレイから慎重にフレームを外して、新しいディスプレイに接着剤で装着しなければなりません。この作業は、作業手順に含まれていません。
必要な工具と部品
-
-
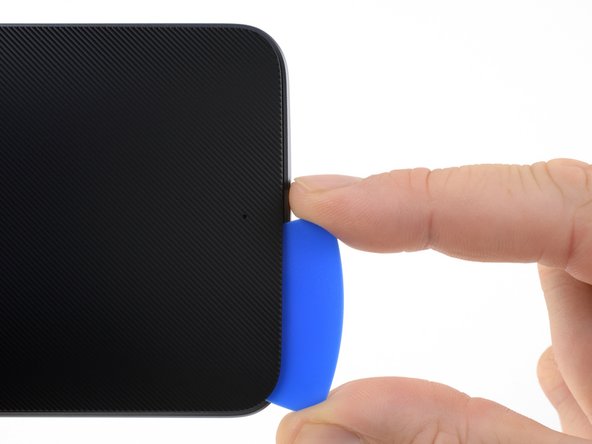
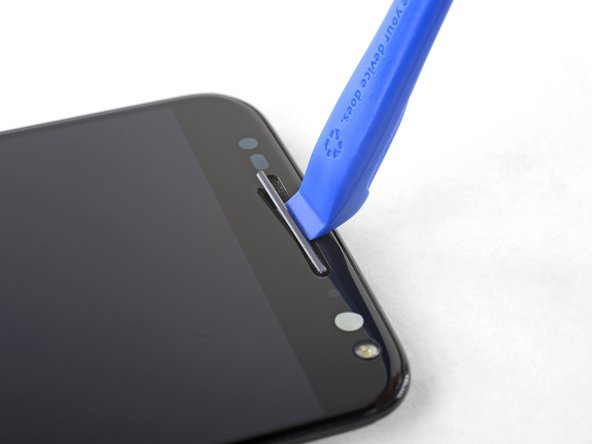
先端が鋭利なピンセットを閉じたまま、先端をSIMカードスロット付近のバックカバーの端についた小さなホールに差し込みます。
-
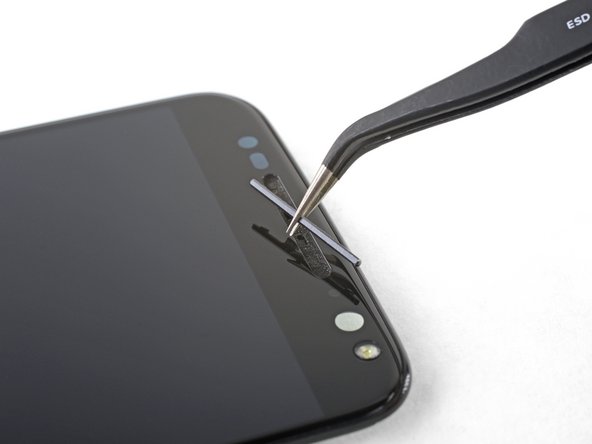
ピンセットを使って、わずかにカバーを持ち上げます。そして開口ピックをカバーとフレームの隙間に差し込んで、スライドします。
Insert only one of the tweezers’ point into the hole. Once the rubber backing is lifted high enough, slip a corner of the opening pick under the rubber backing. Leave the first pick near the corner while you use a second pick as directed in Step 6.
-
-
-
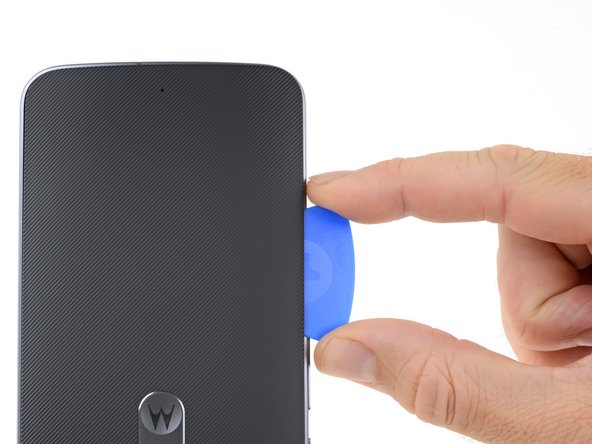
開口ピックをデバイスの端にそってスライドして、バックカバーに付けられた接着剤を切開します。
-
カバーの中央に向かって、できる限り深く開口ピックを挿入してください。カバーの中央に厚い接着剤が付けられており、これを剥がさなければなりません。
I did not have a pick, used a few old credit cards, leaving them in place to keep the phone back separated.
Used a hair dryer to heat up a little, one section at a time, was enough to remove. Pulled apart slowly.
Left adhesive on the back and on the phone, where possible, using a tiny screw driver to separate. Reused whatever adhesive remained to reattach.
-
-
-
-
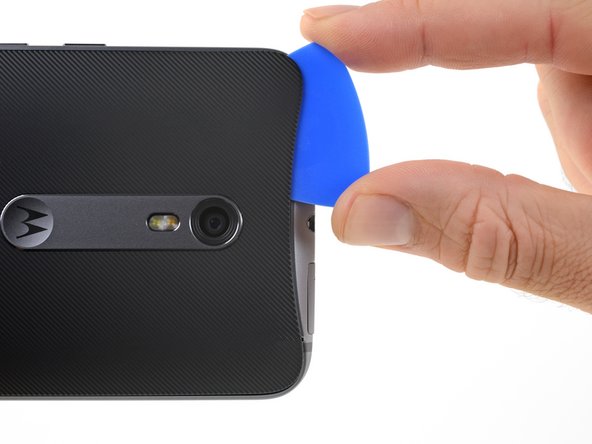
デバイスからカバーを慎重にこじ開けます。
-
まず、ピンセットとスパッジャーを使用して、リアカバーとデバイス筐体の両方に残っている接着剤を剥がし取ります。
-
次に、高濃度のイソプロピルアルコール(90%以上)と糸くずの出ない布で接着エリアを綺麗に拭き取ります。 拭き取る際は、前後ではなく、一方向に動かしてください。 新しい接着剤を付けるため表面を準備してくれます。
-
交換用の接着剤は、バックカバーの形状完全フィットするようにプレカットされたシートで提供されてます。 このプレカットシートがない場合は、Tesa 61395などの高接着両面テープを使用できます。バックカバーにプレカットした接着剤を取り付ける前に、メタルインサートを外してください。 接着剤を装着してから、インサートを交換します。
-
バックカバーを取り付けた後、デバイスに強い安定した圧力を数分間加えて、接着剤をしっかりと接着させます。
Had the pre-cut adhesive sheet for reinstalling the Moto X Pure’s back cover. It seemed like the most “original” option at the time. I tried and tried to get it aligned inside the back cover, but found it virtually impossible to do. You pretty much have to get it perfectly aligned and then stick it down all at once. If it makes contact with the cover before it’s perfectly aligned, it’s all over. You’ll never get it back off without destroying it.
After failing with the pre-cut sheet, I resorted to the die-cut strips and corner pieces. This worked just fine.
-
-
-
スパッジャーの平面側先端を使って、ソケットからバッテリーコネクタをまっすぐ持ち上げて取り出します。
Reconnecting the battery was difficult, did not align exactly. Note there are 2 slots that line up and 4 pins. Used a 10x magnifying lens with LED light, purchased to do this job. This step (reassembly) is where the magnifier came in handy. Had to move battery around a bit to get it to line up. Ended up removing adhesive tape from battery, so I could get in place to attach the connector. Battery held in place with screws and phone case, so far so good.
this is the difficult part. I find it is easier to remove this connector as the midframe and phone screen are separating (see step 19). Be also careful in prying this mine got broken luckily it is connected to the old battery which I replaced anyway
Broke the battery plug right off the motherboard! Trying to do a 2nd battery replacement. Only push up gently on the edge of the tab and straight up. Shopping for a new phone.
-
-
-
T3トルクスネジ用ドライバーを使って、2.4mmネジを20本外します。
Need to add a step for removing the bar holding the buttons in place. Step 5 from the tear down. Still can’t take the mid frame off though.
I stripped the threads on one of the 20 screws, had to drill it out. (Managed to do this without cracking the screen, completed battery replacement, all ok.)
Careful removing the screws, be sure of tight grip. I saw T4 torx suggested on another site for Moto X Pure, this might grip better? Try both.
I did not have to remove the screw holding the volume buttons bar in place. These stay attached, not needed for replacing the battery. Just the 20 screws shown.
DO NOT REMOVE THE SILVER SCREW HOLDING IN THE VOLUME AND ON-OFF BUTTON. If these buttons fall out there are 4 very small springs that will pop out and are very hard to reinsert. If they do pop out do not use tweezers to reinsert but use a magnetic screw driver bit to reinsert.
This is extremely easy to overlook. This screw is a different color (silver versus black) but when you’re in the swing of removing all the screws it’s tempting to just remove ALL the screws. I goofed, had the buttons fall out, could only find 3 of the springs. Put two back in the volume rocker and only one in the power button since it’s smaller, seems like it wouldn’t need two as much. Everything still works, maybe just slightly less tactile than before. Even without the the springs, there’s still some mechanical return to the buttons, so if you do lose them don’t despair.
This is not working, got two out. Most just strip.
Update. The driver provided is not the right size. I had some tools laying around and found one that fit. This allowed me to get all the screws out except the six I stripped using the driver provided by ifiixit. Turns out they come out pretty easy if you have the right size bit. Would have been an easy fix had I not bought the tools…. go figure.
What is the right size bit?
The T3 Torx Driver was bundled in the bag with the Alcohol Prep Pad, not with the rest of the drivers! So look before you there before you call support like I did.
pixilated1 - 返信
T4 works better, T3 also works. Try both and proceed carefully, get a good grip before turning.
-
-
-
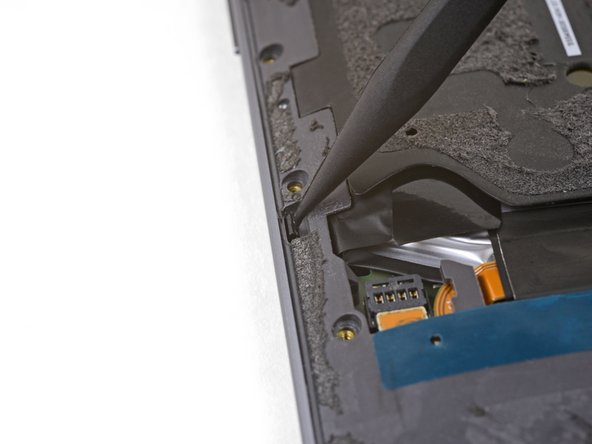
スパッジャーの先端を使って、ミッドフレームの左側を固定している小さなクリップを外しながら、デバイスの端側に押し出します。
On reassembly, these did not really click back in place. Held tight when reattaching the 20 (19 in my case) screws).
I had to push rather hard to release both clips. The tip of the spudger bent under the pressure I had to apply. But the the clips did finally release without damage.
-
-
-
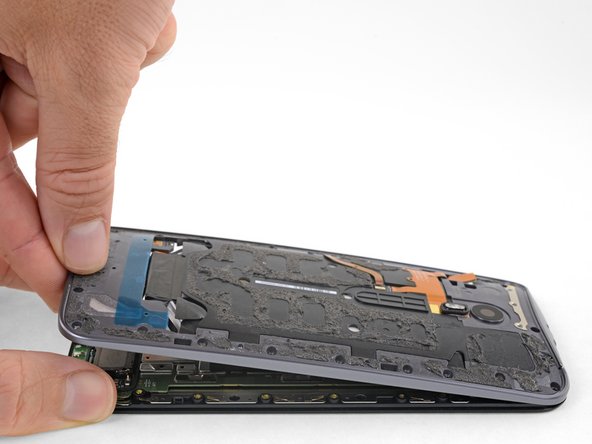
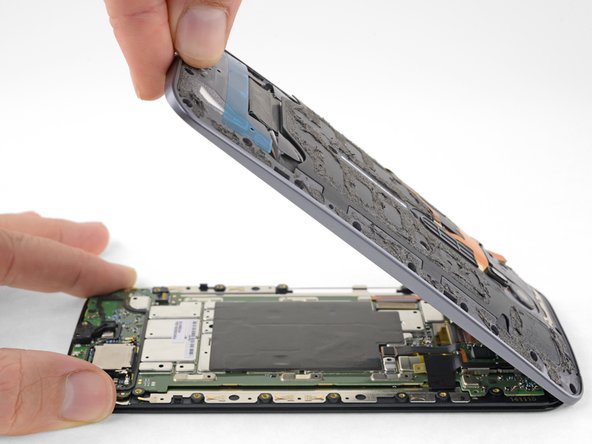
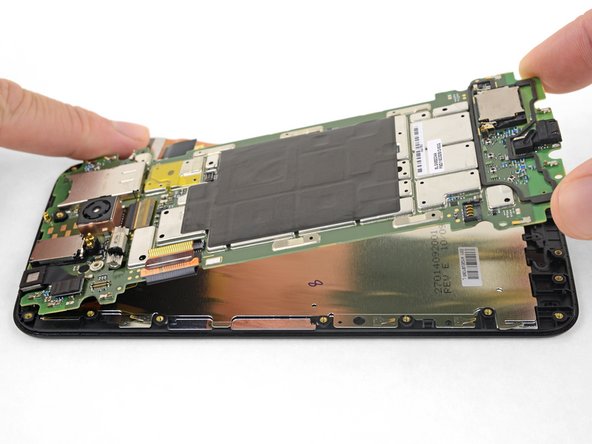
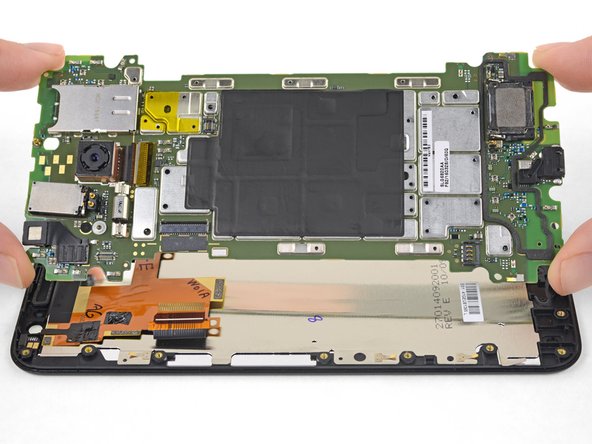
ディスプレイの端を持って、ディスプレイからミッドフレームを慎重に持ち上げて外します。
-
ディスプレイからミッドフレームを外します。
My mid-frame and display were separated on the long sides but seemed a little bit stuck on the top and bottom. I used the flat end of the spudger to carefully pry the two assemblies apart at either end.
In my case, stuck in the middle. Pulled apart very slowly, giving the adhesive a chance to separate, and not tearing whatever it was in there. Kept an eye on the inside middle, and very SLOW let it separate. Or was that the battery? In either case, go slow on all steps.
Yeah, everything went according to the guide until this step. I lifted the midframe away from the screen assembly as shown and something in the center didn’t separate at all. I spent a good half hour terrified that I had missed a step or a screw or that there was something different about my phone. In the end I read the comments and very slowly and patiently lifted the midframe until something uncoupled and the two parts cleanly separated. I was certain that permanent damage must have been done, but upon reassembling everything seems to be working perfectly.
Note to self - check that ALL (20) screws have been removed… especially if midframe is stubborn lifting up - i (almost) forgot about the one near the display cable (and it’s threaded into the motherboard instead of the frame) :)
In my unit, the midframe released from the display nicely just as described in the instructions.
-
-
-
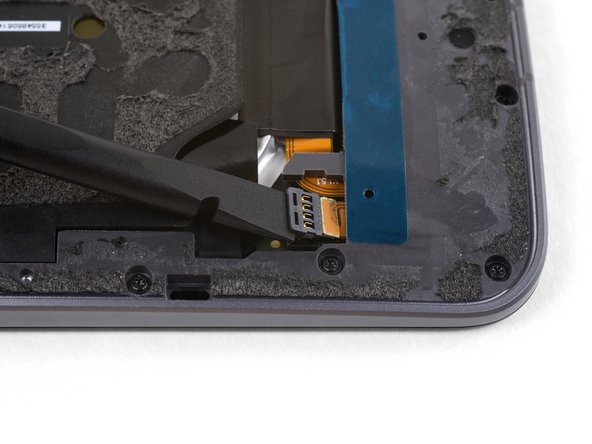
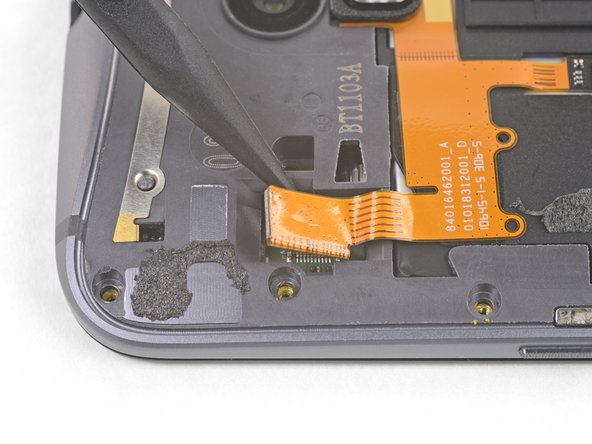
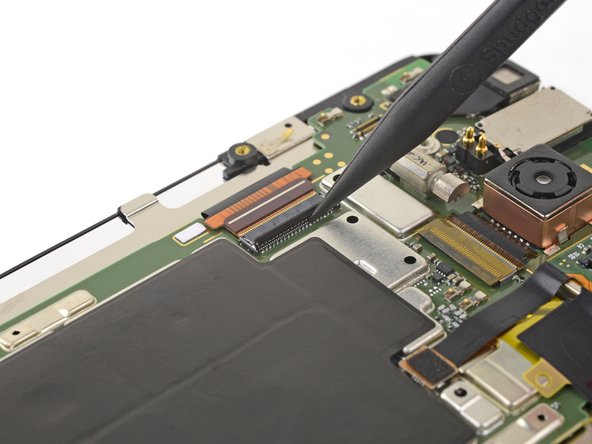
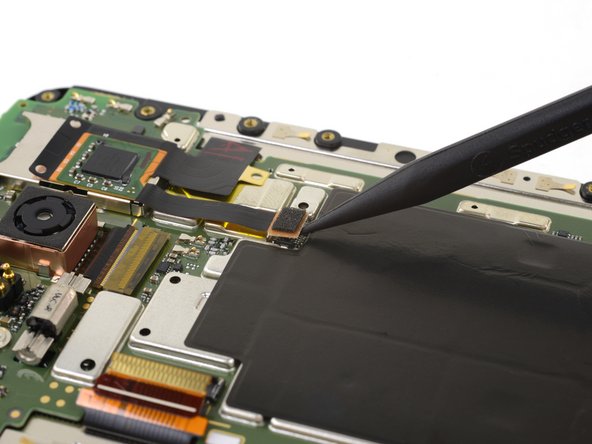
スパッジャーの先端を使って、ディスプレイケーブルのZIFコネクタ上の固定プラップを跳ね上げます。
-
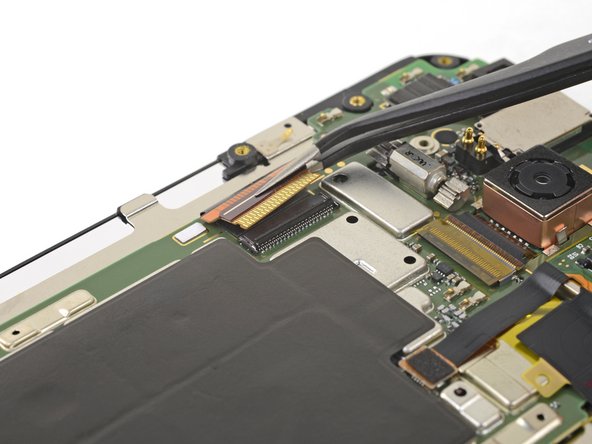
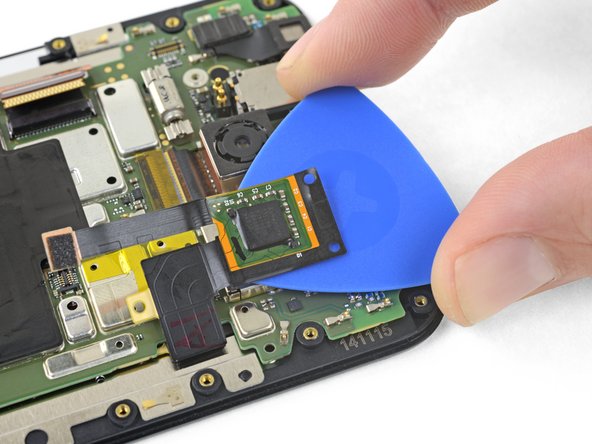
ディスプレイリボンケーブルをまっすぐソケットから引っ張り、外します。
This step means straight in a flat or horizontal sense, as in move the ribbon cable toward the side of the phone, The image makes it appear that it was lifted up away from the back of the phone.
Thanks Chris!
I’ve adjusted the wording slightly to clarify the action.
-
-
-
LCDスクリーンとデジタイザアセンブリ(フレーム付き)のみが残ります。
-
交換用のパーツとオリジナルが一致しているか確認してください。新しいフレームに取り付けるため、古いフレームから必要なすべての部品を取り外したか確認してください。
-
新しいディスプレイには、フロントスピーカーグリルの上にある小さな金属製のスピーカーガードが取り付けられていない場合があります。 この場合、次の手順に進みます。 ディスプレイにこれらがインストールされている場合は、ここで作業を終了です。
note to self - upon reassembly the battery low display flashed on - but the power button didn’t work … so after a hour, took the cover off and re-seated the ribbon wire that comes from the power button - then the power button worked normally (although still trying to get the speaker guards to snap in but those are probably cosmetic anyway)
also, mine was off for more than a year and had to reset phone by running recovery restart boot-loader … (reset) described in (volume down and power) https://support.motorola.com/us/en/produ...
-
-
I’ve cracked two screens attempting to reinstall the guards. Be REALLY careful doing this.
Any tips? I can’t get mine to go back in. They came out so easily!
Use the tweezers to hold the guard and also as a spacer to keep it centered up and down. Then press in one of the tabs and once its in move the tweezers out of the way and press in the other tab.


交換用のパーツとオリジナルのパーツを見比べてください。残りのコンポーネントを移植する必要があるか、パーツを装着する前に接着剤の裏張りを取る必要があります。
デバイスを再組み立てする際は、これらの手順を逆の順番に従って作業を進めてください。
e-wasteを処理する場合は、認可済みリサイクルセンターR2を通じて廃棄してください。
修理が上手く進みませんか?トラブルシュートのヘルプには、アンサーコミュニティを参照してください。
交換用のパーツとオリジナルのパーツを見比べてください。残りのコンポーネントを移植する必要があるか、パーツを装着する前に接着剤の裏張りを取る必要があります。
デバイスを再組み立てする際は、これらの手順を逆の順番に従って作業を進めてください。
e-wasteを処理する場合は、認可済みリサイクルセンターR2を通じて廃棄してください。
修理が上手く進みませんか?トラブルシュートのヘルプには、アンサーコミュニティを参照してください。
18 の人々がこのガイドを完成させました。
以下の翻訳者の皆さんにお礼を申し上げます:
85%

Midori Doiさんは世界中で修理する私たちを助けてくれています! あなたも貢献してみませんか?
翻訳を始める ›

3 件のコメント
what i needed to know how to replace speaker covers
I have Motorola moto x pure edition that the LCD screen went bad/ blacked out. I found a replacement screen. Now the left half of the screen works perfectly but the right half is scrambled. What causes this? Is there a bad component that I can replace to fix this? Has anyone else experienced this? Is it a bad motherboard?
I have 2 of these phones, but really needed to replace the screen on the latest one to get data off it. I thought I’d get the walnut back off the first phone, but I found it wasn’t as easy as the rubber backing, perhaps heat transfer issues, and super hard to get it started, I have a small crack at that point.